April, 2020
To recap the prior step, in order to build the MVS starter system, you should already have downloaded and installed on your computer -
Hercules executables.
The stand alone utility programs that are executed to build the MVS starter system will not complete properly under older versions of the Hercules' executables. Most communications I have received report failure of the utilities to complete when using version 3.07. The behavior reported is that after responding to the input prompt with "input=1442,..." the system will run indefinitely without reaching normal end of job; i.e. the instruction counter will advance, but the next expected output message from the utility program will never be displayed and the operation will never complete. If you encounter this behavior, you are probably using a version of Hercules that is earlier than 3.11. The corrective action you should follow is to upgrade to a version of Hercules at level 3.11 or greater. There is no reason not to use the latest version of Hercules that is available for the host Operating System you are using (Linux, Windows, or Mac).
As I am writing this set of instructions, I am using version 3.13 of the Hercules emulator.
MVS Starter System Archive (vs2StarterTapes.tar.gz).
My installation objects archive (mvsInstallationResources.tar.gz for use on Linux /or/ mvsInstallationResources.zip for use on Windows). You do not need both of these files, only the one appropriate for your Operating System.
Although not mandatory, this is the structure into which I have MVS related files and these instructions will show commands, output, etc. using this relative structure as a reference point:
The starter system tapes archive (item #2 in the prerequisites list above) contains three files:
vs2starter.md5sums text file containing the md5 sums for the two tape images vs2spool.het stand-alone programs and volume image for the SPOOL0 3330 DASD volume vs2start.het stand-alone programs and volume image for the START1 3330 DASD volume
The two tape image files above should be located in the tape directory. Carefully verify that the archive you downloaded was correct, using the MD5 sum provided. You should also use the MD5 sums provided for the individual tape images to verify the two tape images individually. After the MD5 sums have been verified, you will no longer need the vs2starter.md5sums file.
Both of the tape images will be used in this step: v2spool.het and vs2start.het.
My installation objects archive (item #3 in the prerequisites list above) contains additional files used for this and subsequent steps of this set of instructions. Six of the files from the mvsInstallationResources archive are required for this step:
For Linux host Operating Systems, mvsInstallationResources.tar.gz:
File Name
Extracted to Directory
Contains
create.dasd.sh mvs bash script that utilitzes the dasdinit utility to create empty DASD volumes ibcdmprs.cnf conf Hercules configuration file for executing stand-alone programs inspool0.sajob sajobs Directives to the stand-alone DASDI program for the SPOOL0 volume instart1.sajob sajobs Directives to the stand-alone DASDI program for the START1 volume rsspool0.sajob sajobs Directives to the stand-alone DUMP/RESTORE program for the SPOOL0 volume rsstart1.sajob sajobs Directives to the stand-alone DUMP/RESTORE program for the START1 volume Note: The files listed above are not the complete list of files contained in the archive. They are only the files that are utilized in this step.
For Windows host Operating Systems, mvsInstallationResources.zip:
File Name
Extracted to Directory
Contains
create.dasd.bat mvs Windows bat script that utilizes the dasdinit utility to create empty DASD volumes ibcdmprs.cnf conf Hercules configuration file for executing stand-alone programs inspool0.sajob sajobs Directives to the stand-alone DASDI program for the SPOOL0 volume instart1.sajob sajobs Directives to the stand-alone DASDI program for the START1 volume rsspool0.sajob sajobs Directives to the stand-alone DUMP/RESTORE program for the SPOOL0 volume rsstart1.sajob sajobs Directives to the stand-alone DUMP/RESTORE program for the START1 volume Note: The files listed above are not the complete list of files contained in the archive. They are only the files that are utilized in this step.
 The clock time required to complete the steps below should be
approximately 10 minutes. All times given here should
be taken as estimates. The actual time reported for each job depends
greatly upon the hardware and host Operating System (Linux/MAC/Windows) upon
which Hercules is executing. The time required will be longer if you have not
already gathered all required files before beginning and have them restored to the
appropriate locations. I am
running Linux Mint on a fairly recent, quad core machine. Granted I don't
have to contemplate the instructions as carefully as someone who had not read/followed them
previously might, so I am at a distinct advantage.
The clock time required to complete the steps below should be
approximately 10 minutes. All times given here should
be taken as estimates. The actual time reported for each job depends
greatly upon the hardware and host Operating System (Linux/MAC/Windows) upon
which Hercules is executing. The time required will be longer if you have not
already gathered all required files before beginning and have them restored to the
appropriate locations. I am
running Linux Mint on a fairly recent, quad core machine. Granted I don't
have to contemplate the instructions as carefully as someone who had not read/followed them
previously might, so I am at a distinct advantage.
You will be creating DASD volumes in this step, as well as every step of this process to build an MVS 3.8j system. DASD is an acronym from the IBM mainframe world which expands to: Direct Access Storage Device, or to put it plainly, a disk drive. The DASD volumes that MVS uses under Hercules reside in files on the host computer (Linux, Windows or Mac files). The Hercules emulator manages the contents of these host system files and presents them to MVS, which views the DASD image files as physical devices on which are stored the datasets (the IBM mainframe word for files) that the MVS Operating System uses to store the component parts of the Operating System, information about the operation of the system, and users' datasets (files).
The name you give the host system file that will contain the DASD image is completely irrelevant to the Hercules emulator. The host system file is associated with a hardware address managed by Hercules that is located in the Hercules' configuration file, or is specified in the Hercules' command window with the Hercules attach command. However, it has become the usual practice to name these files in such a way that it is possible to tell from looking a the host system file name what the contents of the file represents to the MVS system. My convention is to use a file name in the format: VVVVVV.MMMM, where VVVVVV is the Volume Serial Number and MMMM is the DASD model. The Volume Serial Number, which consists of six characters composed of letters and numbers, is the means that the MVS system will use to identify the DASD volume; and, yes, the name of this field is always Volume Serial Number, even though it consists of both letters and numbers. This Volume Serial Number is written in a special structure when the DASD is initialized and physically occurs near the beginning of the DASD image. You may see another convention in the Hercules' community, which is VVVVVV.AAA, where the AAA represents the hardware address at which the DASD volume is mounted (or attached) to the Hercules emulator.
Quite a few releases back, Hercules gained the ability to utilize compressed MVS DASD images. This allows even the very large 3390 type DASD to occupy a reasonably small space in the host operating system file. Data is automatically uncompressed during MVS read operations and compressed during MVS write operations. The compression system also has the ability to make the base file read only with any updates to the data stored in shadow files. A number of people regularly use compressed DASD with absolutely no problems, and there has been improvement in the compression algorithms and features available for use with compressed DASD. I have chosen to utilize non-compressed DASD on my system, both because I have the hard drive space available and because there is some tradeoff in performance to achieve the reduced host file system space.
"... If you use compressed dasd, particularly using bzip2, then the cpu overhead of all the compression/decompression is noticeable. Interestingly, in some circumstances it has been noted that the cpu overhead offsets the hard drive latency in a single processor machine. That is, by transferring less data to/from the hard drive but spending cycles doing compression/decompression results in a faster elapsed time ..." posted by Greg Smith, 5 July 2003
You will be given the option by the script I provide (described in the next paragraph) to create either compressed or uncompressed DASD volumes. If you later decide to switch from compressed to uncompressed, or from uncompressed to compressed, there is a utility provided with Hercules - dasdcopy - that may be used to compress (or decompress) DASD volumes.
The starter system is a quite comprehensive, but compact, configuration of MVS 3.7 and will reside on two 3330 DASD volumes. I have provided a command script that will create the two volumes required for this step. The script also includes code to produce additional volumes for subsequent steps in this installation tutorial, so you will see this script several times as you build your MVS system. The script makes certain that:
there is a dasd subdirectory present beneath the mvs directory (where you should be executing the script from),
the volumes to be created do not already exist, which allows you to repeat or restart this step, erasing any previous copies of the DASD images,
the file name of the volumes is the correct one to match the names used in the Hercules' configuration files I have provided for these steps,
the DASD device model is correct for the MVS datasets that will be written to the DASD image,
and the initial internal MVS Volume Serial Number is what the upcoming steps expect to find.
So, the script will:
create a dasd subdirectory if it does not already exist,
change to that subdirectory,
if the two DASD volumes to be created exist, delete them,
utilize the dasdinit utility (included with Hercules) to create the two DASD volume images.
On a Linux system, open a terminal window in the mvs directory and type the command:
./create.dasd.sh starter
and press Enter. The argument 'starter' instructs the script to produce the two DASD volumes required for this step. The script will execute, creating the two DASD volumes. The output of the script on my (Linux) system is shown below:
If your host Operating System is macOS, I have been told that you need to use the command:
/bin/sh ./create.dasd.sh starter
On a Windows system, open a command prompt window in the mvs directory and type the command:
create.dasd.bat starter
and press Enter. The argument 'starter' instructs the script to produce the two DASD volumes required for this step. The script will execute, creating the two DASD volumes. The output of the script on a Windows system is shown below:
The DASD volumes that were created above are simply raw emulated volumes; they have not been initialized for use by MVS and contain no VTOC (Volume Table of Contents) or control structures. They will be initialized in the this step.
The two tape images (vs2start.het and vs2spool.het) contain a dumped copy of the two DASD volumes required to run the MVS starter system. Also contained on each tape, in front of the dumped volume image, are two stand-alone programs; the first is a disk initialization program (DASDI, version 7.80) and the second is a disk dump restore program (DUMP/RESTORE, version 7.83). We use Hercules to load the stand-alone programs from the tape to initialize both of the DASD volumes created above and then restore the dumped volume image from the tape to the initialized DASD volume.
The Hercules configuration file ibcdmprs.cnf, located in the conf directory, defines the environment in which the initialization/restoration will occur. Here is a schematic representation of the starter system hardware:
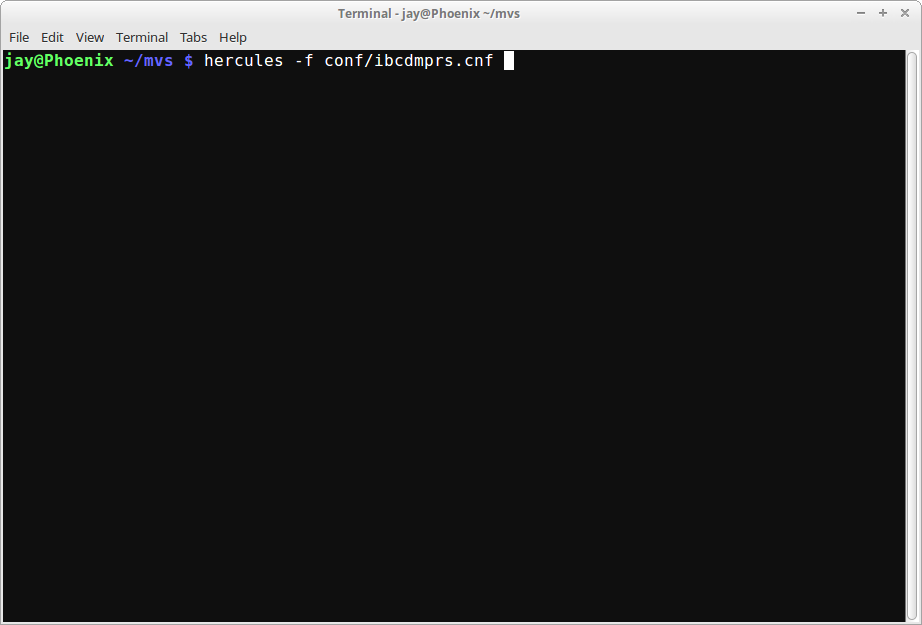
Open a terminal window (Linux) or a Command Prompt window (Windows) and start hercules by typing the command hercules -f conf/ibcdmprs.cnf and pressing Enter:
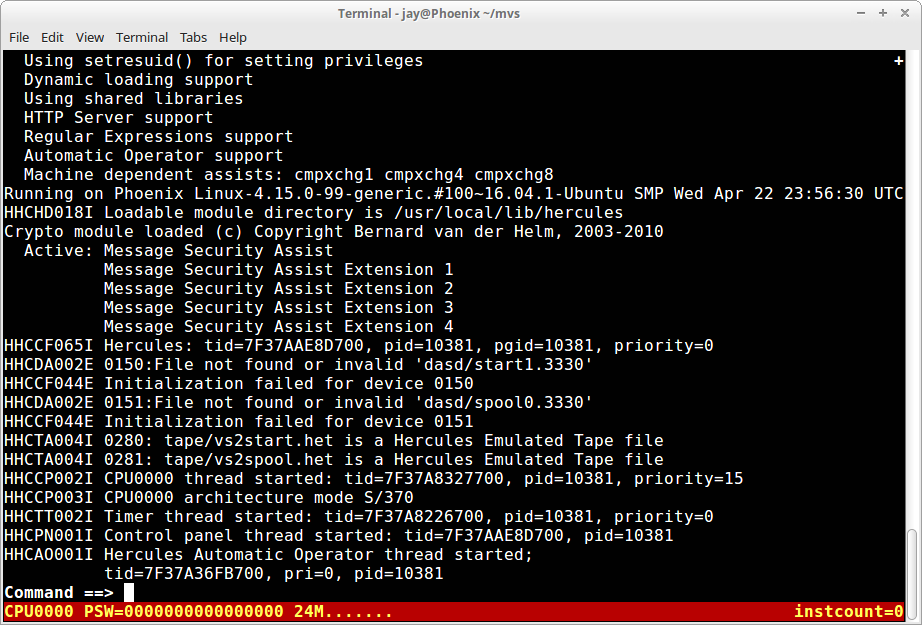
Hercules will begin execution, load the configuration file, and display the following messages:
From this point forward in this step, I will refer to this window as the Hercules console window.
When you start Hercules for this step, the DASD volumes we just created above, START1.3330 and SPOOL0.3330, have not been initialized, so you will probably see HHCDA0002E and HHCCF044E messages informing you that those files are invalid and initialization can not be completed for them. That is as expected, as these volumes are just raw disk images at this point, with no Volume Table of Contents or control structures present. Note: I have had reports that these messages do not always appear, although I cannot say why they would appear at some times and not at others.
Joe Monk made a suggestion that I use the integrated console feature of Hercules, which allows the Hercules console to be used to interact both with the Hercules emulator and with the 1052 console device at address x'009' where the stand-alone programs communication exchanges occur. That eliminates the need for using a separate window for a telnet client. For this step, it will make the interaction easier and simpler to understand.
So in this window you will see messages from the Hercules emulator and from the stand-alone programs. You will also enter commands to be processed by the Hercules emulator and the stand-alone programs.
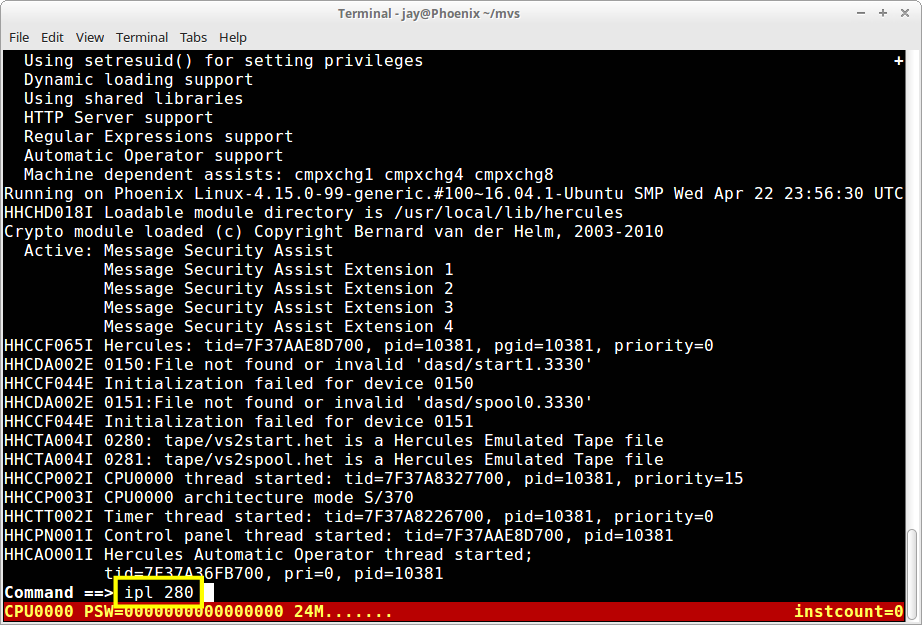
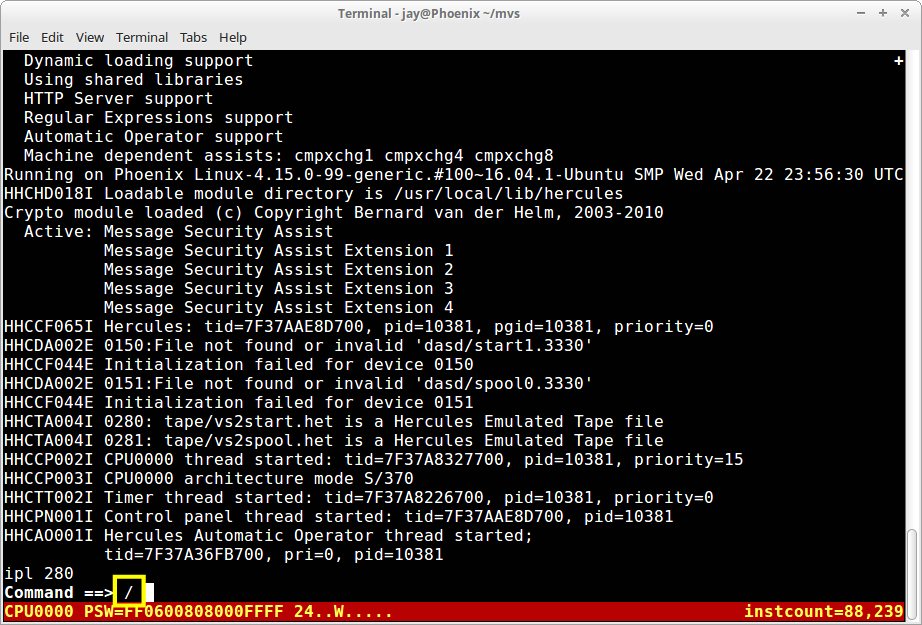
On the command line type the command ipl 280 and press Enter:
This will instruct Hercules to load and execute the first stand-alone program, the DASD initialization program, from the emulated tape image at address x'280':
If you receive the error message:
HHCCP029E S/370 mode IPL failed: CSW status=0D00
first check the validity of the archive that contains the tape images and the tape images themselves after they are extracted using the MD5 sums provided, and verify that the tape images were extracted to the tape directory. If the MD5 sums prove the tape images are valid, ensure that your version of Hercules has been built with zlib and bzip support. These are the three reasons that can cause this error message from the Hercules emulator.
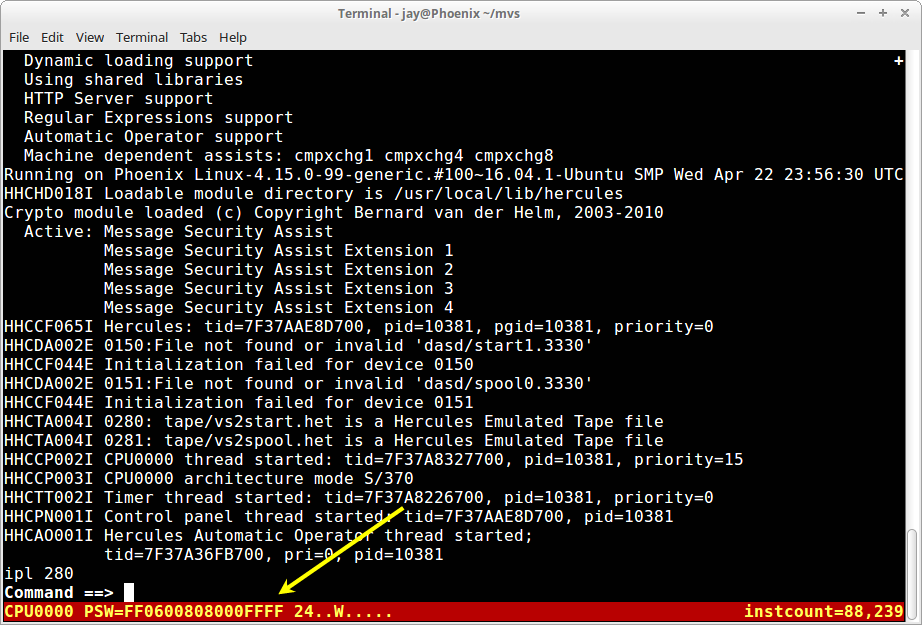
When the DASDI program has completed loading from the tape image, it will execute until it requires input from the emulated 1052 console at address x'009'. At that time, the program will halt and the last four characters of the Program Status Word, displayed at the bottom of the Hercules console window, will be 'FFFF':
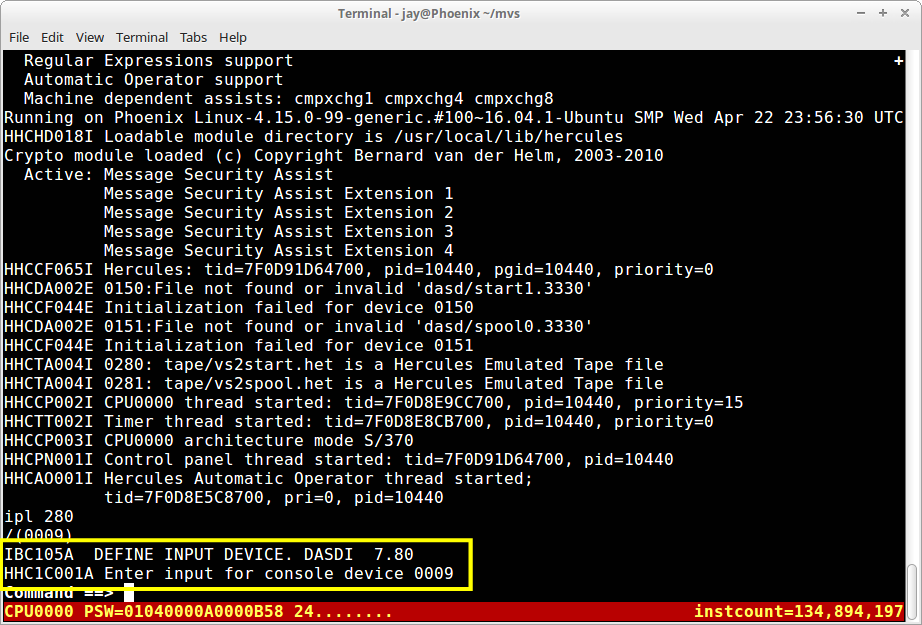
When using the integrated console feature of Hercules, any input that is to be directed to the emulated 1052 console at address x'009' must be preceded by a slash (/). The stand-alone program is waiting for an interrupt from the console device, so on the command line type a single forward slash and press the Enter key. In the screen capture below, there appears to be a space following the /; do not enter anything besides the forward slash, then press Enter:
The program, DASDI, will prompt you for input into the emulated console at address x'009':
The stand-alone programs are very small, simple programs and are pretty unforgiving when interpreting input, whether typed by you or read from the 'job' cards that will be read from the card reader. There is no opportunity provided by the program to correct an incorrect response, and even the addition of a space in a response, or following a response, can cause the program to issue an error message and then it will terminate. When I first started using stand-alone programs like these to do system generations, we had to enter the control commands into the console, so I am quite familiar with the rigid demands made by these type programs on command/response entry.
The stand-alone programs require control commands, similar to Job Control Language, which will be read from card images. There are four sets of these job card image decks, and they are located in the sajobs directory. The job card images will be read from emulated card readers at device addresses: x'00c', x'00d', x'00e', and x'00f'. The proper set of job card images are associated with the correct device address by statements in the Hercules configuration file ibcdmprs.cnf, which is located in the conf directory. The files containing the card images and the configuration file have been provided to you in the mvsInstallationResources archive.
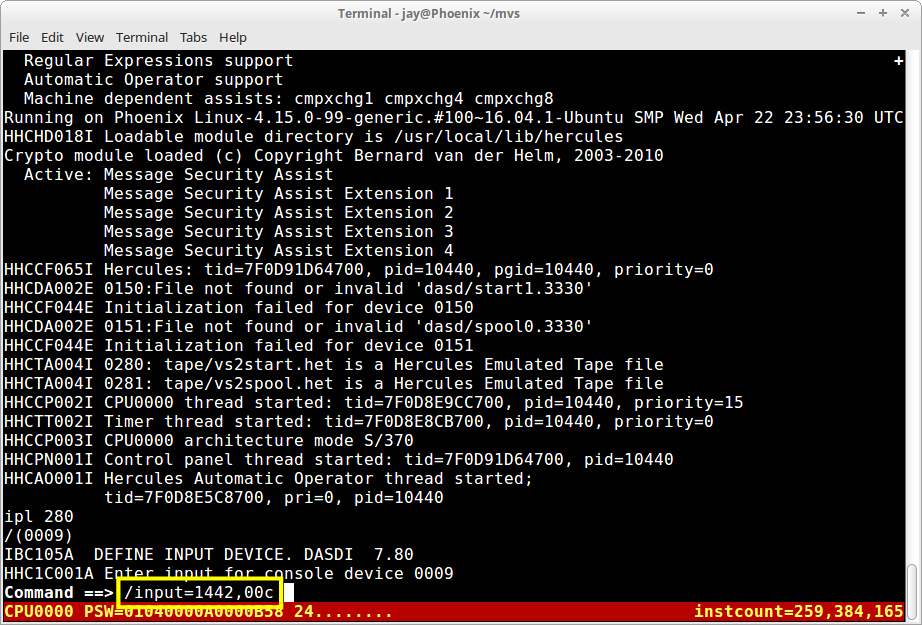
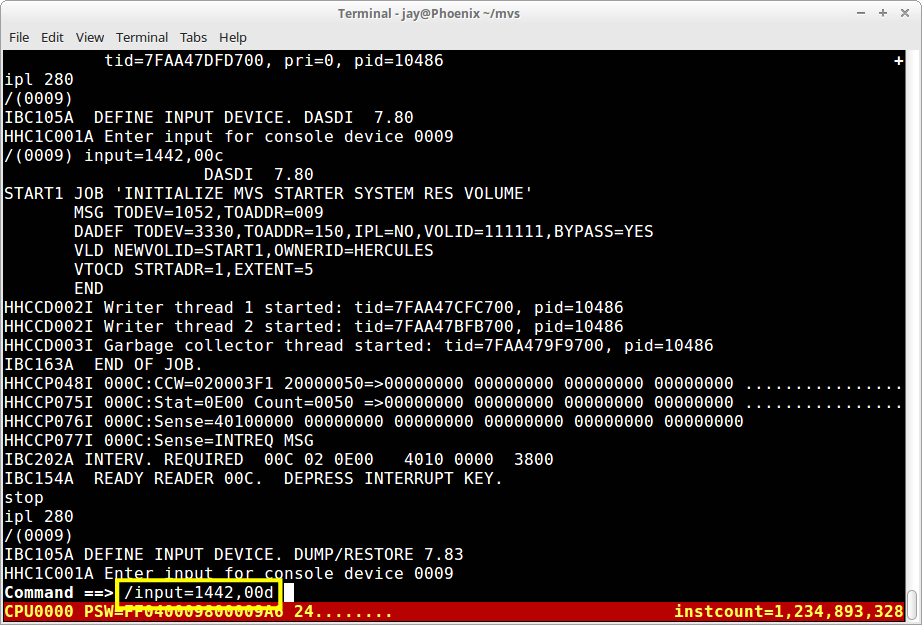
At this time the DASDI program is waiting to be told where to read the control commands that direct it to perform the initialization of the START1 DASD volume. On the command line type /input=1442,00c and press Enter:
Remember, this is a command to the stand-alone program, so you must precede the text of the command with a slash to inform Hercules to pass the text along to the emulated console at address x'009'.
In the command you entered, the 1442 specifies the type of device that input is to be expected from, and 00c specifies the hardware address in hexadecimal (x'00c').
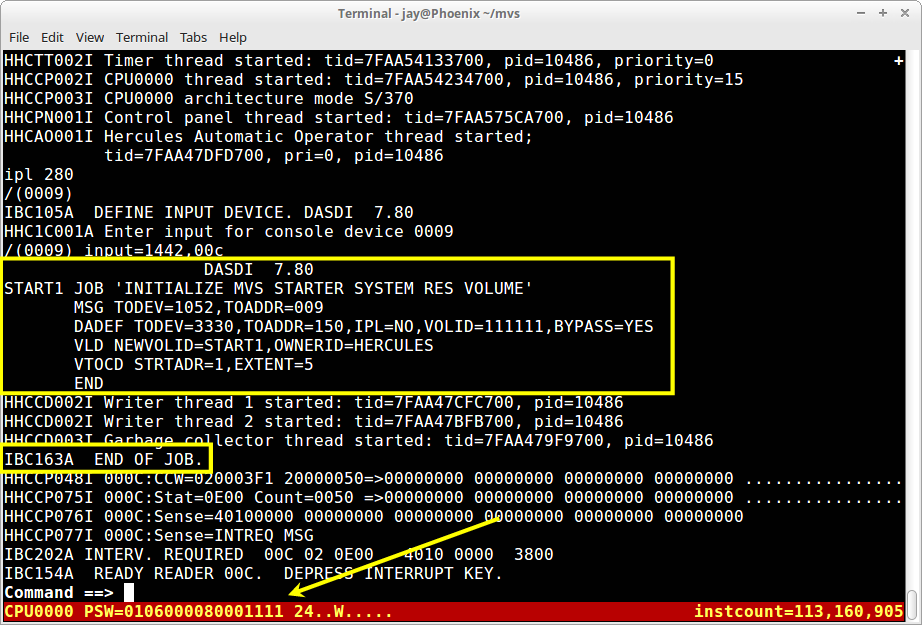
The job should only take a few seconds to complete, and output from the program will be displayed on the Hercules console:
In the screen capture above, the lines in the two yellow boxes are from the DASDI program. In the first yellow box the program has reproduced the control card images it read from the emulated card reader at address x'00c'. The message in the second yellow box indicates the job has completed successfully. The other messages are from Hercules and DASDI letting you know that all the cards have been read from the card reader and intervention is required by you at that device in order to continue.
More significantly, the last four characters of the Program Status Word, displayed at the bottom of the Hercules console window, will be '1111', which indicates that the DASDI program has completed initializing the volume where the Starter System will be restored.
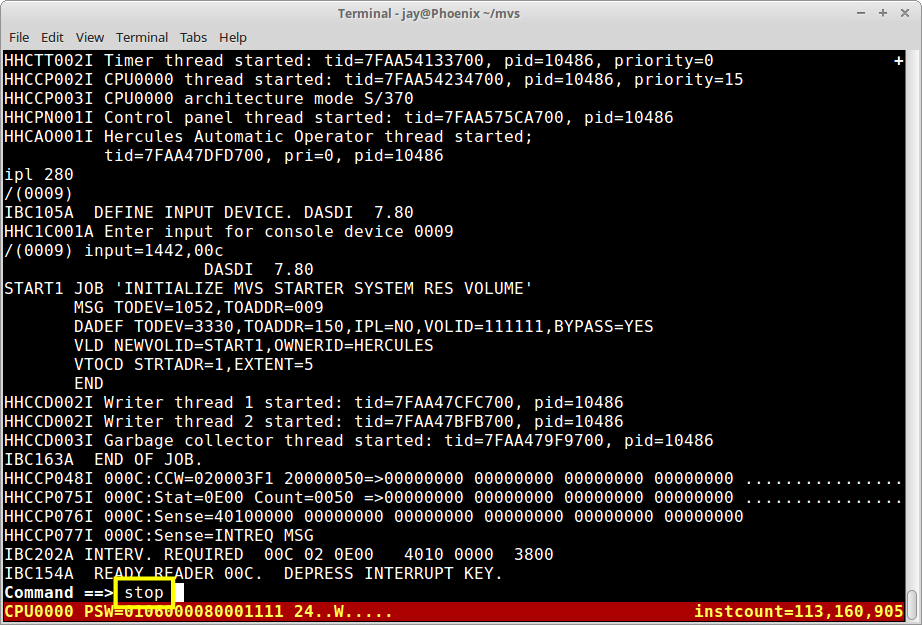
At the front of each tape there are two stand-alone programs to be used. The tape image at address x'280' has been left positioned correctly to load and execute the second program, which has the singular purpose to restore the dumped image, which follows the program on the tape, back onto a DASD volume. On the command line type the command stop and press Enter:
The stop command is a command to Hercules, so it is not preceded by a slash.
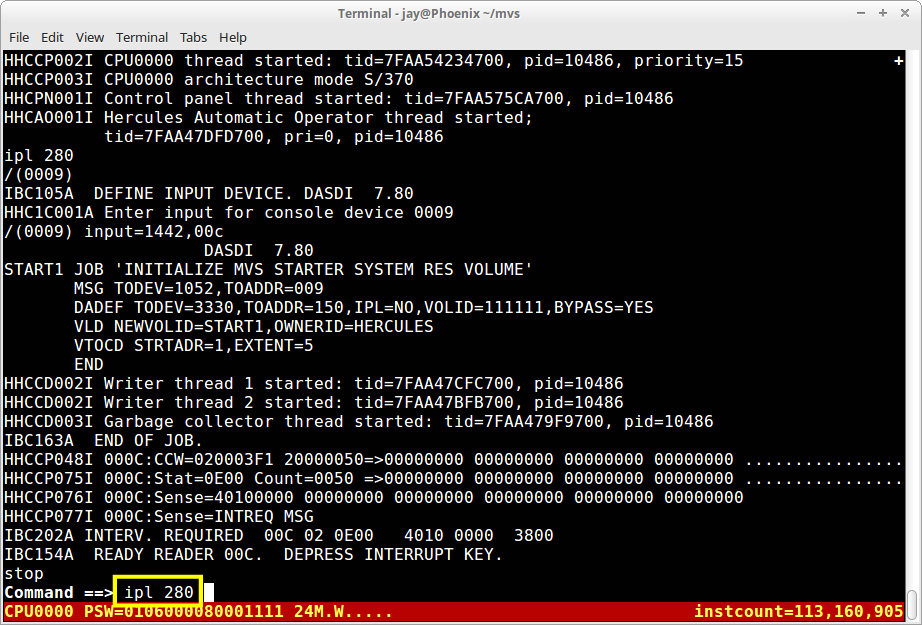
Then type the command ipl 280 and press Enter, to load the second stand-alone program from the tape:
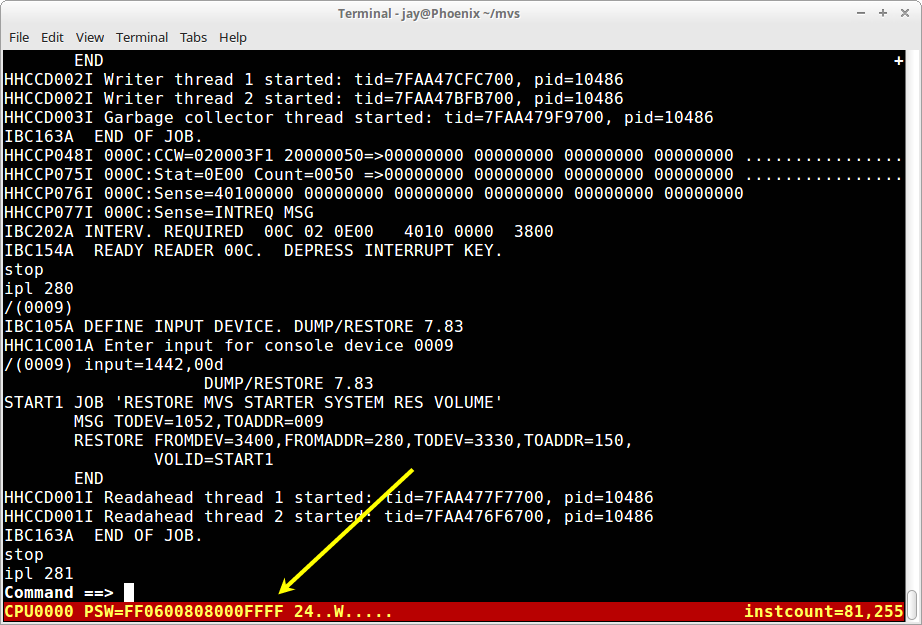
As with the DASD initialization program, the DUMP/RESTORE program will load and it will execute until it requires input from the emulated 1052 console at address x'009'. At that time, the program will halt and the last four characters of the Program Status Word, displayed at the bottom of the Hercules console window, will be 'FFFF':
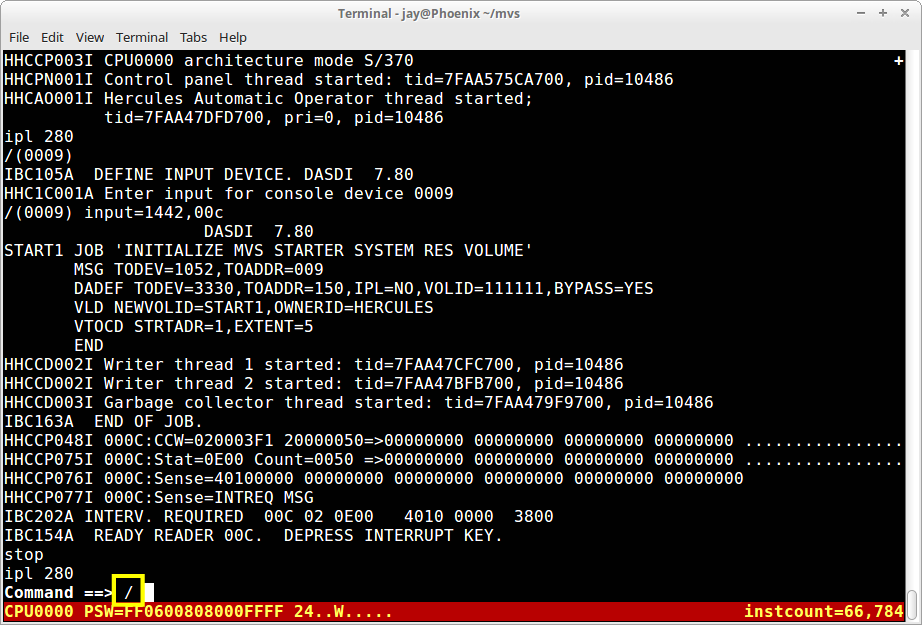
The stand-alone program is waiting for an interrupt from the console device, so on the command line type a single forward slash and press the Enter key:
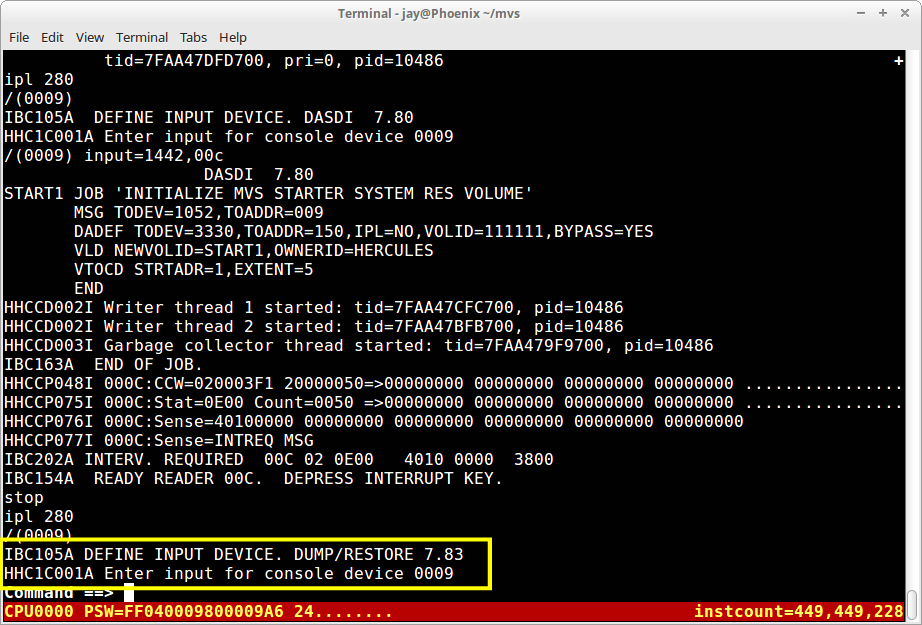
The program, DUMP/RESTORE, will prompt you for input into the emulated console at address x'009':
The DUMP/RESTORE program is waiting to be told where to read the control commands that direct it to perform the restore of the START1 DASD volume.
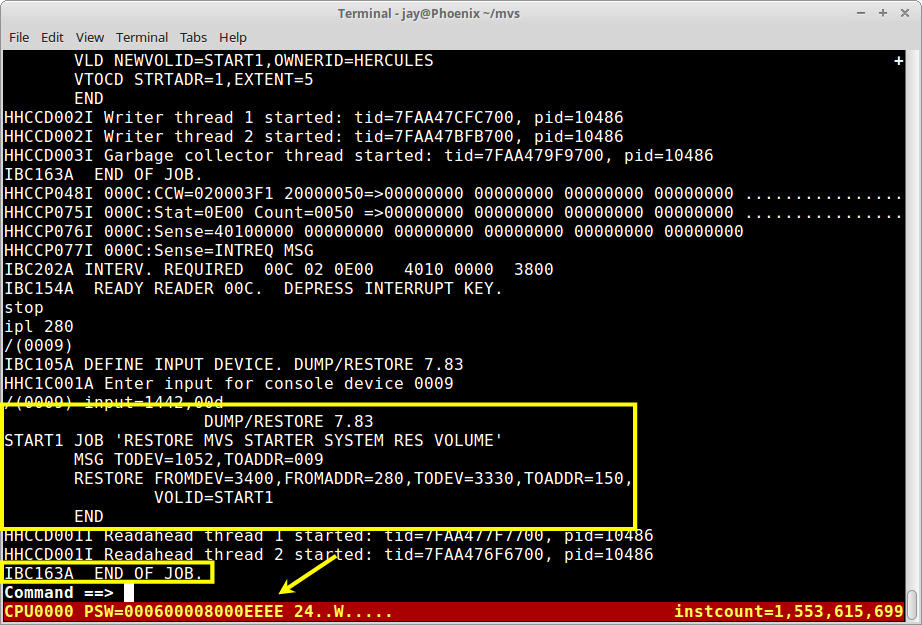
On the command line type /input=1442,00d and press Enter:
The job should only take a few seconds to complete, and output from the program will be displayed on the Hercules console:
In the first yellow box the program has reproduced the control card images it read from the emulated card reader at address x'00d'. The message in the second yellow box indicates the job has completed successfully. The other messages are from Hercules and DUMP/RESTORE letting you know that all the cards have been read from the card reader and intervention is required by you at that device in order to continue.
More significantly, the last four characters of the Program Status Word, displayed at the bottom of the windows, will be 'EEEE', which indicates that the DUMP/RESTORE program has completed restoring the Starter System to disk.
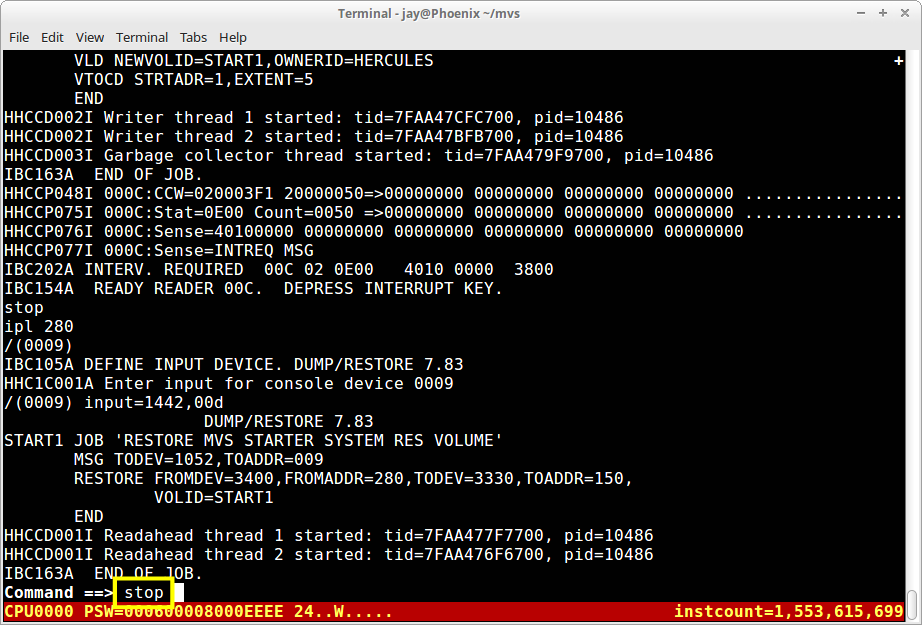
That completes the process for the DASD volume START1. Now the same process must be performed for the SPOOL0 volume.
Everything is set up to continue without the necessity of reloading Hercules, except we are now going to use the programs and dumped DASD image on the tape loaded at address x'281' and the jobs loaded in the emulated card readers at addresses x'00e' and x'00f'.
On the command line type the command stop and press Enter:
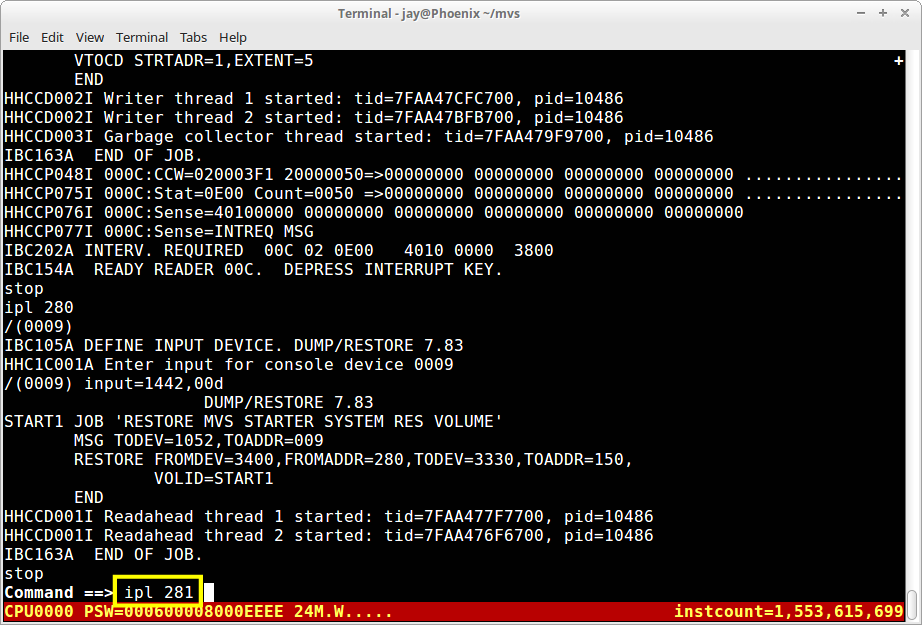
Then type the command ipl 281 and press Enter, to load the first stand-alone program, the DASD initialization program, from the tape at device address x'281':
When the DASDI program has completed loading from the tape image, it will execute until it requires input from the emulated 1052 console at address x'009'. At that time, the program will halt and the last four characters of the Program Status Word, displayed at the bottom of the Hercules console window, will be 'FFFF':
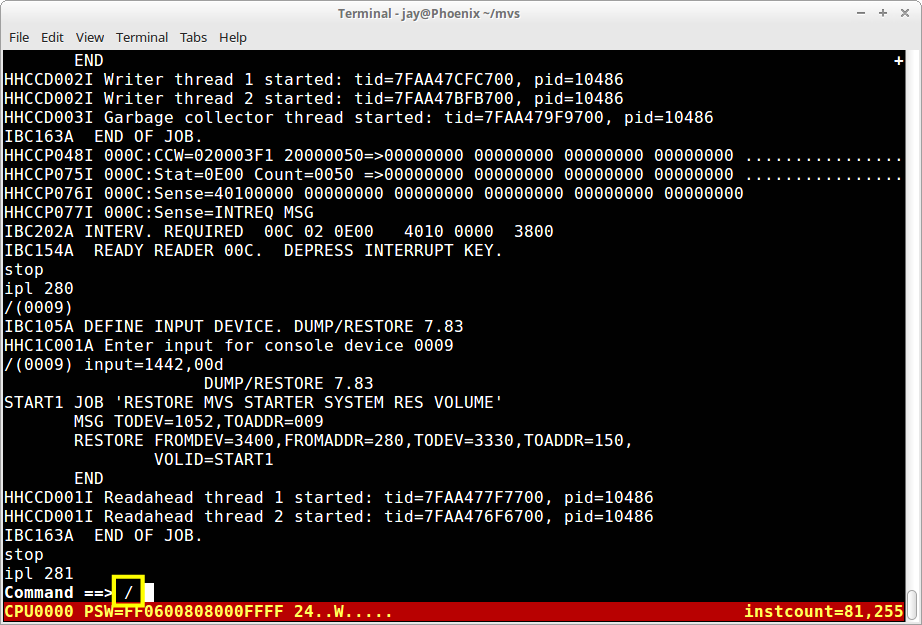
The stand-alone program is waiting for an interrupt from the console device, so on the command line type a single slash and press the Enter key:
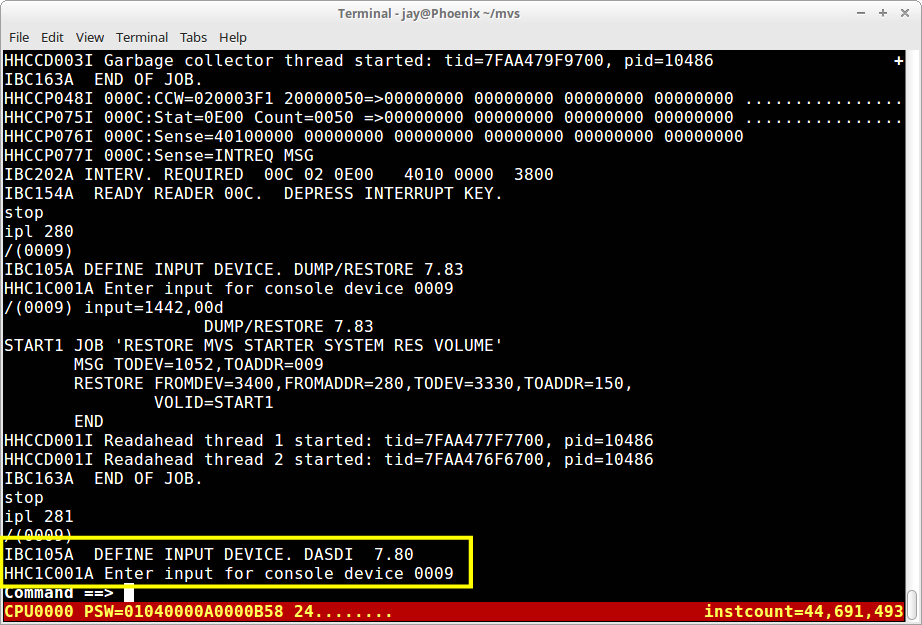
The program, DASDI, will prompt you for input into the emulated console at address x'009':
At this time the DASDI program is waiting to be told where to read the control commands that direct it to perform the initialization of the SPOOL0 DASD volume.
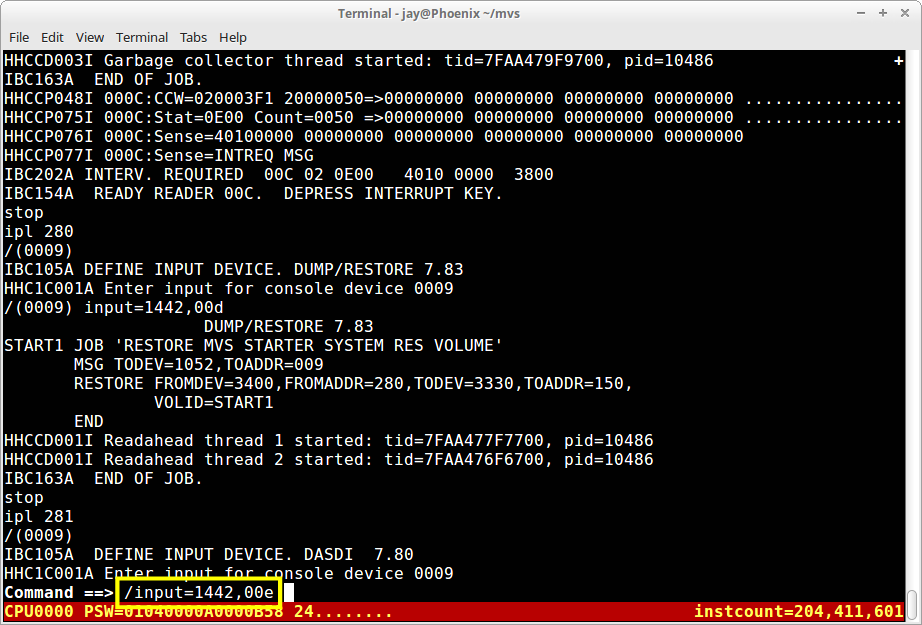
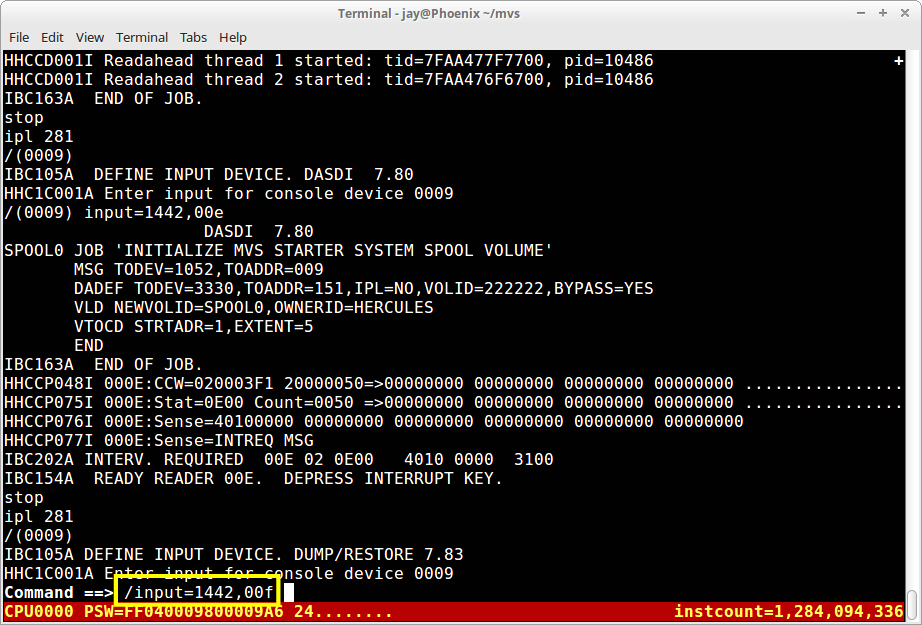
On the command line type /input=1442,00e and press Enter:
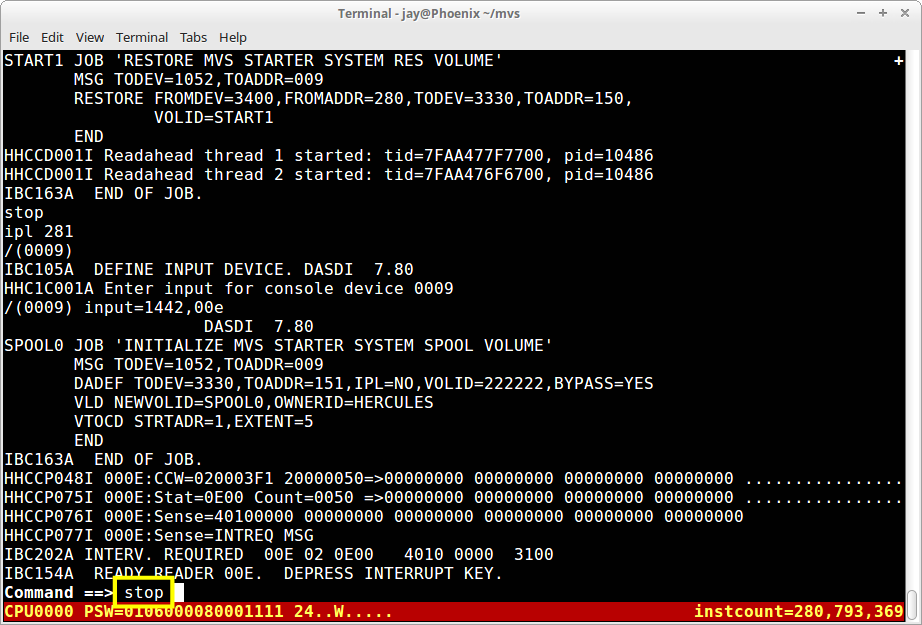
The job should only take a few seconds to complete, and output from the program will be displayed on the Hercules console:
In the yellow box the program has reproduced the control card images it read from the reader at x'00e'. The message on the last line in the yellow box indicates the job has completed successfully. The other messages are from Hercules and DASDI letting you know that all the cards have been read from the emulated card reader and intervention is required by you at that device in order to continue.
More significantly, the last four characters of the Program Status Word, displayed at the bottom of the windows, will be '1111', which indicates that the DASDI program has completed initializing the volume where the Starter System Spool volume will be restored:
The tape image at address x'281' has been left positioned correctly to load and execute the second program, which has the singular purpose to restore the dumped image which follows the program on the tape, back onto a DASD volume. On the command line type the command stop and press Enter:
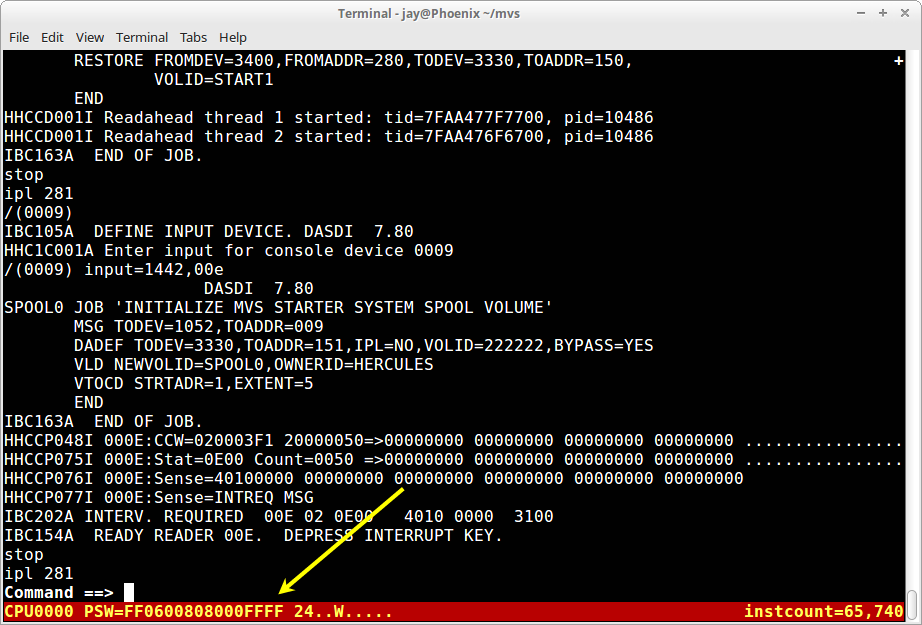
Then type the command ipl 281 and press Enter, to load the second stand-alone program from the tape:
As with the DASD initialization program, the DUMP/RESTORE program will load and it will execute until it requires input from the emulated 1052 console at address x'009'. At that time, the program will halt and the last four characters of the Program Status Word, displayed at the bottom of the window, will be 'FFFF':
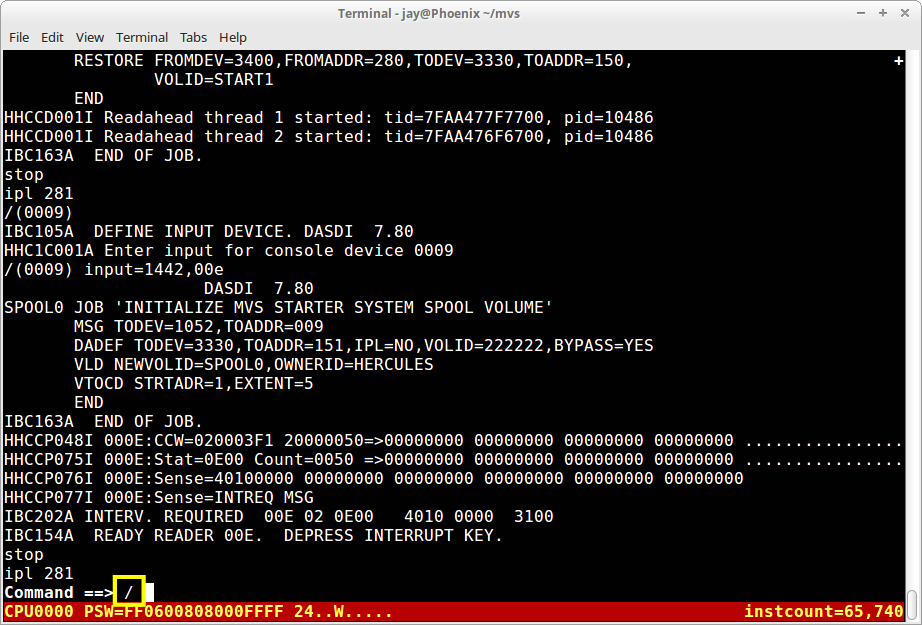
The stand-alone program is waiting for an interrupt from the console device, so on the command line type a single slash and press the Enter key:
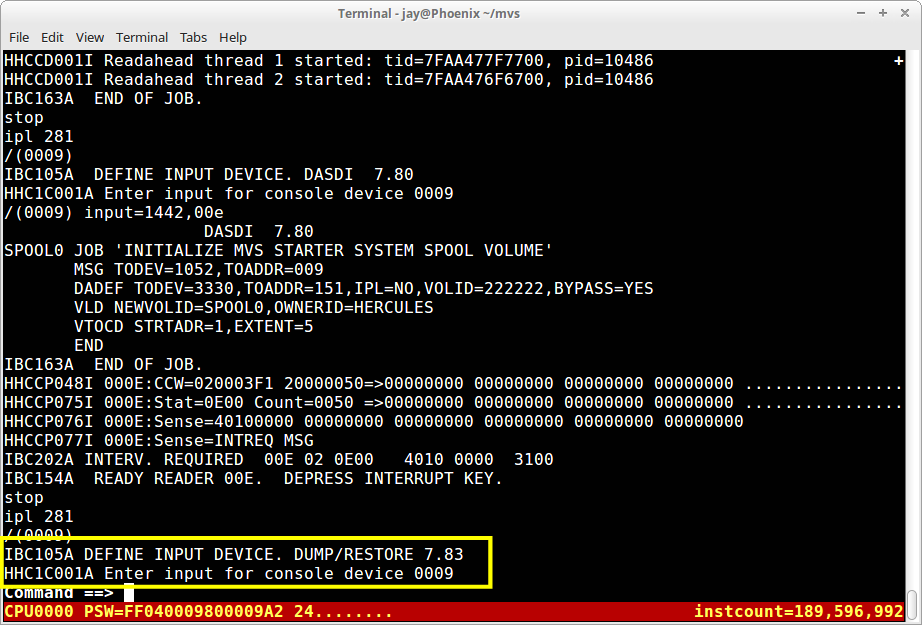
The program, DUMP/RESTORE, will prompt you for input into the emulated console at address x'009':
The DUMP/RESTORE program is waiting to be told where to read the control commands that direct it to perform the restore of the SPOOL0 DASD volume.
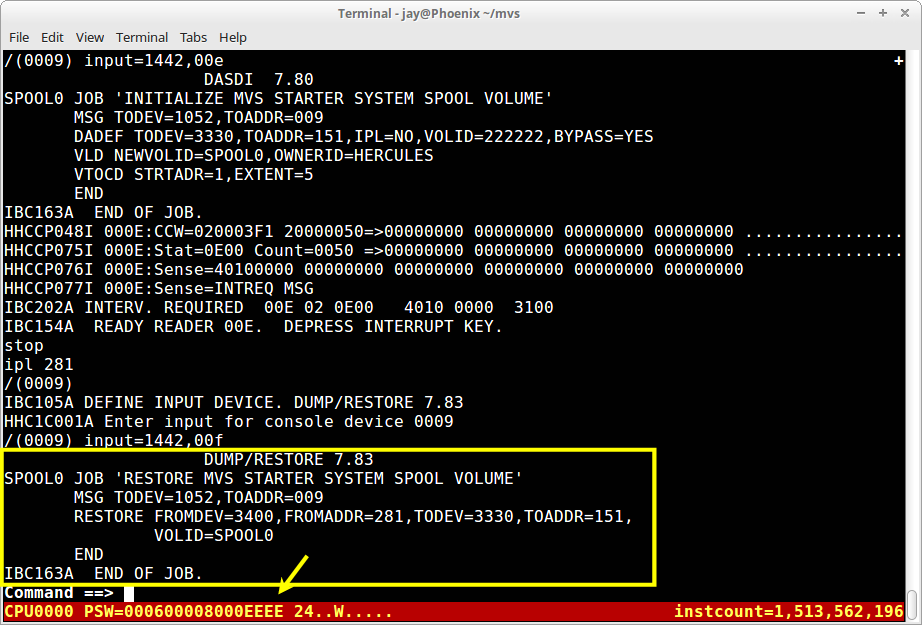
On the command line type /input=1442,00f and press Enter:
The job should only take a few seconds to complete, and output from the program will be displayed:
In the yellow box the program has reproduced the control card images it read from the emulated card reader at address x'00f'; the message on the final line in the yellow box indicates the job has completed successfully.
More significantly, the last four characters of the Program Status Word, displayed at the bottom of the windows, will be 'EEEE', which indicates that the DUMP/RESTORE program has completed restoring the Starter System Spool volume to disk.
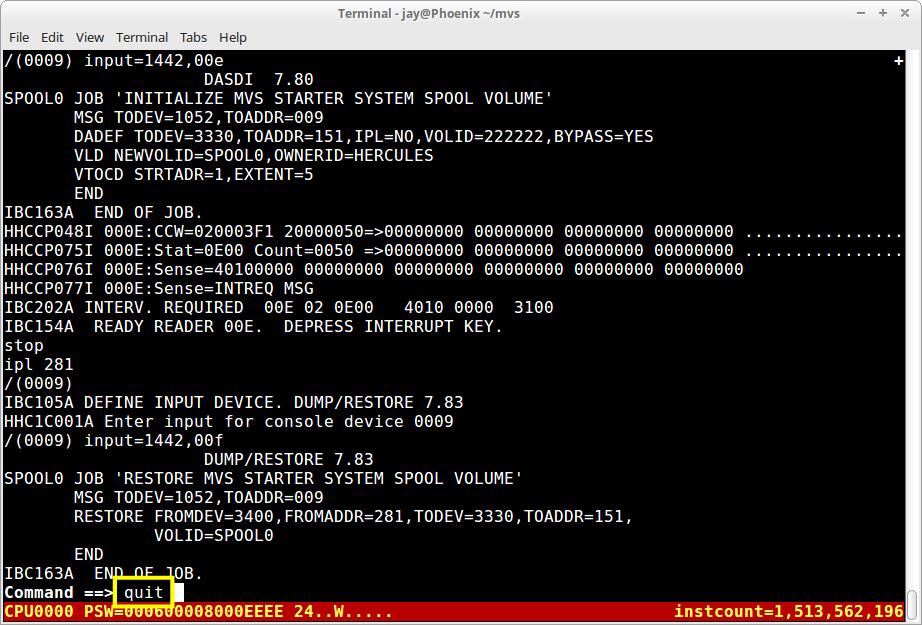
We have now completed initializing and restoring both DASD volumes which contain the MVS Starter system. Previously at this point in process, at the conclusion of the stand-alone program, we have entered the Hercules command stop to halt the CPU prior to issuing the next IPL command. We are finished with the Hercules emulator at this point, so it not necessary to stop the CPU prior to terminating Hercules. On the command line type the command quit and press Enter:
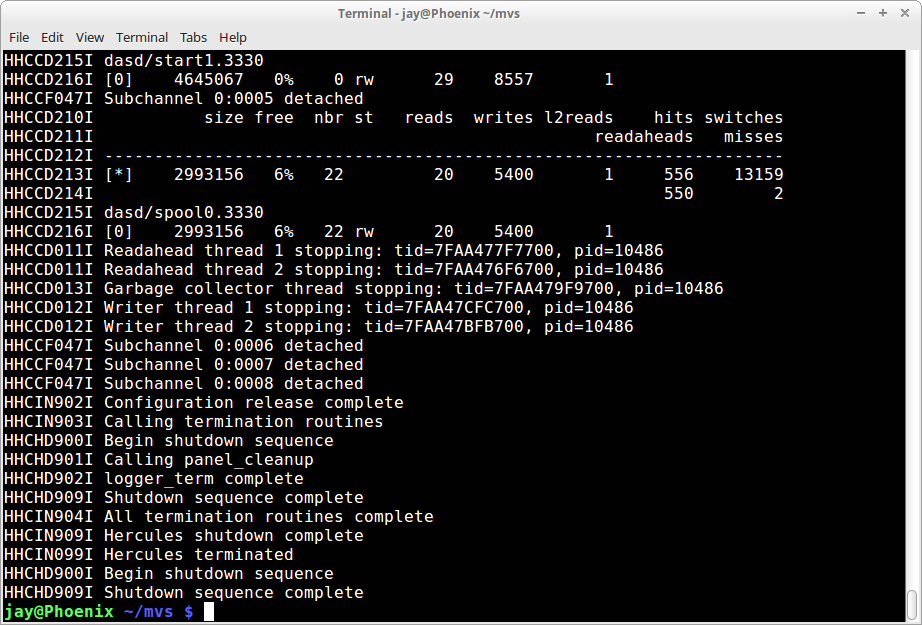
Messages are displayed as Hercules shuts down:
The two emulated 3330 DASD volumes in the dasd directory now contain an unmodified MVS starter system. It would probably be a good idea to make a backup copy of those two files, because in case of a serious error you could then restore to this point without following the procedure we have just completed in order to re-create the volumes. Although not difficult, it would be frustrating to have to go through it again when a simple backup would prevent it. You can use any means to store a backup copy of the two files - place them in a WinRar, Zip or tar archive; or burn them onto a CD-rom blank.
And now you may proceed to the next step, creating the MVS 3.8j Distribution Libraries. So, when you are ready, proceed to the next step - Using SMP4 to Build the Distribution Libraries
I hope that you have found my instructions useful. If you have questions that I can answer to help expand upon my explanations and examples shown here, please don't hesitate to send them to me:

This page was last updated on September 10, 2020.