September, 2020
To recap prior steps, in order to build the MVS distribution libraries, you should already have downloaded and installed on your computer -
Hercules executables.
The MVS 3.8j Distribution tapes archive (vs2DistributionTapes.tar.gz).
My installation objects archive (mvsInstallationResources.tar.gz for use on Linux /or/ mvsInstallationResources.zip for use on Windows). You do not need both of these files, only the one appropriate for your Operating System.
You should have created the MVS starter system on two 3330 DASD volumes - START1.3330 and SPOOL0.3330 - located in the dasd directory.
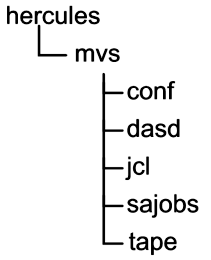
Although not mandatory, this is the structure into which I have MVS related files and these instructions will show commands, output, etc. using this relative structure as a reference point:
The MVS 3.8j Distribution tapes archive (item #2 in the prerequisites list above) contains four files:
distribution.md5sums text file containing the md5 sums for the three tape images dz1d02.het tape image containing Device Support Facilities (release 13) components smp4b.het tape image containing SMP4 load modules and procedures zdlib1.het tape image containing all product elements required to build the distribution libraries for MVS 3.8j
The three tape image files should be located in the tape directory. Carefully verify that the archive you downloaded is correct, using the MD5 sum provided. You should also use the MD5 sums provided for the individual tape images to verify the three tape images individually. After the MD5 sums have been verified, you will no longer need the distribution.md5sums file.
Two of the tape images will be used in this step: smp4b.het and zdlib1.het.
My installation objects archive (item #3 in the prerequisites list above) contains additional files used for this and subsequent steps of this set of instructions. Eighteen of the files from the mvsInstallationResources archive are required for this step:
For Linux host Operating Systems, mvsInstallationResources.tar.gz:
File Name
Extracted to Directory
Contains
condcode.rexx mvs REXX script to extract/display condition codes for jobs create.dasd.sh mvs bash script that utilizes the dasdinit utility to create empty DASD volumes dlibs.script conf Hercules command script to add new DASD to configuration smp1.cnf conf Hercules configuration file to execute Hercules/MVS starter system to install SMP4 smp2.cnf conf Hercules configuration file to execute Hercules/MVS starter system to build distribution libraries null.jcl
smp4p44.jcl
smpjob00.jcl
smpjob01.jcl
smpjob02.jcl
smpjob03.jcl
smpjob04.jcl
smpjob05.jcl
smpjob06.jcl
smpjob07.jcl
smpmount.jcljcl Jobstreams (Job Control Language statements) submitted to MVS starter system to build distribution libraries j90010.het tape Jim Morrison's 3375/3380/3390 modifications [updated 08/2023 by Rob Prins] ptfs.het tape A large collection of known PTFs (program Temporary Fixes) for MVS 3.8j Note: The files listed above are not the complete list of files contained in the archive. They are only the files that are utilized in this step.
For Windows host Operating Systems, mvsInstallationResources.zip:
File Name
Extracted to Directory
Contains
condcode.rexx mvs REXX script to extract/display condition codes for jobs create.dasd.bat mvs Windows bat script that utilizes the dasdinit utility to create empty DASD volumes dlibs.script conf Hercules command script to add new DASD to configuration smp1.cnf conf Hercules configuration file to execute Hercules/MVS starter system to install SMP4 smp2.cnf conf Hercules configuration file to execute Hercules/MVS starter system to build distribution libraries null.jcl
smp4p44.jcl
smpjob00.jcl
smpjob01.jcl
smpjob02.jcl
smpjob03.jcl
smpjob04.jcl
smpjob05.jcl
smpjob06.jcl
smpjob07.jcl
smpmount.jcljcl Jobstreams (Job Control Language statements) submitted to MVS starter system to build distribution libraries j90010.het tape Jim Morrison's 3375/3380/3390 modifications [updated 08/2023 by Rob Prins] ptfs.het tape A large collection of known PTFs (program Temporary Fixes) for MVS 3.8j Note: The files listed above are not the complete list of files contained in the archive. They are only the files that are utilized in this step.
 The clock time required to complete the steps below should be
approximately 20 minutes; the actual elapsed time for the jobs to execute was
extracted from the jobs' SYSOUT logs [7.31 minutes], so I have added 12 minutes to this
estimate for 'user' time and rounded up to 20 minutes. All times given here
should be taken as estimates. The actual time reported for each job depends
greatly upon the hardware and host Operating System (Linux/MAC/Windows) upon
which Hercules is executing. The time necessary for you to complete the steps may be longer if you have not
already gathered all required files and have them restored to
the appropriate locations before beginning. I am completing this process
on Linux Mint 18.3 on a fairly recent, quad core machine. Granted I
don't have to contemplate the instructions as someone who had not read and
followed
them previously might, so I am at a distinct advantage.
The clock time required to complete the steps below should be
approximately 20 minutes; the actual elapsed time for the jobs to execute was
extracted from the jobs' SYSOUT logs [7.31 minutes], so I have added 12 minutes to this
estimate for 'user' time and rounded up to 20 minutes. All times given here
should be taken as estimates. The actual time reported for each job depends
greatly upon the hardware and host Operating System (Linux/MAC/Windows) upon
which Hercules is executing. The time necessary for you to complete the steps may be longer if you have not
already gathered all required files and have them restored to
the appropriate locations before beginning. I am completing this process
on Linux Mint 18.3 on a fairly recent, quad core machine. Granted I
don't have to contemplate the instructions as someone who had not read and
followed
them previously might, so I am at a distinct advantage.
The end result of building the starter system in the prior step was two 3330 DASD volumes, which are located in the dasd directory.
Now we will use the the create.dasd command script (the same script we used in the prior step) to create three additional DASD volumes required for this step.
The three volumes created are type 3350 DASD images. Two of the volumes created are work volumes; that is, they are for any jobs running under MVS to use to store temporary or transient datasets. The Volume Serial Numbers of these two volumes are WORK00 and WORK01. These two work volumes will be used in this step and in the following step where we will be doing a System Generation. They will also be retained in the target MVS 3.8j system you will have to use on your machine, so they will be available to store temporary datasets when you are running your own jobs. The third volume is reserved for the exclusive use of the System Modification Program and will contain information about the resources used to build the target MVS 3.8j system. I'll present more information about the System Modification Program in a following section on this page.
So, the create.dasd script will:
create a dasd subdirectory if it does not already exist,
change to that subdirectory,
if the three DASD volumes to be created exist, delete them,
utilize the dasdinit utility (included with Hercules) to create the three DASD volume images.
On a Linux system, open a terminal window in the mvs directory and type the command:
./create.dasd.sh dlibs
and press Enter. The argument 'dlibs' instructs the script to produce the three DASD volumes required for this step. The script will execute, creating the three DASD volumes. The output of the script on my (Linux) system is shown below:
If your host Operating System is macOS, I have been told that you need to use the command:
/bin/sh ./create.dasd.sh dlibs
On a Windows system, open a command prompt window in the mvs directory and type the command:
create.dasd.bat dlibs
and press Enter. The argument 'dlibs' instructs the script to produce the three DASD volumes required for this step. The script will execute, creating the three DASD volumes. The output of the script on a Windows system is shown below:
The DASD volumes that are created are simply raw emulated volumes; they have not been initialized for use by MVS and contain no VTOC (Volume Table of Contents) or control structures. They will be initialized in the following steps.
Every batch job or started task that executes under MVS returns a completion code (also known as a condition code or return code) at the conclusion of each step (program executed). The value of the completion code is printed in the Job Log section of the SYSOUT listing, following the Allocation messages for each step. It is essential that you examine the output of each job to ensure that the codes you received for each step match those expected. If you receive an unexpected code, it probably means an error has occurred during execution of the job that must be corrected, and the job rerun, before you proceed. The SYSOUT listings can be found in the host Operating System file assigned to the printer device address as specified in the Hercules' configuration file. When you use the Hercules configuration files included in the installation objects archive, the file will be located in the mvs directory and will be named prt00e.txt. You can view this file with a text viewer or editor while Hercules is still running. Recent versions of Hercules protect the files assigned to its emulated devices by making them read-only access, which will prevent them from being modified by another host Operating System program while Hercules is running. The completion code is listed in a message with the prefix IEF142I, so you can find the completion code by searching for this string.
As an alternative to opening the file in an editor/viewer and searching for the message prefix, I have included a REXX script in the installation objects - condcode.rexx - which you may use to display the step completion codes for any job If you do not already have REXX installed on your computer, you can easily find a free version to download; search for Regina, which is the REXX interpreter that I use. As I write this it is available for many Operating System platforms on SourceForge @ https://regina-rexx.sourceforge.io/.
On Linux the command line syntax for the script is:
./condcode.rexx <print file name> <MVS job name>
On Windows the command line syntax for the script is:
condcode.rexx <print file name> <MVS job name>
On macOS, I have been told that you need to use the command:
/bin/sh ./condcode.rexx <print file name> <MVS job name>
If you are following the directory structure I have suggested, the script should be executed from the
mvs directory. The output from the script may also be redirected to a file, a printer, or filtered to another
program. Any step with a completion code other than 0000 will be indicated by the inclusion of "<--" to the right of the completion code. Remember that a non-zero completion code may be acceptable for a particular step; all acceptable and expected codes will be listed in these instructions.
The REXX script may be used after you have completed building your target MVS system for use on your computer to check the completion codes of jobs that you write and submit. The REXX script includes code to enable searching for some special jobs that will be submitted in later steps, but this code will not impede your use of the script for
your own use later when checking your own jobs.
The program used to reload the MVS 3.8j product tape onto DASD is SMP4 (System Modification Program Release 4). The AWS tape labeled smp4b.het contains version 4.22 of this program. Unfortunately, version 4.24 is required to successfully reload MVS 3.8j. So it is necessary to extract the components to build SMP4 from the distribution tape (zdlib1.het). There are procedure library members on the smp4b.het tape that must be restored to the procedure library, so you will still need the smp4b.het tape image.
The System Modification Program was created by IBM to control the distribution and updating of their MVS Operating System installed in their customer's mainframe systems. Distributing a completely new copy of the entire Operating System code when changes (corrections) were made to a part of the code base would not work for even a small target customer base. So SMP was created to allow the management of MVS Operating System code on mainframe computers. During installation of a completely new system (which is what we are doing) SMP creates a substantial group of files into which it will collect and maintain everything known about the target MVS 3.8j system. SMP will load the elements of the MVS Operating System into these files from the distribution tape. Any modifications and patches we apply during this initial installation will also be placed into the files by SMP. After we complete the System Generation, a copy of the jobstream that was used to generate the system will also be read by SMP and the information about the choices made for how the Operating System will function will also be placed into the files. Then, whenever a change needs to be applied to the system SMP will be used to apply the change, ensuring that nothing is broken in the target Operating System. That is a very brief overview of SMP and the functions it provides. In 1988 Sam Golub wrote an article providing a very concise overview of SMP. A copy of that article is available to download @ SMP Tutorial.pdf. If you really want to learn more about the System Modification Program, you can download a copy of the 1980 version of the SMP Programmers Guide from GC28-0673-6 OS/VS System Modification System Programmer's Guide.pdf. It is not necessary for you to know more about SMP to complete the building of your target MVS 3.8j system, as I have provided all the jobstreams necessary to build the SMP environment and use it to install the distribution and generate MVS 3.8j.
The MVS starter system is simply MVS 3.7, which is the release prior to MVS 3.8j. The hardware configuration generated in the starter system is quite comprehensive and is illustrated on pages 25/26 in the OS/VS System Generation Reference; if you are interested in the details provided by this chart and do not have a copy of that manual, I provide those pages @ ../downloads/pdf/GC26-3792-p25-26.pdf.
It is not necessary to define all of the hardware generated for the system in order to use the system, so for the first step of this process, we will be using the configuration defined in the Hercules configuration file smp1.cnf, which is located in the conf directory. The schematic representation of that configuration is:
Open a terminal window (Linux) or a Command Prompt window (Windows) and start hercules by typing the command hercules -f conf/smp1.cnf and pressing Enter:
Hercules will begin execution, load the configuration file, and display the following messages:
From this point forward in this step, I will refer to this window as the Hercules console. In this window you will see messages from the Hercules emulator and enter commands to be processed by the Hercules emulator.
Hercules is waiting for a telnet client session to connect to the emulated device specified at address x'01f' in the configuration file. The device is specified as a 3215 console. The 3215 device was a a printer/keyboard combination, frequently a modified IBM Selectric typewriter. So you must use a telnet client on your machine to connect, not a tn3270 client, which would be appropriate for connecting to an emulated display terminal. The output and input for this device would have been interspersed and would appear on a continuous sheet of paper, so in your telnet window you will see output from the MVS 3.7 Starter System, followed by responses typed by you, and then followed by more output from the program. The telnet window will never 'clear' and the output and input will simply continue to scroll by.
Start your telnet client program. In the connection dialog for your client, specify the address as 'localhost' and the port number as 3270 (the 3270 here refers to the port number that Hercules is listening on, and not the device type 3270). If necessary, make certain that your telnet client settings include 'local echo' so that when you type in the client window, what you type will also be displayed in the window. In the Windows telnet client, if you are not seeing the characters you are typing, local echo is 'off'. Type ctrl+] to enter command mode, then type set localecho to turn on local echo, and then press Enter to exit command mode. When connected, the telnet window will display:
The last line displayed indicates that the telnet session has connect to the Hercules emulator, specifically to the emulated 3215 console devices at address 0:001F.
From this point forward in this step, I will refer to this window as the MVS Starter System console.
In the Hercules console window, an additional line will be added to reiterate that the telnet session client has been connected to device 0:001f:
It is time to IPL the starter system. On the command line in the Hercules console window, type the command ipl 150 and press Enter. This will instruct Hercules to load the MVS 3.7 operating system from the 3330 DASD volume at x'150':
When MVS IPLs, some users have noticed that Hercules logs many repetitive messages that seem like an error condition exists. The messages may look something like this:
In fact, MVS is testing the memory allocated to it by the emulator to see how much memory is available to it and these messages are a result of those tests. If they are a distraction to you, you may edit the Hercules configuration file and change the OSTAILOR NULL line to read OSTAILOR QUIET. You may also enter the Hercules command OSTAILOR QUIET on the command line, and the change will only affect the current session. Setting OSTAILOR QUIET will suppress all error condition log messages.
In the MVS Starter System console window you will see:
At the beginning of the MVS IPL procedure, this prompt allows the console operator to enter parameters that can be used to alter how the system is started. The possibilities can be very extensive, but in most cases there will only be a very few circumstances where any behavior of the Operating System needs to be overridden.
In this particular case, this is the first time this system has ever been started (IPLed), so in response to the IEA101A message, you need to type in a response to instruct the system to clear and rebuild the Link Pack Area. Load modules (programs) that are used frequently are kept in the LPA, which is stored in the paging files, so that they may be located and loaded very quickly.
As MVS is a multi-processing Operating System, there can and will be times when there are multiple user programs and/or system services that are running concurrently. Therefore it is possible that there may be multiple messages for which responses are pending. To facilitate this each message is given a number, which is set to zero at IPL time and is incremented by the Operating System for each subsequent message issued. However, for the IEA101A message there is no message number displayed, as the system at this point has only begun loading and this is the only message that it is possible to be pending. Nevertheless, your response must be made using a message number, so you will respond using response number zero. The format for the response to system messages is:
r <message number>,<response>
Note that there is a space between the r and the message number.
In the MVS Starter System console window, type: r 0,clpa and press Enter.
Building the LPA will take only a few seconds. Next you will see a message from JES2 (Job Entry System 2):
JES2 is the system that controls all jobs entering MVS for execution, monitors resources required for the jobs to execute, controls the initiation and termination of job steps (programs) as the jobs run, and processes all punched card and printed output from the jobs.
The asterisk (*) preceding the message indicates that the system requires a reply and the 00 following the asterisk is the number that needs to be entered to allow the system to associate your reply with the outstanding message. [The reply number that is displayed is incremented by the system each time a response is required, so the number displayed on your console may not always match the number I show in these instructions!] The leading zero of the reply number may be omitted when you type your responses.
The field following the asterisk is the message identifier. The $HASP is the prefix used by JES2, so all messages issued by JES2 will begin with $HASP. The three digit number following the prefix, 426, uniquely identifies the message.
Here JES2 is asking what options you wish to specify for it use as it begins execution. JES2 uses a disk dataset (actually it uses dedicated DASD volumes, which on the starter system is a single volume: SPOOL0), and since this MVS system has never been run, that dataset needs to be formatted. So the first operand of the command - format - is to instruct JES2 to format its storage dataset. The second operand of the command - noreq - specifies that JES2 is to begin operating immediately, without waiting for an additional Start command from us.
On the MVS Starter System console window, type: r 0,format,noreq and press ENTER: Remember that there is a space between the r and the numeral zero in this response.
Next you will see the following message from JES2:
The $HASP436 message is issued because we have instructed JES2 to format the queue. Because of the importance of JES2 to the MVS system, there are several safeguards in place to ensure that the data in the queue are not corrupted. One of these is the checkpoint record. This message is asking you to confirm that you wish to change the checkpoint record.
In the MVS Starter System console window, type: r 1,y and press ENTER:
JES2 will complete initialization and you will see:
As you can see at the bottom of the screen, there are three initiators started. An initiator is the process in JES2 that selects jobs eligible for execution and submits them to MVS to begin execution. It will make things simpler for you to manage during this step if there is only one job executing at a time, so we will stop two of the initiators. Not only will it be simpler for you to manage this new process you are attempting, but most of the jobs we will be running as we build your target MVS 3.8j system must run serially. That is, each job must complete, you must ensure that every step in the completed job finished with an expected completion code, and only then will you submit the next job for execution.
In the MVS Starter System console window, type the command $pi2-3 and press Enter:
JES2 will report the termination of Initiators 2 and 3:
At this point the system is ready to process jobs and service operator commands. However, before we submit the first job, we need to modify the hardware configuration.
The three DASD volumes we created above - WORK00, WORK01, SMP000 - are not defined in the smp1.cnf Hercules configuration file. This is intentional, because the volumes must be offline to allow the job below to initialize them. During IPL MVS will place all DASD volumes visable to it online, so these new volumes are omitted from the configuration file. Had they been included in the configuration file and MVS attempted to place the volumes online, errors would have been reported because the volumes have not been initialized. I have provided a Hercules script to add the drives to the 'active' configuration. On the command line in the Hercules console window, type script conf/dlibs.script and press Enter:
The script will be read and the command executed by Hercules, just as though you had typed them into the Command line:
Hercules provides an alternate panel for viewing information about the operation of the emulator. You may switch back and forth between the view by pressing the ESCape key in the Hercules console window.
In this alternate view, which is sometimes referred to as the semi-graphical console, you can see that there are now three 3350 type DASD volumes being managed by Hercules, in addition to the two 3330 type DASD volumes that were defined in the Hercules configuration file. All of the Hercules commands that are to be entered during this entire installation process are given by me in the format to enter on the normal Hercules display.
There is some preparatory work to be completed on the MVS Starter System before we can begin to build the Distribution Libraries:
The SMP load modules and procedures are supplied by IBM on the tape contained in the file smp4b.het. However, the load modules supplied on the tape are at a release level that is not up-to-date enough to properly function in building the MVS 3.8j Distribution Libraries. So we will extract the object components needed to build the SMP load modules from the MVS 3.8j product tape, zdlib1.het.
The procedures, which are prewritten blocks of Job Control Language, are used to simplify the jobstreams we are submitting from the card reader. When jobstreams are read from the card reader, 'calls' to these procedures may be interspersed with additional commands, so that the procedures from the library are retrieved and merged with the additional commands to form the job which is submitted to MVS for execution. We will install the procedures contained on the smp4b.het tape into SYS1.PROCLIB; however, they also have some errors and omissions, so I have provided an alternate (corrected and enhanced) procedure which will also be installed in SYS1.PROCLIB.
The new volumes we created do not have any information written into the image files, so we will use a standard IBM utility to initialize each volume. Initialization involves performing an analysis of the DASD volume image. In the real world of physical DASD, the surface would be analyzed for defects. Finally, control information that allows MVS to store and quickly locate and retrieve datasets is written into a special area of the volume. The control structures are collectively called a Volume Table of Contents, and functions much like the Contents section at the beginning of a book.
The Job Control Language (JCL) for the job, SMP4P44, is contained in the file smp4p44.jcl located in the jcl directory.
On the command line in the Hercules console window, type the command devinit 12 jcl/smp4p44.jcl and press Enter:
This command causes Hercules to initialize device 012 (the 3505 card reader) to point to the file containing the jobstream - smp4p44.jcl in the jcl directory. Hercules will read the card images from the file and display a response:
Messages will be displayed on the MVS Starter System console as the job begins execution:
The $HASP100 message indicates that job SMP4P44 has been submitted to MVS on READER1. The $HASP104 message (3 lines) is an information message embedded in the JCL to let you (the operator) know that an IPL will be required after this job has completed. The $HASP373 message indicates that job SMP4P44 has been started executing on Initiator 1, in Class A, on the system identified as H158.
The next messages are an indication of a problem to be resolved. IEF244I is informing you that MVS has been unable to allocate one hardware unit that is required. Message IEF489I repeats that by saying that one unit is needed by Initiator 1. Message IEF247I (4 lines) lists all the hardware units that match the device type of the needed unit, as a means to suggest to you the possible hardware addresses at which the required media might be loaded.
The asterisk in front of message IEF238D indicates an operator decision and corrective action is required by MVS. This message is asking for a tape device to be made available (varied online) to the operating system.
The purpose of step S1 in job SMP4P44 is to copy the files required to rebuild the load modules for the SMP program from the distribution tape. So the tape that is required is the distribution tape - zdlib1.het. So, on the command line in the Hercules console window, type the command devinit 170 tape/zdlib1.het and press Enter:
This command causes Hercules to initialize device 170 (the 3420 tape drive) to point to the file containing the required tape image zdbli1.het in the tape directory. Hercules will open the tape image from the file and display a response to the command:
The tape is now ready to be read by the starter system, so on the MVS starter system console type the command: r 2,170 and press Enter. Note that there is a space between the r and the numeral two in this response.
The program will process the tape, the tape will be unloaded, and you will see another series of messages:
The IEC502E message is informing you that the program has finished with the tape on 170; it has been dismounted and is to be kept. The IEC501A message is informing you that a new tape is required by the job - specifically, it is requesting that on the same drive at address 170 the job requires an existing tape with the volume serial number T74172 to be mounted. This time, the tape required is the one contained in the image file smp4b.het contained in the tape directory (the internal Volume Serial Number on the tape is T74172). On the command line in the Hercules console window, type the command: devinit 170 tape/smp4b.het and press Enter:
This command causes Hercules to initialize device 170 (the 3420 tape drive) to point to the file containing the required tape image smp4b.het in the tapes directdory. Hercules will open the tape image from the file and display a response to the command:
The job will not require any input to begin using the tape once it is made available by Hercules. The next set of messages you will see require a response:
This step is restoring files from the tape into libraries on the MVS Starter System DASD volumes. MVS uses expiration dates to protect data from being overwritten accidentally; message IEC507D is informing you that this job is about to write information into the dataset SYS1.PROCLIB and that dataset is not expired. Therefore you have to provide an 'override permission' for the action to complete. On the MVS Starter System console, enter r 3,U to allow the dataset to be updated:
There will be two more dataset updates that will require an override to continue. Reply U to each of the messages. I have not included the screen captures for each of these exchanges, but you can see in the following screen that there are a total of three datasets which require the override - replies 3, 4, and 5. You will then see a different message:
The final process of this job is to initialize the three new DASD volumes. The message IEH841D is informing you that a request has been made to perform initialization on the DASD volume at hardware address 148. Reply r 6,U to allow the initialization to proceed:
There will be two more DASD volumes that will require confirmation before the initialization can proceed. Reply U to each of the messages. I have not included the screen captures for each of these exchanges, but you can see in the following screen the two additional responses:
After responding to the third request to confirm initialization, there will be about a quarter minute of time following your final confirmation response before you see another message. That is because there is quite a bit of processing to be done to scan the three DASD volumes, build the file control structures, and write the labels. Then you will see messages:
Message IEH809I (three times, once for each DASD volume initialized) is informing you that the volumes were initialized. Message IEF471E is informing you that the tape with the Volume Serial Number MVS38J is no longer needed and may be stored. Message $HASP395 is informing you that the job SMP4P44 has ended. Message $HASP150 is informing you that the printed output from job SMP4P44 is being processed on PRINTER1 (the printed output will be available in the file prt00e.txt on your host system in the mvs directory). Message $HASP309 is informing you that Initiator 1 is now inactive and waiting for jobs to be submitted in class A. After the JES2 printer task completes, message $HASP160 is informing you that PRINTER1 is inactive and waiting to print further output in classes A and J. Message $HASP099 is informing you that all functions of JES2 are complete and it is idle. Message $HASP250 is informing you that all processing is complete for job SMP4P44 and it is being purged (removed) from the system.
You may open the host operating system (Windows, Linux, etc.) file attached to the emulated printer - prt00e.txt - and view the output if you wish. For each step of every job processed by MVS there is a completion (or condition) code printed which indicates the success, or degree of errors, that occurred during the execution of the step. The completion code is listed in a message with the prefix IEF142I, so you can find the completion code by searching for this string. It is easier to use the script I provided - condcode.rexx - which will scan the prt00e.txt file and report the condition codes for any given job.
To execute the script, in a terminal window from the mvs directory, type the command ./condcode.rexx prt00e.txt smp4p44 and press Enter:
As shown above, the expected and acceptable completion code for all five steps of this job are 0000.
If you receive a completion code other than what is expected, on this or any MVS job, you will need to determine the cause of the error(s), correct the condition causing the error, possibly back out partial modifications made by the failing job, and resubmit the job. These steps must be repeated until acceptable completion codes indicate successful completion of a job. If you proceed with subsequent jobs after a job which encountered errors, you are probably wasting your time. The resulting system may be unstable or completely unusable.
Among the first set of messages printed for job SMP4P44, there was an informational message printed on the console from commands embedded in the JCL:
$HASP104 SMP4P44 ******************************************************
$HASP104 SMP4P44 * An IPL is required after this job has completed!!! *
$HASP104 SMP4P44 ******************************************************
In order to execute the load module for SMP4 which has been added to the system load library of the MVS starter system, it is necessary to shut down and re-IPL the starter system. On the MVS Starter System console, type the command $p jes2 and press ENTER:
This command instructs JES2 to shut down normally. The following messages will be displayed:
which are issued by JES2 and MVS as JES2 terminates. On the MVS Starter System console, type the command z eod and press ENTER:
This command instructs the MVS operating system to shut down normally. The IEE334I message will be displayed:
which indicates the MVS system has reached a point where power down is possible. Note that MVS is still running and additional operator commands might be entered and jobs submitted. But, the object of the "z eod" command is to close all the system files and prepare for an orderly shutdown.
On the MVS Starter System console, type the command quiesce and press ENTER:
This command instructs the MVS operating system to write any buffers to the DASD devices. This ensures that when you shut down Hercules any information held in memory by MVS is written to the DASD images. The only response to the console following this command is a blank line:
The Hercules console will show that the CPU is in a disabled wait state:
On the command line in the Hercules console window, type the command quit and press ENTER:
Hercules will close all the files for the emulated mainframe devices and terminate:
The telnet client window will display:
Now that the programs/procedures we need are installed onto the starter system, we will again IPL the starter system, this time using a slightly different hardware configuration:
Open a console window (Linux) or a Command Prompt window (Windows) and start hercules by typing the command hercules -f conf/smp2.cnf and pressing Enter:
Note: the name of the Hercules configuration file is smp2.cnf, whereas before we used smp1.cnf.
Hercules will begin execution, load the configuration file, and display the following messages:
Start your telnet client program. In the connection dialog for your client, specify the address as 'localhost' and the port number as 3270 (the 3270 here refers to the port number that Hercules is listening on, and not the device type 3270). If necessary, make certain that your telnet client settings include 'local echo' so that when you type in the client window, what you type will also be displayed in the window. When connected, the telnet window will display:
In the Hercules console window, an additional line will be added to reiterate that the telnet session client has been connected to device 0:001f. On the command line in the Hercules console window, type the command ipl 150 and press Enter:
The MVS Starter System console will display:
Since this is not the first time we have IPLed the starter system, we do not need to rebuild the Link Pack Area, so for the first prompt - IEA101A SPECIFY SYSTEM PARAMETERS FOR RELEASE 03.70.VS2 - simply press Enter on MVS Starter System console. JES2 will prompt for startup options:
It is not necessary to format the JES2 dataset, as we did that at the previous IPL, so type the response: r 0,noreq and press ENTER:
In the Hercules configuration file that we have started Hercules with, the card reader is initialized pointing to the file smpmount.jcl in the jcl directory. Although the DASD volumes that we created and initialized above are active in the Hercules configuration file we are now using - smp2.cnf in the conf directory - we need to make some changes in the way the MVS Starter System will view one of those volumes: SMP000. MVS automatically mounts all DASD volumes visible to it at IPL. There is parameter file that MVS reads at IPL to see what DASD volumes it expects to find and the volumes it locates that have an entry in that file are assigned the attributes coded in that file. Any volumes not listed in that file are assigned the class of STORAGE. STORAGE class DASD volumes may be selected by MVS to receive any dataset that needs to be written that is not specifically assigned to a designated volume in the Job Control Language. That means that STORAGE class volumes are eligible to receive all manner of work datasets that MVS requires to complete tasks, as well as non-specified datasets created by user jobs. We want the SMP000 volume to be reserved for the exclusive use of the jobs we are going to be running to set up MVS 3.8j. This job sitting in the emulated card reader has the singular purpose of issuing a MOUNT command to assign the volume SMP000 to the class of PRIVATE. The MVS Starter System is set up to prevent the unconfirmed execution of MVS system commands embedded in jobstreams, so you will see a message asking you to confirm the execution of this embedded command:
Reply r 1,y to allow the command to execute:
You will see this response:
Once it was confirmed, the command was submitted to the internal reader, which is indicated by the message $HASP100. Just like any batch job, the MOUNT request is processed and receives a message when it is started ($HASP373), when it ends ($HASP395) and when its output is printed ($HASP150). You can even utilize the condcode.rexx script to check that the command executed successfully. To do that, in a host operating system window, in the mvs directory, type the command condcode.rexx prt00e.txt mount and press Enter. You should see:
SMP requires several datasets to be initialized before the MVS 3.8j elements may be loaded into them. This includes both loading basic information into several SMP control datasets and pre-allocating datasets that will constitute the MVS 3.8j Distribution Libraries at the conclusion of the steps on this page. The first job to be run - SMPJOB00 - will first delete any of these datasets that exist and then allocate and initialize all the required datasets. Therefore, this job may be run to 'restart' from this point if there are serious errors in the subsequent steps.
To submit the job to MVS, on the command line in the Hercules console window, type the command devinit 12 jcl/smpjob00.jcl and press Enter:
Note: At this point you should be getting familiar with the normal outputs from the Hercules console, so I will be reducing the number of screen captures I include.
The MVS Starter System console will show:
This job takes less than a minute to complete (actually, 0.01 minutes from the SYSLOG). The expected return codes for the job are:
The first step - IEHPROGM - receives a condition code of 0008 because it is attempting to delete datasets that are not present. If you run this job again, either right now or later to 'restart' from this point, the condition code for this step will be 0000. You will not harm anything if you wish to try that, so if you wish, submit the job again to see for yourself.
The second step - IEFBR14 - is pre-allocating datasets.
The third step - SMP - is initializing control information in several of the SMP datasets. One of the first tasks it attempts is to delete a target that is not there (remember the datasets were just allocated and are empty), so it gets a condition code of 0008. It will always get that code, so it is expected and acceptable. If you examine the output from SMP4 (which is near the end of the prt00e.txt file), you will see that all the subsequent operations receive a return code of 00.
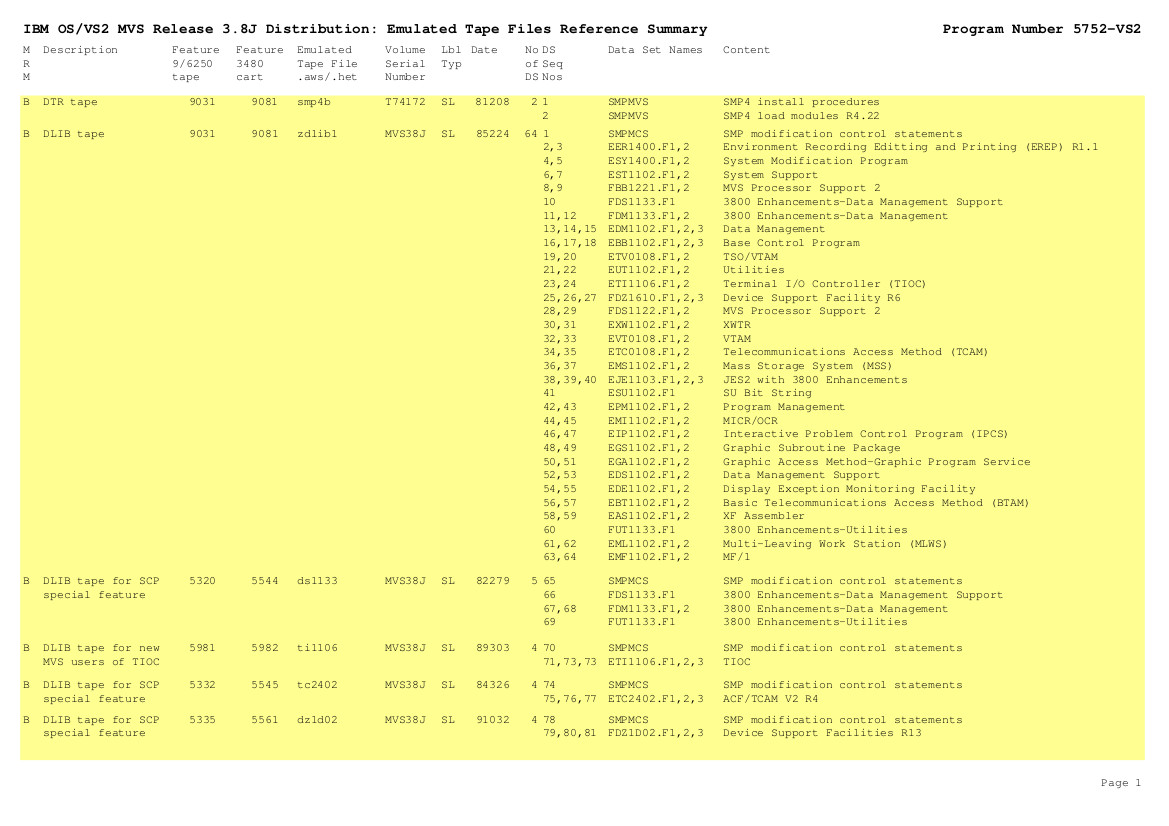
The MVS Release 3.8j distribution was shipped by IBM on five tapes. All five of the tapes images were included on the CBT CD-ROM. In all the material I have collected over the decades I have a reference summary for the MVS 3.8 distribution tapes. I do not know the author of this pdf, or where I obtained it, but as Jim Morrison pointed out, the origin of the information is the base program directory that accompanies the distribution tapes when shipped from IBM (also available from my site @ https://www.jaymoseley.com/hercules/downloads/pdf/mvs38bas.pdf). The two page summary of distribution tape contents is an excellent and concise index of the contents of the distribution tapes and it is available for download @ The IBM 3.8J Distribution Reference Summary. [31 January 2022 update: Peter Stockdill is the originator of both the base program directory and the two page summary document. He posted both to the, now defunct, Yahoo Hercules MVS group. The base directory was posted on January 25, 2002 and the two-page summary was posted on January 26, 2003.] Of particular relevance to this page is the material on page 1 of the document, highlighted in yellow:
From this summary, the tape we need is the second tape, labeled zdlib1. That tape image is contained in the file: zdlib1.het. The product elements to be loaded are contained in 64 separate datasets; some elements require up to three datasets to contain the entire product.
The next job to be run - SMPJOB01 - will load all of the MVS 3.8j product elements into the SMP datasets from the tape datasets.
To submit the job to MVS, on the command line in the Hercules console window, type the command devinit 12 jcl/smpjob01.jcl and press Enter:
This job requires a tape, so on the MVS Starter System console you will see:
You may remember that you receive this type of message for the first job requiring a tape after MVS has been IPLed. On the command line in the Hercules console window, type the command devinit 170 tape/zdlib1.het and press Enter:
On the MVS Starter System console, type r 02,170 and press Enter:
This job takes 1.36 minutes to complete. After the job concludes, the MVS Starter System console will show:
The expected return code for the single step of this job is:
There will be a huge volume of printed output from this job (almost 38,000 lines), but there is a summary report that lists the elements that were received. Here are the pages that contain this summary report, extracted from the entire output:
======================================================================================================================
DATE 20.108 TIME 14:42:23 HMASMP LVL 04.44 MESSAGES AND CONTROL STATEMENTS PAGE 0454

                   RECEIVE SUMMARY REPORT


     SYSMOD  STATUS   TYPE     ------------------------

     EAS1102 RECEIVED FUNCTION SMPTLIB DATASETS LOADED   System assembler
     EBB1102 RECEIVED FUNCTION SMPTLIB DATASETS LOADED   Base control pgm
     EBT1102 RECEIVED FUNCTION SMPTLIB DATASETS LOADED   BTAM
     EDE1102 RECEIVED FUNCTION SMPTLIB DATASETS LOADED   Display Exception Monitor Facility
     EDM1102 RECEIVED FUNCTION SMPTLIB DATASETS LOADED   Data Management
     EDS1102 RECEIVED FUNCTION SMPTLIB DATASETS LOADED   DM Support
     EER1400 RECEIVED FUNCTION SMPTLIB DATASETS LOADED   EREP
     EGA1102 RECEIVED FUNCTION SMPTLIB DATASETS LOADED   GAM
     EGS1102 RECEIVED FUNCTION SMPTLIB DATASETS LOADED   GAM Subroutines
     EIP1102 RECEIVED FUNCTION SMPTLIB DATASETS LOADED   IPCS
     EJE1103 RECEIVED FUNCTION SMPTLIB DATASETS LOADED   JES2 + 3800 enhancements
     EMF1102 RECEIVED FUNCTION SMPTLIB DATASETS LOADED   MF/1
     EMI1102 RECEIVED FUNCTION SMPTLIB DATASETS LOADED   MICR/OCR
     EML1102 RECEIVED FUNCTION SMPTLIB DATASETS LOADED   Multi-Leaving Work Station
     EMS1102 RECEIVED FUNCTION SMPTLIB DATASETS LOADED   MSS
     EPM1102 RECEIVED FUNCTION SMPTLIB DATASETS LOADED   Program Management
     EST1102 RECEIVED FUNCTION SMPTLIB DATASETS LOADED   System Support
     ESU1102 RECEIVED FUNCTION SMPTLIB DATASETS LOADED   SU Bit String
     ESY1400 RECEIVED FUNCTION SMPTLIB DATASETS LOADED   SMP4
     ETC0108 RECEIVED FUNCTION SMPTLIB DATASETS LOADED   TCAM
     ETI1106 RECEIVED FUNCTION SMPTLIB DATASETS LOADED   TIOC
     ETV0108 RECEIVED FUNCTION SMPTLIB DATASETS LOADED   TSS/VTAM
     EUT1102 RECEIVED FUNCTION SMPTLIB DATASETS LOADED   Utilities
     EVT0108 RECEIVED FUNCTION SMPTLIB DATASETS LOADED   VTAM
     EXW1102 RECEIVED FUNCTION SMPTLIB DATASETS LOADED   External Writer
     FBB1221 RECEIVED FUNCTION SMPTLIB DATASETS LOADED   MVS Processor Support
     FDM1133 RECEIVED FUNCTION SMPTLIB DATASETS LOADED   3800 enhancements - Data Management Utilities
     FDS1122 RECEIVED FUNCTION SMPTLIB DATASETS LOADED   MVS Processor Support
     FDS1133 RECEIVED FUNCTION SMPTLIB DATASETS LOADED   3800 enhancements - Data Management Utilities
     FDZ1610 RECEIVED FUNCTION SMPTLIB DATASETS LOADED   Device Support Facilities
     FUT1133 RECEIVED FUNCTION SMPTLIB DATASETS LOADED   3800 enhancements - Data Management Utilities

======================================================================================================================
DATE 20.108 TIME 14:42:23 HMASMP LVL 04.44 MESSAGES AND CONTROL STATEMENTS PAGE 0455

HMA2050 RECEIVE PROCESSING COMPLETED - HIGHEST RETURN CODE IS 00


HMA2050 HMASMP PROCESSING COMPLETED - HIGHEST RETURN CODE IS 00
I have added annotation (in magenta) identifying what element is installed with each FUNCTION.
Note that if you want to search for this summary report in the output contained in the prt00e.txt file, you need to place two spaces between the words of 'RECEIVE SUMMARY REPORT'.
Subsequent to the release of any version of an Operating System by IBM, when problems are discovered in the code, Program Temporary Fixes (PTFs) are issued by IBM to correct the problems. There has been an ongoing attempt to recover all the applicable PTFs for MVS 3.8j since early 2000, and there may yet be success in recovering more. The tape image - ptfs.het - located in the tape directory contains a merged set of all the PTFs that I know about. There are 1,482 PTFs contained on this tape.
The next job to be run - SMPJOB02 - loads all those PTFs into the SMP datasets.
To submit the job to MVS, on the command line in the Hercules console window, type the command devinit 12 jcl/smpjob02.jcl and press Enter:
On the MVS Starter System console you will see:
On the command line in the Hercules console window, type the command devinit 170 tape/ptfs.het and press Enter:
This job takes 0.67 minute to complete. After the job concludes, the MVS Starter System console will show:
The expected return code for the single step of this job is:
As with the prior job, there will be a huge volume of printed output from this job (over 74,000 lines), but it is not necessary to review it.
Now that all the product elements and PTFs have been loaded into the SMP datasets, the next job will accept all the product elements and those PTFs that are necessary to correct known problems that would affect the MVS 3.8j system we are building.
The next job to be run - SMPJOB03 - completes this function.
To submit the job to MVS, on the command line in the Hercules console window, type the command devinit 12 jcl/smpjob03.jcl and press Enter:
This job takes 3.61 minutes to complete. After the job concludes, the MVS Starter System console will show:
The expected return codes for the job are:
Step 4 is expected to receive a completion code of 0004, because some of the link-edit steps will receive IEW0461 errors, because some links could not be resolved at this time.
Portions of the report produced on my system from this job can be viewed at: SMPJOB03. Note that I have deleted most of the output from this very large listing in order to conserve space and show only the most relevant information. The complete SYSOUT listing is almost 74,000 lines.
The original MVS 3.8j does not have support for any DASD device type later than 3350. At the time MVS 3.8j was released, the 3375, 3380, and 3390 DASD devices were not being marketed, so it was not possible to even conceive of them being included in an MVS 3.8j system. Jim Morrison has prepared and made available modifications that may be applied to the distribution libraries to provide this support. In past versions of these instructions, I left this as an optional step, and that step occurred much later in the instructions. In April 2002 Jim released this version of his USERMODs (version 00.09) and placed it into the public domain. Since that time many people have utilized them to add support for the later DASD types in their MVS 3.8j systems. With the additional use these modifications have received, I feel confident that we should go ahead and make them an integral, non-optional part of the Distribution Libraries. In August, 2023, Rob Prins released an updated version of this tape (version 00.10), which fixes some known problems.
The job to load the USERMODs into the SMP datasets is SMPJOB04.
To submit the job to MVS, on the command line on the Hercules console, type the command devinit 12 jcl/smpjob04.jcl and press Enter:
This job requires a tape, so on the MVS Starter System console you will see:
On the command line on the Hercules console, type the command devinit 170 tape/j90011.het and press Enter:
[Note: graphic above has not been updated to reflect Rob Prins updated tape (j90011.het)] This job takes 0.86 minute to complete. After the job concludes, the MVS Starter System console will show:
[Note: graphic above has not been updated to reflect Rob Prins updated tape (j90011.het)] The expected return code for the single step of this job is:
The report produced on my system from this job can be viewed at: SMPJOB04. Note that I have only included output from SMP4 in this listing in order to conserve space and show only the most relevant information.
As with the product tape and PTFs, the USERMODs must be ACCEPTed to produce the modifications to the Distribution Libraries. The job to accomplish that is SMPJOB05.
To submit the job to MVS, on the command line in the Hercules console window, type the command devinit 12 jcl/smpjob05.jcl and press Enter:
This job takes 0.03 minute to complete. After the job concludes, the MVS Starter System console will show:
The expected return code for the single step of this job is:
As with the product/PTF ACCEPT job, the completion code of 0004 is expected; some of the link-edit steps will receive IEW0461 errors, because some links could not be resolved at this time.
The report produced on my system from this job can be viewed at: SMPJOB05. Note that I have only included output from SMP4 in this listing in order to conserve space and show only the most relevant information.
We are almost finished, but before we continue, we are going to do some clean up. All of the Product Elements and User Modifications we have ACCEPTed have created datasets on a work volume, as well as created entries in the SMP datasets. The distribution libraries have been created and populated with the material necessary to build MVS 3.8j, but these materials are still present. Had we APPLYed the elements, these datasets and elements would no longer be present, but we are not going to APPLY this material, as an APPLY operation is used to make changes to the running system. We do not want to modify the starter system, so we are done with the material and it just needs to be removed. So the next job will REJECT all of these elements and free up the disk space. The job to accomplish that is SMPJOB06.
To submit the job to MVS, on the command line in the Hercules console window, type the command devinit 12 jcl/smpjob06.jcl and press Enter:
This job takes 0.03 minute to complete. After the job concludes, the MVS Starter System console will show:
The expected return code for the single step of this job is:
The completion code of 0004 is expected, because SMP4 is not happy that we are deleting elements that have not been applied.
The output produced on my system from this job can be viewed at: SMPJOB06.
The ICKDSF (Device Support Facility) utility is not present in the starter system, but having it available is the easiest way to write IPL records onto the target MVS 3.8 System Residence DASD volume, which you will be doing in the next phase. All the component parts required to add ICKDSF to the MVS starter system are present in the Distribution Libraries.
Also, for unknown reasons, the system assembler (IFOX00) installed on the MVS Starter System will get occasional 0C1 and 0C4 abends during the System Generation. Remember, the MVS 3.7 Starter System is even older than MVS 3.8j, so there is no way to research problems in this very old program. But we have the components to build the version of the program distributed for MVS 3.8j, so we will use them to replace the assembler program on the MVS Starter System.
The job to re-link these programs is SMPJOB07. To submit the job to MVS, on the command line in the Hercules console window, type the command devinit 12 jcl/smpjob07.jcl and press Enter.:

This job completes two tasks. First it extracts information from the distribution libraries needed to build a load module to add to SYS1.LINKLIB on the START1 3330 volume. Using this information, it builds the jobstream for another job which will use the Link Editor to build ICKDSF and rebuild IFOX00. This secondary job, also named SMPJOB07, will be submitted to the internal reader.
The second task the primary SMPJOB07 job completes is to copy another module from the distribution libraries into SYS1.SVCLIB on the START1 volume; this module is an SVC (Supervisor Call) that is required by ICKDSF when it is executing. Both of these target libraries on the MVS Starter System that are to be modified contain expiration dates which have not been reached, so the IEC507D message will be presented for each library. You will receive IEC507D messages before the libraries may be modified:
In total, you will receive three requests for confirmation of library modification: two for SYS1.LINKLIB and one for SYS1.SVCLIB.
Respond U to each of these messages on the MVS Starter System console:
The first SMPJOB07 takes .59 minutes to complete, and the second SMPJOB07 takes .06 minutes to complete. The expected return codes for the two jobs are:
Among the first set of messages printed for job SMPJOB07, there was an informational message printed on the console from commands embedded in the JCL:
$HASP104 SMPJOB07 ************************************************************
$HASP104 SMPJOB07 * AN IPL IS REQUIRED AFTER THIS JOB HAS COMPLETED          *
$HASP104 SMPJOB07 ************************************************************
In order to execute the load module for ICKDSF which has been added to the system load library of the MVS starter system, it is necessary to shut down and re-IPL the starter system. This is a good time, because we need to create some additional DASD volumes and it would be a great time to take a snapshot backup. There are now five DASD volumes in the dasd directory. After you have shut down MVS and Hercules, simply make a copy of them with your favorite archive program - WinZip, PKZIP, tar - or copy them onto a CD-rom blank. Then if you encounter a catastrophic error, it is simple to come back to this point by restoring your backup copy.
On the MVS Starter System console type the command $p jes2 and press ENTER:
This command instructs JES2 to shut down normally and messages will be displayed to indicate JES2 has shut down. On the MVS Starter System console type the command z eod and press ENTER:
This command instructs the MVS operating system to shut down normally. Message IEE334I will be displayed to indicate EOD has been completed successfully. This indicates the MVS system has reached a point where power down is possible. Note that MVS is still running and additional operator commands might be entered and jobs submitted. But, the object of the "z eod" command is to close all the system files and prepare for an orderly shutdown. In the telnet client window type the command quiesce and press ENTER:
This command instructs the MVS operating system to write any buffers to the DASD devices. This ensures that when you shut down Hercules any information held in memory by MVS is written to the DASD images.
On the command line in the Hercules console window, type the command quit and press ENTER:
Hercules will close all the files for the emulated mainframe devices and terminate:
And the telnet client window will display:
In this step you have built three 3350 DASD volumes and populated the SMP datasets on volume SMP000 with the components necessary to build the target MVS 3.8j system. You also have modified some of the load modules on the MVS Starter System, contained on 3330 DASD volume START1, updating them to the level required to perform a System Generation building the MVS 3.8j system. It would probably be a good idea to make a backup copy of those four files, because in case of a serious error you could then restore to this point without following the procedure we have just completed in order to re-create the volumes. Although not difficult, it would be frustrating to have to go through it again when a simple backup would prevent it. You can use any means to store a backup copy of the two files - place them in a WinRar, Zip or tar archive; or burn them onto a CD-rom blank.
I strongly suggest that you save the SYSOUT listings from this process, which you have been examining to verify completion codes for each step. When you proceed with the next step and restart Hercules, the contents of this file will be overwritten. If there were errors that you did not catch that prevent a successful System Generation from completing, having the output from building the Distribution Libraries will greatly assist you in determining the problem and reaching a successful resolution. Simply use the command appropriate for your host Operating System to rename the file 'prt00e.txt' to some other name, such as 'DistributionLibrarySYSOUT.txt'.
I had a suggestion that you can also just drag (or backup) the entire mvs directory to another location and you will have all the DASD volumes and printer output files collected together for each step. Whatever method you use to back up the DASD volumes and SYSOUT depends upon your experience and tastes. It is simply important to be able to return to a previous point in this process if you need to, or be able to research what happened at a particular prior point in the process if errors are encountered at later steps.
And now you may proceed to the next step, Performing a System Generation. So, when you are ready, proceed to the next step - Performing a System Generation
I hope that you have found my instructions useful. If you have questions that I can answer to help expand upon my explanations and examples shown here, please don't hesitate to send them to me:

This page was last updated on December 14, 2023.