September, 2020
System generation is the process that creates an OS/VS2 MVS system control program tailored to both the data processing requirements and machine configuration of an installation.
For a complete system generation, the job stream produced during Stage I is processed during Stage II to create an entirely new MVS system control program.
The two summary statements above are taken from the OS/VS System Generation Reference [GC26-3792].
The system control program referenced in these statements is not a single program, but rather a complete set of datasets, allocated (planned, then defined on one or more DASD volumes, and initialized to receive content), catalogued in a Master Catalog (a VSAM object defined on the primary DASD volume of the system), and then populated with object modules, load modules, tables of parameters, and JCL (Job Control Language) statements. The majority of the material used to populate the datasets will come from the Distribution Libraries built from the IBM product tape, however some of the material is derived from settings chosen during the system design. In a production system in a real world environment, many settings are the result of months or years of fine tuning and modification.
To recap prior steps, in order to perform a System Generation, you should already have downloaded/installed on your computer -
Hercules executables.
The MVS 3.8j Distribution tapes archive (vs2DistributionTapes.tar.gz).
My installation objects archive (mvsInstallationResources.tar.gz for use on Linux /or/ mvsInstallationResources.zip for use on Windows). You do not need both of these files, only the one appropriate for your Operating System.
You should have created the MVS starter system on two 3330 DASD volumes - START1.3330 and SPOOL0.3330 - located in the dasd directory.
You should have created the distribution libraries on 3350 DASD volume SMP000.3350 and have two work 3350 DASD volumes (WORK00.3350 and WORK01.3350) - also located in the dasd directory.
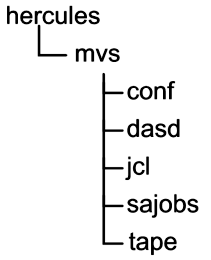
Although not mandatory, this is the structure into which I have MVS related files and these instructions will show commands, output, etc. using this relative structure as a reference point:
The MVS 3.8j Distribution tapes archive (item #2 in the prerequisites list above) contains four files:
distribution.md5sums text file containing the md5 sums for the three tape images dz1d02.het tape image containing Device Support Facilities (release 13) components smp4b.het tape image containing SMP4 load modules and procedures zdlib1.het tape image containing all product elements required to build the distribution libraries for MVS 3.8j
The three tape image files should be located in the tape directory.
Two of the tape images will be used in this step: dz1d02.het and zdlib1.het.
My installation objects archive (item #3 in the prerequisites list above) contains additional files used for this and subsequent steps of this set of instructions. Twenty-five of the files from the mvsInstallationResources archive are required for this step:
For Linux host Operating Systems, mvsInstallationResources.tar.gz:
File Name
Extracted to Directory
Contains
condcode.rexx mvs REXX script to extract/display condition codes for jobs create.dasd.sh mvs bash script that utilizes the dasdinit utility to create empty DASD volumes stage2.awk mvs AWK script to convert stage 1 job output to stage 2 jobstreams stage2.rexx mvs REXX script to convert stage 1 job output to stage 2 jobstreams sysgen.cnf conf Hercules configuration file to execute Hercules/MVS starter system to complete System Generation sysgen.script conf Hercules command script to add new DASD to configuration fdz1d02.jcl
null.jcl
sysgen00.jcl
sysgen01.jcl
sysgen02.jcl
sysgen03.jcl
sysgen04.jcl
sysgen05.jcl
sysgen06.jcl
usermods1.jcl
usermods2.jcl
usermods3.jcl
usermods4.jcl
usermods5.jcl
usermods6.jcljcl Jobstreams (Job Control Language statements) submitted to MVS starter system to complete the System Generation apvtmacs.het tape Macros required for some user modifications j90009.het tape Jim Morrison's 3375/3380/3390 modifications ptfs.het tape A large collection of known PTFs (program Temporary Fixes) for MVS 3.8j stage1.het tape A blank, initialized tape used to transfer stage1 output to host computer stage 2 jobstreams Note: The files listed above are not the complete list of files contained in the archive. They are only the files that are utilized in this step.
For Windows host Operating Systems, mvsInstallationResources.zip:
File Name
Extracted to Directory
Contains
condcode.rexx mvs REXX script to extract/display condition codes for jobs create.dasd.bat mvs Windows bat script that utilizes the dasdinit utility to create empty DASD volumes stage2.awk mvs AWK script to convert stage 1 job output to stage 2 jobstreams stage2.rexx mvs REXX script to convert stage 1 job output to stage 2 jobstreams sysgen.cnf conf Hercules configuration file to execute Hercules/MVS starter system to complete System Generation sysgen.script conf Hercules command script to add new DASD to configuration fdz1d02.jcl
null.jcl
sysgen00.jcl
sysgen01.jcl
sysgen02.jcl
sysgen03.jcl
sysgen04.jcl
sysgen05.jcl
sysgen06.jcl
usermods1.jcl
usermods2.jcl
usermods3.jcl
usermods4.jcl
usermods5.jcl
usermods6.jcljcl Jobstreams (Job Control Language statements) submitted to MVS starter system to complete the System Generation apvtmacs.het tape Macros required for some user modifications j90009.het tape Jim Morrison's 3375/3380/3390 modifications ptfs.het tape A large collection of known PTFs (program Temporary Fixes) for MVS 3.8j stage1.het tape A blank, initialized tape used to transfer stage1 output to host computer stage 2 jobstreams Note: The files listed above are not the complete list of files contained in the archive. They are only the files that are utilized in this step.
 The clock time required to complete the steps below should be
approximately 36 minutes; the actual elapsed time for the jobs to execute was
extracted from the jobs' SYSOUT logs [6.72 minutes], so I have added 29 minutes to this
estimate for 'user' time and rounded up to 36 minutes. All times given here
should be taken as estimates. The actual time reported for each job depends
greatly upon the hardware and host Operating System (Linux/MAC/Windows) upon
which Hercules is executing. The time necessary for you to complete the steps
may be longer if you have not already gathered all required files and have them
restored to the appropriate locations before beginning. I am running Linux Mint on a fairly recent, quad core
machine. Granted I don't have to contemplate the instructions as someone
who had not read/followed them previously might, so I am at a distinct
advantage.
The clock time required to complete the steps below should be
approximately 36 minutes; the actual elapsed time for the jobs to execute was
extracted from the jobs' SYSOUT logs [6.72 minutes], so I have added 29 minutes to this
estimate for 'user' time and rounded up to 36 minutes. All times given here
should be taken as estimates. The actual time reported for each job depends
greatly upon the hardware and host Operating System (Linux/MAC/Windows) upon
which Hercules is executing. The time necessary for you to complete the steps
may be longer if you have not already gathered all required files and have them
restored to the appropriate locations before beginning. I am running Linux Mint on a fairly recent, quad core
machine. Granted I don't have to contemplate the instructions as someone
who had not read/followed them previously might, so I am at a distinct
advantage.
The end result of building the distribution libraries in the prior step was three 3350 DASD volumes. They are located in the dasd directory along with the two 3330 DASD volumes which contain the starter system.
Now we will use the the create.dasd command script (the same script we used in the prior step) to create three additional DASD volumes required for this step.
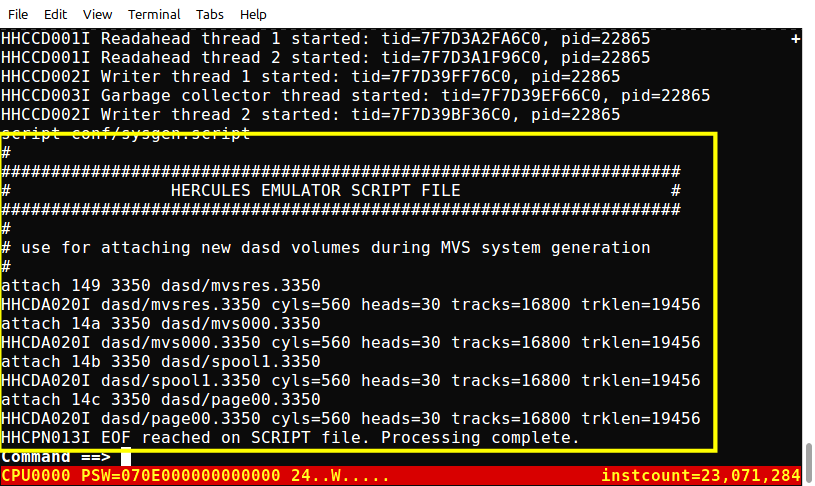
The four volumes created are type 3350 DASD images and contain datasets that are mandatory for running MVS 3.8j. The Volume Serial Numbers of the volumes created are:
MVSRES
This volume will contain the main datasets of the MVS 3.8j system, and is the volume from which MVS 3.8j will IPL.
MVS000
This volume will contain additional datasets holding information defining the characteristics and operating parameters for MVS.
SPOOL1
This volume will contain the JES2 queue dataset.
PAGE00
This volume will contain the page files for MVS.
So, the create.dasd script will:
create a dasd subdirectory if it does not already exist,
change to that subdirectory,
if the four DASD volumes to be created exist, delete them,
utilize the dasdinit utility (included with Hercules) to create the four DASD volume images.
On a Linux system, open a terminal window in the mvs directory and type the command:
./create.dasd.sh sysgen
and press Enter. The argument 'sysgen' instructs the script to produce the four DASD volumes required for this step. The script will execute, creating the four DASD volumes. The output of the script on my (Linux) system is shown below:
If your host Operating System is macOS, I have been told that you need to use the command:
/bin/sh ./create.dasd.sh sysgen
On a Windows system, open a command prompt window in the mvs directory and type the command:
create.dasd.bat sysgen
and press Enter. The argument 'sysgen' instructs the script to produce the four DASD volumes required for this step. The script will execute, creating the four DASD volumes. The output of the script on a Windows system is shown below:
The DASD volumes that are created are simply raw emulated volumes; they have not been initialized for use by MVS and contain no VTOC (Volume Table of Contents) or control structures. They will be initialized in one of the following steps.
If you read this section when you built the distribution libraries, you can skip to the next section head. Checking completion codes for MVS job steps is so important, that I have included this information here again.
Every batch job or started task that executes under MVS returns a completion code (at times also referred to as a condition code or return code) at the conclusion of each step (program executed). The value of the completion code is printed in the Job Log section of the SYSOUT listing, following the Allocation messages for each step. It is essential that you examine the output of each job to ensure that the codes you received for each step match those expected. If you receive an unexpected code, it probably means an error has occurred during execution of the job which must be corrected, and the job rerun, before you proceed. The SYSOUT listings can be found in the host Operating System file assigned to the printer device address as specified in the Hercules' configuration file. When you use the Hercules configuration files included in the installation objects archive, the file will be located in the mvs directory and will be named prt00e.txt. You can view this file with a text viewer or editor while Hercules is still running. The current version of Hercules protects the files assigned to its emulated devices by making them read-only access, which will prevent them from being modified by another program while Hercules is running. The completion code is listed in a message with the prefix IEF142I, so you can find the completion code by searching for this string. As an alternative, I have included a REXX script in the installation objects archive - condcode.rexx - which you may use to display the step completion codes for any job. If you do not already have REXX installed on your computer, you can easily find a free version to download; search for Regina, which is the REXX interpreter that I use. As I write this it is available for many Operating System platforms on SourceForge @ https://regina-rexx.sourceforge.io/.
On Linux the command line syntax for the script is:
./condcode.rexx <print file name> <MVS job name>
On Windows the command line syntax for the script is:
condcode.rexx <print file name> <MVS job name>
On macOS, I have been told that you need to use the command:
/bin/sh ./condcode.rexx <print file name> <MVS job name>
If you are following the directory structure I have suggested, the program should be executed from the mvs directory. The output can also be redirected to a file, a printer, or filtered to another program, such as more. Any step with a completion code other than 0000 will be indicated by the inclusion of "<--" to the right of the completion code. Remember that a non-zero completion code may be acceptable for a particular step; all acceptable and expected codes will be listed in these instructions.
The REXX script may be used after you have completed building your target MVS system for use on your computer to check the completion codes of jobs that you write and submit. The REXX script includes code to enable searching for some special jobs that will be submitted in later steps, but this code will not impede your use of the script for later use.
Again you will be using a slightly different configuration from before. The hardware environment is defined in the Hercules configuration file sysgen.cnf, which is located in the conf directory. The schematic representation of that configuration is:
If you have examined the Hercules configuration file in the conf directory (from the installation objects archive), you will notice that this graphic doesn't quite match the hardware defined in the configuration file, because the four DASD volumes at the bottom are not present in the configuration file. You should remember we had a similar situation in the last step, where we were building the distribution libraries on the SMP000 DASD volume. The reason is that the four volumes that we just created have not been initialized. In order to initialize them, they must be 'offline' to MVS. At IPL time, MVS will attempt to place all DASD volumes visible to it online. That would have caused an error with these volumes that are not initialized. Also, you may notice that the five DASD volumes from the previous steps are now located at slightly different unit addresses. The reason for this is that the MVS Starter System does not have 3350 DASD devices generated at seven consecutive unit addresses, so the seven 3350 DASD volumes are split between addresses on channel 1 and channel 2. It makes no difference to the operation of MVS what addresses the DASD volumes are mounted on, except that for any particular DASD volume type (2314, 3330, 3350, etc.) the volume must be mounted at an address which has been associated with that volume type during System Generation.
The purpose for each of the new volumes is:
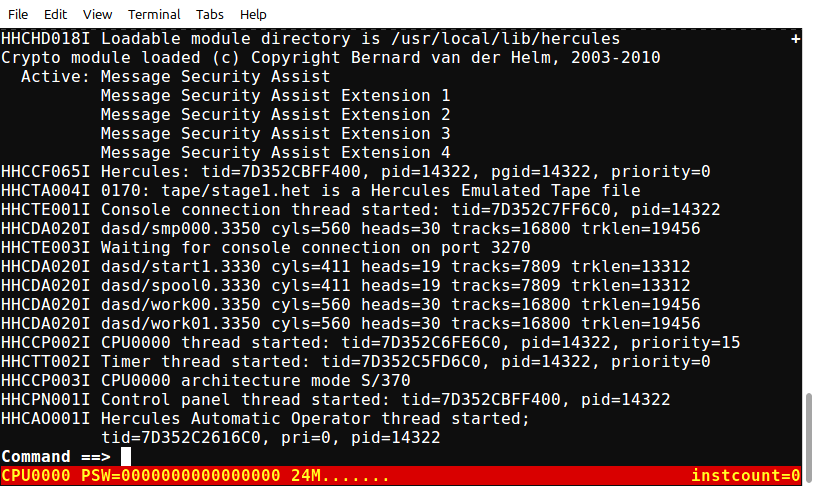
Open a terminal window (Linux) or a Command Prompt window (Windows) and start hercules by typing the command hercules -f conf/sysgen.cnf and pressing Enter:
Hercules will read the configuration file and wait for the console to connect at address x'01f'. From this point forward, I will refer to the window where Hercules is running as the Hercules console.
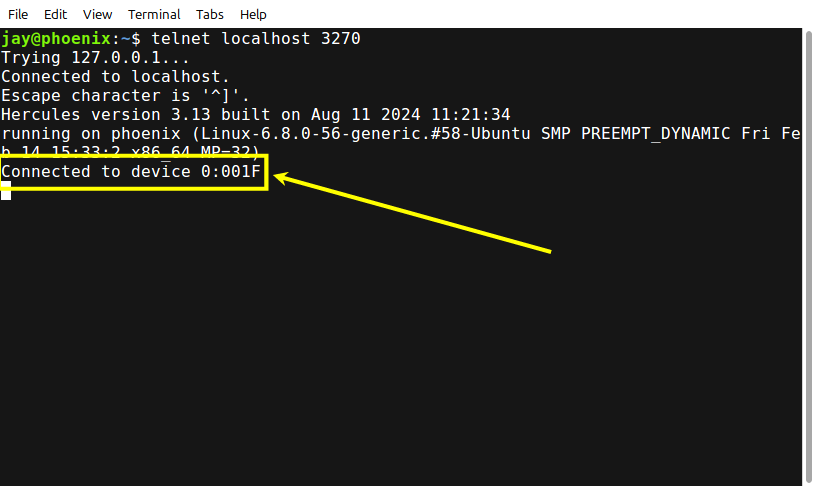
Start your telnet client and connect to 'localhost', port number 3270; if your telnet client does not store options, remember that you need 'local echo' set on. The telnet client window will show that it is connect to Hercules at address x'01f':
From this point forward, I will refer to the telnet client window as the MVS Starter System console.
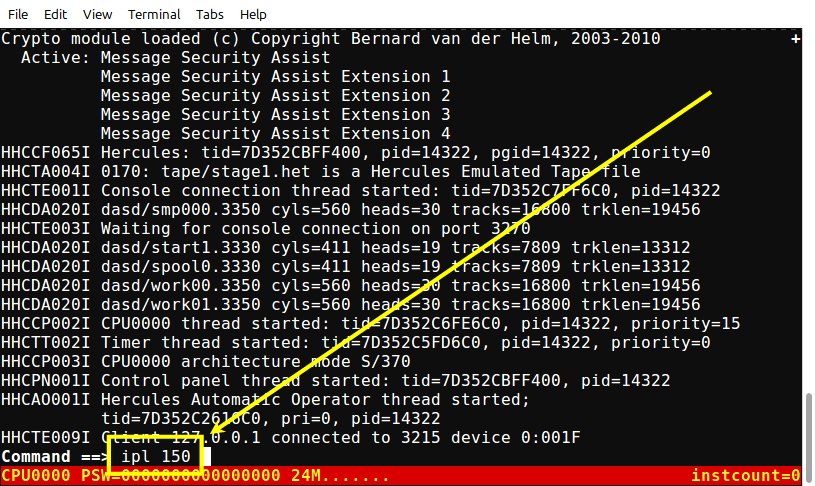
On the command line in the Hercules console, type the command ipl 150 and press Enter:
This will instruct Hercules to load the MVS 3.7 operating system from the 3330 DASD volume at x'150'.
When MVS IPLs, some users have noticed that Hercules logs many repetitive messages that seem like an error condition exists. In fact, MVS is testing the memory allocated to it by the emulator to see how much memory is available to it and these messages are a result of those tests. If they are a distraction to you, you may edit the Hercules configuration file and change the OSTAILOR NULL line to read OSTAILOR QUIET. You may also enter the Hercules command OSTAILOR QUIET on the command line, and the change will only affect the current session. Setting OSTAILOR QUIET will suppress all error condition log messages.
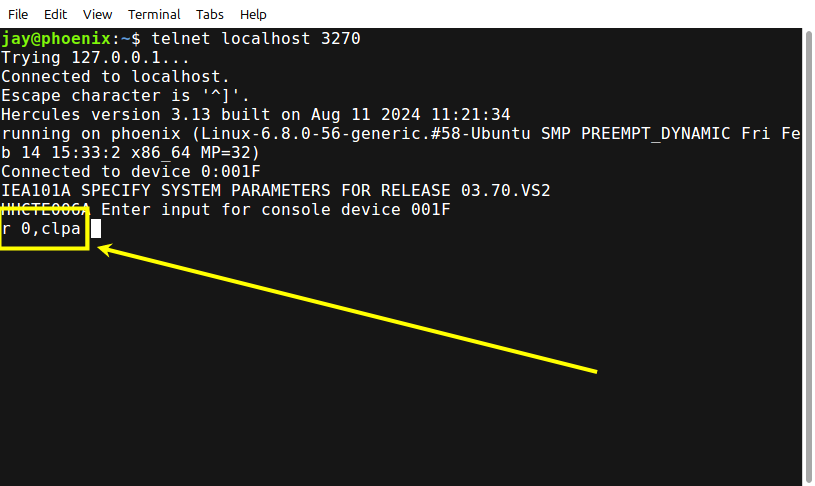
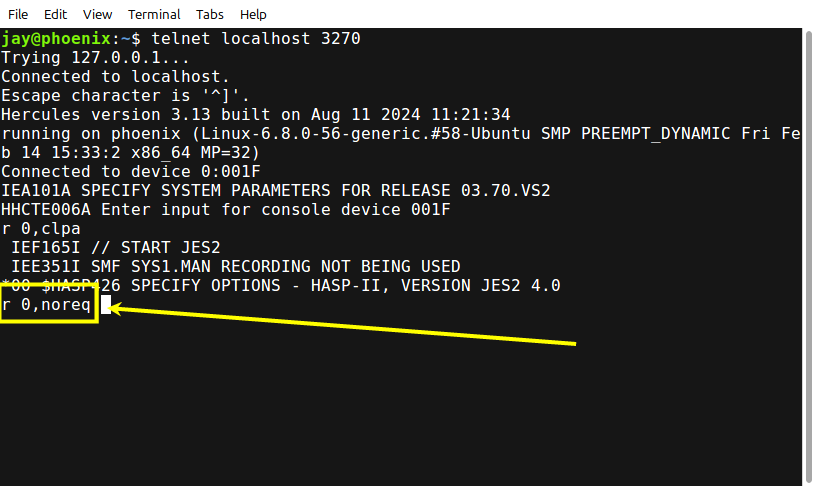
Since we rebuilt some load modules at the end of the prior step, it would be a good idea to rebuild the Link Pack Area, so for the first prompt on the MVS Starter System console - IEA101A SPECIFY SYSTEM PARAMETERS FOR RELEASE 03.70.VS2 - type r 0,clpa and press Enter:
We do not need to format the JES2 queue this time, so in response to the message - *00 $HASP426 SPECIFY OPTIONS - HASP-II, VERSION JES2 4.0 - type r 0,noreq and press Enter:
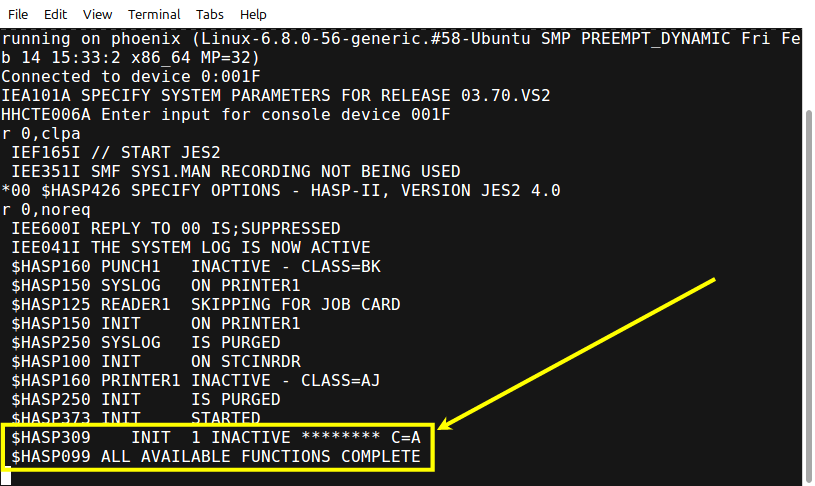
You may remember that noreq instructs JES2 to begin operating immediately, without waiting for the operator to enter a start ($S) command.
You may remember from the prior step, there are three initiators started when the MVS Starter System is IPLed. It will make things simpler for you to manage during this step if there is only one job executing at a time, so we will stop two of the initiators. Not only will it be simpler for you to manage the process, but most of the jobs we will be running as we build your target MVS 3.8j system must run serially. That is, each job must complete, you must ensure that every step in the completed job finished with an expected completion code, and only then will you submit the next job for execution.
To terminate all but one initiator, on the MVS Starter System console, type the command $pi2-3 and press Enter:
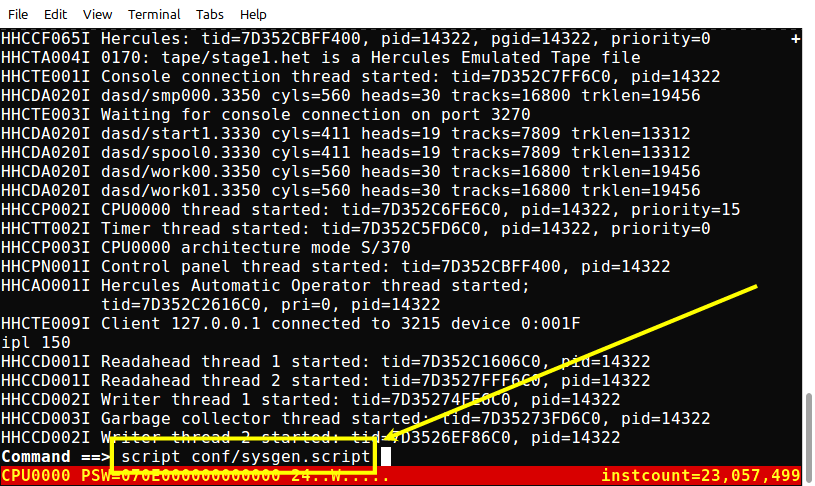
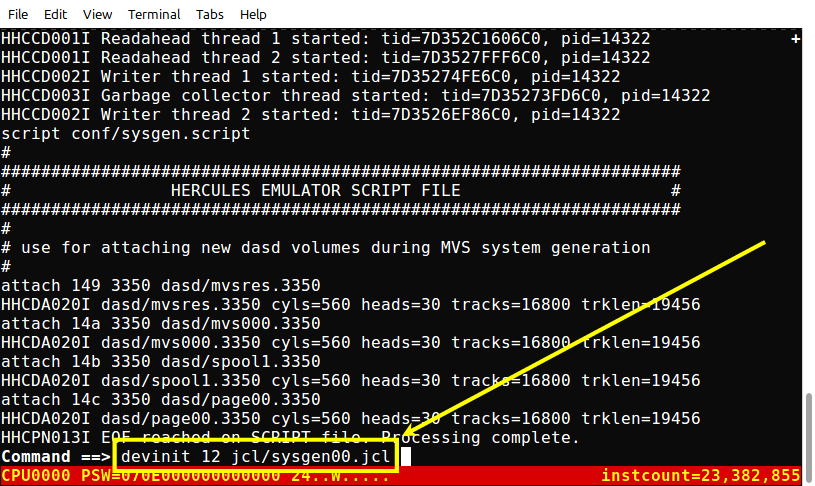
At this point the system is ready to process jobs and service operator commands. However, the four DASD volumes we created above are not defined in the Hercules configuration file (sysgen.cnf in the conf directory). As with the previous step where we built the distribution libraries, I have provided a Hercules script to add the drives to the 'active' configuration. On the command line on the Hercules console, type the command script conf/sysgen.script and press Enter:
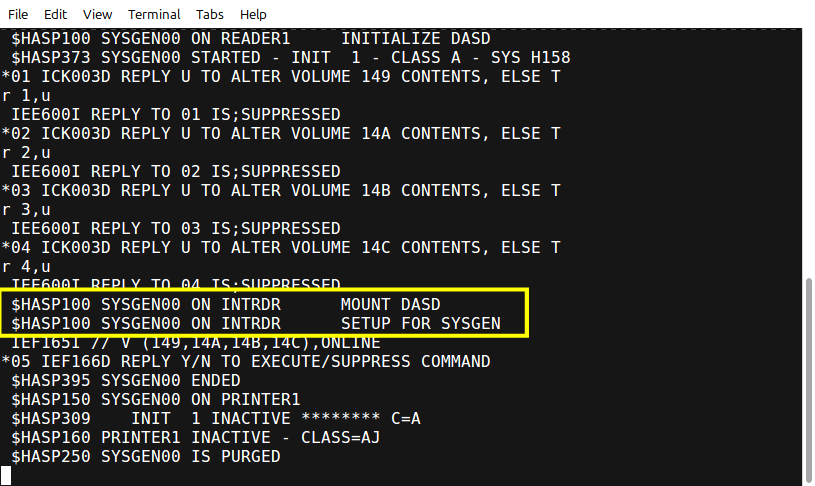
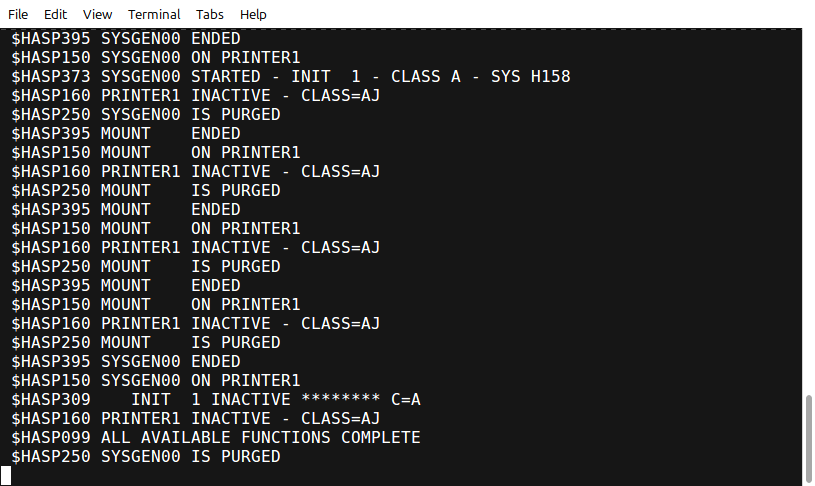
The first task is to initialize the four DASD volumes that we just created on which the new MVS 3.8j system will be built. The jobstream to complete that task - SYSGEN00 - is contained in the file sysgen00.jcl located in the jcl directory.
On the command line on the Hercules console, type the command devinit 12 jcl/sysgen00.jcl and press Enter:
The job will begin execution and you will see JES2 messages related to the job on the MVS Starter System console. As with the prior step where we built new volumes, you will be asked to confirm that you agree to the initialization of the DASD volumes; you will reply U to proceed. On the MVS Starter System console, type the command r 1,U and press Enter:
Remember that the response number shown in the screen captures here may differ from the response numbers presented on your system.
There are four DASD volumes to initialize, so you will need to respond to the ICK003D message a total of four times.
As soon as the four DASD volumes are initialized, SYSGEN00 submits a second jobstream through the internal reader. This job will have the same name - SYSGEN00 - although it is a completely separate job.
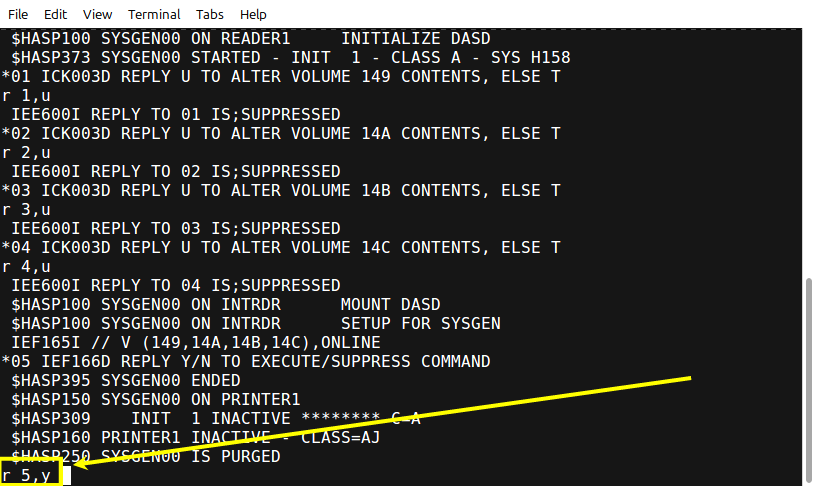
As with the prior step, it is also necessary to vary the new DASD volumes online to MVS and mount them with the proper storage class, which is PRIVATE to prevent any datasets other than those we specifically want to go on those volumes from being created there by MVS. The commands to vary devices online (or offline) and to mount the volumes at those addresses with particular storage attributes are MVS operator commands. I have simplified the process by placing the commands in a Job Control Language statement in the SYSGEN00 job. But the MVS Starter System is set up to not execute operator commands embedded in a jobstream without operator confirmation. So you will receive message IEF166D for each of the five commands; you will need to respond Y for the command to be executed. On the MVS Starter System console, type the command r 5,Y and press Enter:
There are a total of five commands (a vary command, followed by four mount commands), so you will need to enter Y five times.
SYSGEN00 takes 0.26 minutes to complete. Remember there were two jobs named SYSGEN00, so I am including the execution time for both in this total and the expected condition codes for all steps of the two SYSGEN00 jobs are:
The IEHPROGM step of SYSGEN00 attempts to delete a dataset that we will be creating in the following steps in case of a need to rerun this job. The dataset is not present on the volume the first time SYSGEN00 is run, so the return code 0008 is expected. If they had been present and successfully deleted, then the expected return code is 0000.
The remaining steps are setting up the environment to build the new system and must receive return codes of 0000. If you are interested in the details of what each step is doing, I have placed numerous comments in the jobstream explaining the reason for each step.
You may remember from building the distribution libraries, you can also check on the completion of the mount commands:
The Stage 1 jobstream - SYSGEN01 (contained in file sysgen01.jcl in the jcl directory) - contains all of the specifications for the hardware configuration of the new MVS 3.8j system to be built. The Stage 1 deck also specifies many other parameters, such as operating modes of some hardware components, locations and sizes for datasets to be created and populated, esoteric names for devices, etc.
If you have utilized the previous version of my instructions to build MVS 3.8j, you should note that I have made one change to the hardware configuration. Because there is now a lot of interest in running MVS with multiple CPUs, I have coded ACRCODE=YES on the CTLPG macro to generate an MVS system that will take advantage of multiple hardware CPUs (when that is enabled in the Hercules configuration file).
A note about multiple CPUs under Hercules/MVS
Setting ACRCODE=YES causes the code to be included in the MVS nucleus to manage multiple CPUs when MVS is running. It does nothing to the hardware side of the equation. You will need to modify the Hercules configuration file to enable additional CPUs to be emulated for the hardware. I have not yet ventured there, and don't know if I ever will. But if you want to explore that, you will need to change the Hercules configuration file settings to enable multiple CPU emulation. Go back to www.hercules-390.eu and research the options necessary, then make the changes to your Hercules configuration file - mvs.cnf in the conf directory - and see what works for you on your host Operating System. But don't make these changes until you have your MVS system complete and running as it should.
If you know of some changes you would like to make, you should feel free to edit the configuration, but be aware that you may create errors that you will need to resolve before you proceed past this step.
Setting time zone in the Stage 1 deck
Another item that may be set in the CTLPG is on the last line of operands for that macro: TZ=(W,5) ONE HOUR WEST OF GMT. The values inside the parentheses establish the time zone that MVS will set and may be changed to reflect the offset (direction, E or W, and number of hours) from GMT where you are located. There is also a parameter that we will set up in the system settings in the job SYSGEN04 below, that should allow you to override this setting.
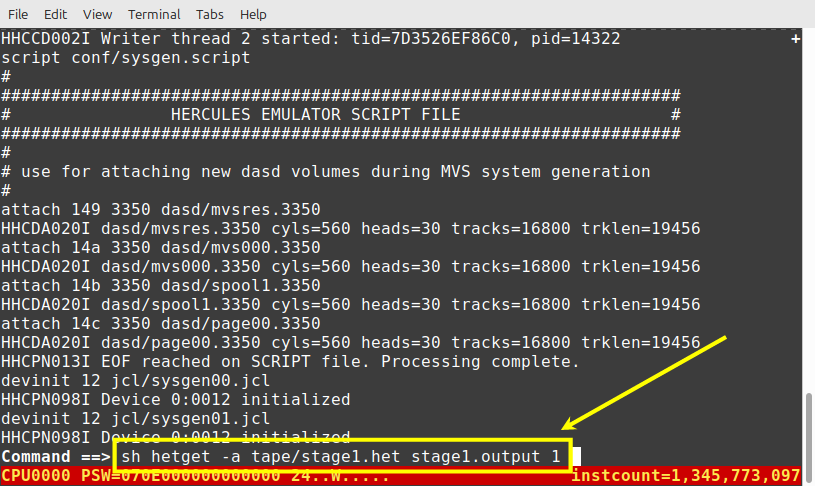
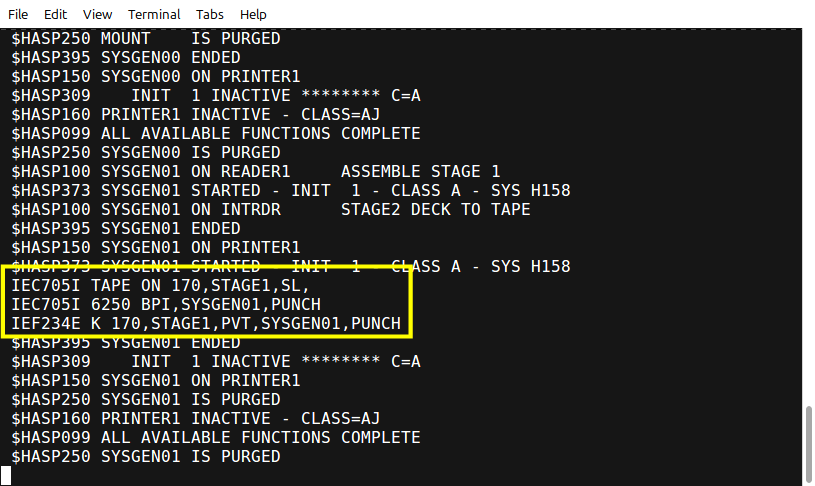
On the command line on the Hercules console, type the command devinit 12 jcl/sysgen01.jcl and press Enter:
Like the previous job, if there are no serious errors, SYSGEN01 submits a second jobstream through the internal reader. This job will have the same name - SYSGEN01 - although it is a completely separate job and its sole purpose is to transfer the output generated from processing the Stage 1 configuration onto a host Operating System file.
Another change I have made in this revision of the instructions is how I transfer the card images generated by this job to the host Operating System. There have been quite a few reports over several years of a very intermittent bug in Hercules that results in mangled output to an emulated card punch device when this job is run on the MVS Starter System under Hercules. I researched as I was doing this revision and, although the problem was last mentioned in 2018, there doesn't seem to be any success in tracking down and resolving the bug. So I have modified this job from prior versions to use an emulated tape drive to transfer the images out to the host Operating System file.
In the installation objects archive there is a blank tape image - stage1.het in the tape directory. I set up the Hercules configuration file - sysgen.cnf in the conf directory - so that when you IPLed the system, the system started with this blank tape image mounted at address x'170'. So MVS will allow SYSGEN01 to use the tape without direct intervention from you, which you can see in the output messages for the job on the MVS Starter System console:
If you rerun this job, you will receive a request to mount this tape, which you can do by using the Hercules command devinit 170 tape/stage1.het on the Hercules command console.
SYSGEN01 takes 0.25 minutes to complete. Expected condition codes are:
The CLEANUP step attempts to delete the dataset which will hold the output from the job; it is not there when we start, so the return code 0008 is expected. If you need to rerun the job, you should expect a return code of 0000 for this step. You may rerun this job as many times as you desire, or are needed to remove all errors discovered during the assembly. If you are using the jobstream as I have distributed it, there are no errors to be resolved.
If you look at the printed output from this step, in the diagnostics listing from the assembler, you should see a single MNOTE issued at statement 2046. The severity of this error is 0, so it is only an informational message, specifically stating that all tables will be included for the 3800 printing subsystem. This is expected and normal; no corrective action needs to be taken to resolve this.
If you do make changes to the configuration and serious errors occur during the assembly which must be corrected, the assembly will be terminated prematurely and a Stage 2 deck will not be created. If there are serious errors, the secondary job will not be submitted, so you will not even see the steps listed for the IEBGENER and PUNCH steps. The punch step transfers the card images produced when the Stage 1 deck is assembled to the file attached to the emulated tape drive at address x'170'. This file may be found in the tape directory and its name is stage1.het.
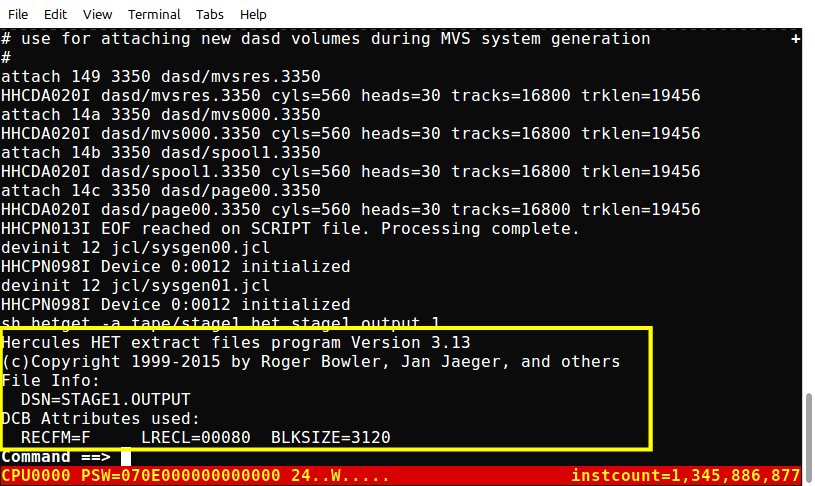
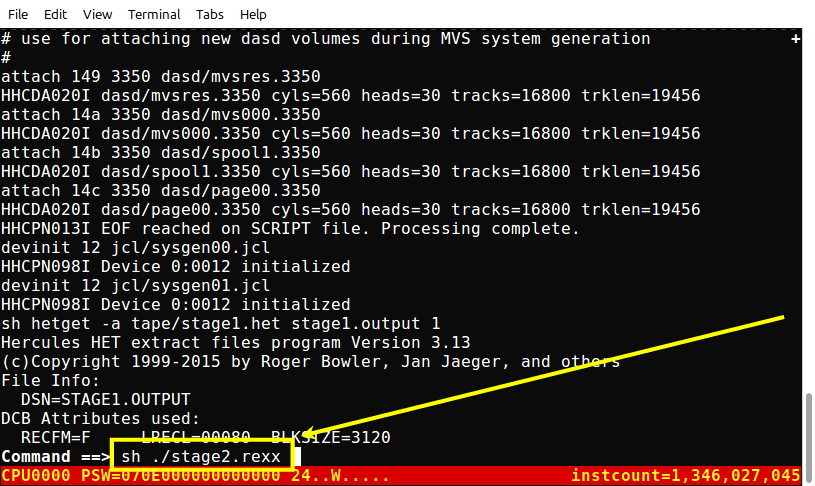
The tape image file contains a standard labeled MVS tape image, written in EBCDIC, so it is impossible to access the contents directly. There is a utility included with Hercules that will read an emulated tape image, extract a particular dataset from the tape (should there be more than one; in this case there is only one), convert the characters from EBCDIC to ASCII, and write the contents into a file on the host Operating System. Open a terminal window (Linux) or command window (Windows) - you probably already have one open to run the condcode script to check step completion codes, so you can use that one - and type the command hetget -a tape/stage1.het stage1.output 1:
The '-a' in the command tells the utility to convert the data to ASCII. You should be executing this command from the mvs directory, so the 'tape/stage1.het' is the input tape image. The contents of the tape dataset are to be written to the host Operating System file 'stage1.output' in the current (mvs) directory. The sequence number of the file on the tape to retrieve is 1. The output from the command shows that the file has been retrieved successfully:
The output from job SYSGEN01 is a set of six generated jobstreams that will need to be submitted to MVS to continue the System Generation process. However, there are some changes that need to be made to the jobstreams before they are submitted.
I am aware that other folks who have done this process have taken the approach to modify the System Generation macros, which results in these changes already being made when the card images are produced. My approach is to leave the macros as they are distributed and make the changes at this point, when the card images have been transferred to a text file on the host operating system (LINUX, Windows, etc.).
You may make the changes manually with your favorite text editor - joe, vi, etc. - but I have also provided a couple of scripts that will make the changes for you. To make the changes manually, copy the contents of the file stage1.output to stage2.jcl and place the stage2.jcl file in the jcl directory; then edit the stage2.jcl file to make the changes. If you utilize my scripts (which are described in the highlighted section below), execution of the script will copy the contents of stage1.output to stage2.jcl in the jcl directory as it makes the changes.
21 April 2021 Note: The final step of the sixth jobstream - STEPZ2 - copies a card image embedded in the jobstream to the member SYSCATLG of dataset SYS1.NUCLEUS. This record contains four hex characters in positions 7 through 10 of the card [x'00', x'0b', x'00', x'00']. It was pointed out to me that the Notepad editor will mangle these hex digits. If you edit these jobstreams manually, ensure that the editor you use does not alter these characters.
The file contains the six jobstreams which generate the MVS 3.8 system, each preceded by a JOB card generated during the Stage 1 processing. The following changes need to be made to the jobs before the may be submitted for processing:
For jobs 1 through 5, add a continuation card immediately after the JOB card (add a comma onto the rightmost end of the JOB card and insert a card following the JOB card with // in the first 2 columns). Note that job 6 already has a continuation card for the JOB card.
For jobs 1 through 5, add TYPRUN=HOLD on the newly added continuation card of the JOB card beginning anywhere in columns 2 through 16. Note that job 6 already has TYPRUN=HOLD on the continuation card.
For all jobs, add a comma and TIME=1439 following the TYPRUN=HOLD on the continuation of the JOB card.
For all 6 jobs, insert a new card immediately after the continuation card of the JOB card. Beginning in column 1 of this inserted blank card, enter
/*JOBPARM LINES=100
For jobs 1 through 5, insert another new card immediately after the card just inserted (the JOBPARM card). Beginning in column 1 of this inserted blank card, enter
//JOBCAT DD DSN=SYS1.VSAM.MASTER.CATALOG,DISP=SHR
In job 6, locate STEPY (which is the third from the final step in the deck) and change the program executed from IDCAMS to IEFBR14:
//STEPY EXEC PGM=IEFBR14,REGION=512K
Throughout the jobstreams, whereever there is an EXPDT=99350 parameter on a DD statement, change it to EXPDT=00000.
Depending upon your personal preference, you may add a job terminator statement (//) at the end of the generated deck.
The reasons for these changes are:
the TYPRUN=HOLD on jobs 1 through 6 prevent the jobs from executing until specifically released by you. Each job in the Stage 2 deck must be executed sequentially, one after the other. You must verify that all steps of each job have executed correctly before releasing the next job to run.
On slower computer systems, the lack of TIME=1439 may cause one or more of the jobs to abnormally terminate because the default job time limit is reached before the job has had time to complete. The TIME=1439 eliminates this time restriction.
The JOBPARM card is simply to prevent some warning messages. It eliminates messages displayed on the MVS console by JES2 for jobs which generate very large amounts of printed output. The LINES=100 parameter tells JES2 to expect at least 100,000 lines of output from the job.
The JOBCAT card is required because the datasets the jobs are expecting to find catalogued in the starter system's Master Catalog are in fact catalogued in the User Catalog: SYS1.VSAM.MASTER.CATALOG. Without this card the Starter System, where the jobs will be executing, cannot find the datasets.
STEPY in job 6 exports (deletes) the User Catalog (in which all the datasets you have been operating on during the System Generation are cataloged) from the Master Catalog of the starter system. This is totally unnecessary for the generated system's correct operation. If you allow this step to run and later need convenient access to the datasets from the starter system, you will have to build and run a job to re-connect the catalog. It is far better to just leave the catalog connected.
The EXPDT=99350, which was generated by the Stage 1 processing, creates all libraries on the target system to be un-expired until the date 99350 (way in the future at the time MVS 3.8 was in commercial use). There is nothing intrinsically wrong with this, except that you will have to reply to about 200 prompts to allow the Stage 2 jobs to write into the datasets as they build the system. Changing the EXPDT to a value of 00000 eliminates these prompts and will make life much simpler for you.
Since there has been some confusion
about these instructions to those unfamiliar with Job Control Language, I have
added a "before" and "after" comparison viewable at: stage1.output-stage2.jcl.pdf. If you
are unfamiliar with Job Control Language, I strongly recommend that you locate a
good reference/textbook, since a thorough understanding of JCL is required to
successfully utilize MVS. My recommendation would be System/370 Job
Control Language by Gary DeWard Brown, preferably an edition prior to the
fourth, which concentrates far too much on modern facilities and drops
discussion of some of the features which are required on MVS 3.8j. You can
find this and other JCL books at larger university libraries. You local
library may be able to acquire books for you through WorldCat/Interlibrary
Loan. You might
also check for used copies reasonably priced at ABE
books. You can also download a PDF of part six of The
Operating Systems Handbook by Bob DuCHARME, which will give you a good
overview of MVS.
I have also written a simple awk script that will make these changes - stage2.awk
- and I have translated it into a REXX script - stage2.rexx - both are
included in the installation objects archive. If you intend to do anything with MVS after your system is generated
you will need to understand JCL and I recommend you start learning
by making the changes in a text editor.
To use the awk script: gawk -f stage2.awk stage1.output >
jcl/stage2.jcl.
To use the REXX script: stage2.rexx.
Note: It is only necessary to execute one of the scripts; either will produce the same
results.
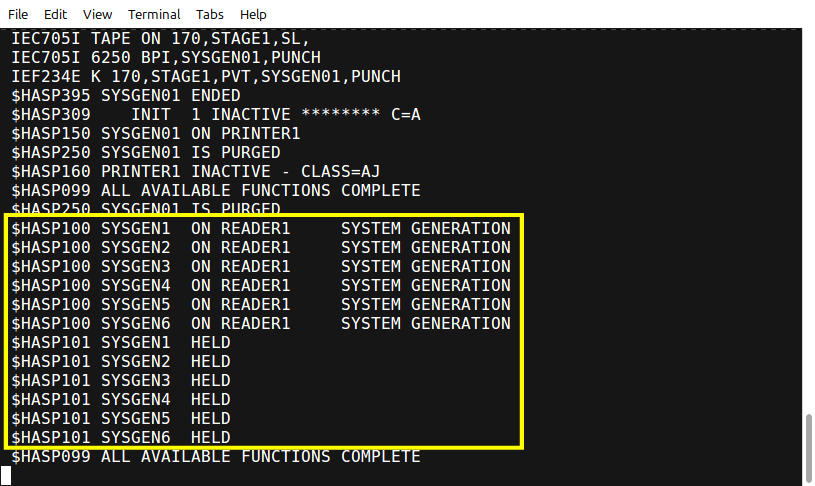
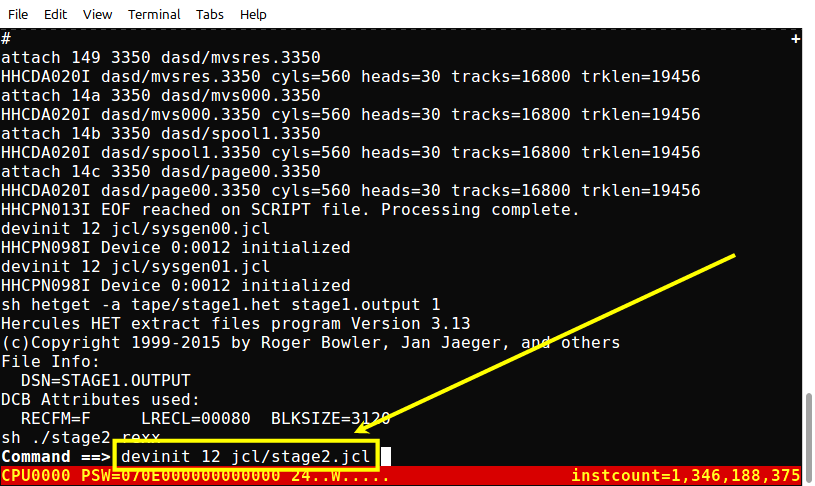
Submit the Stage 2 jobstreams to the reader. On the command line on the Hercules console, type the command devinit 12 jcl/stage2.jcl and press Enter:
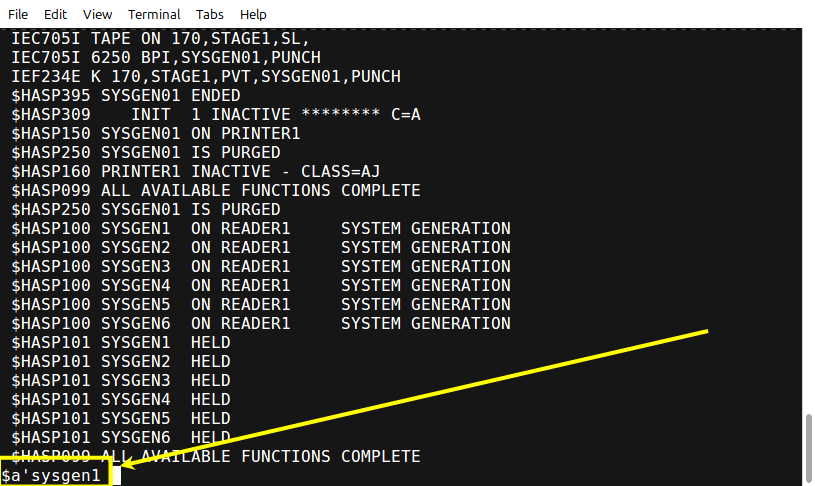
The jobs will be read in by the Starter System and placed on hold:
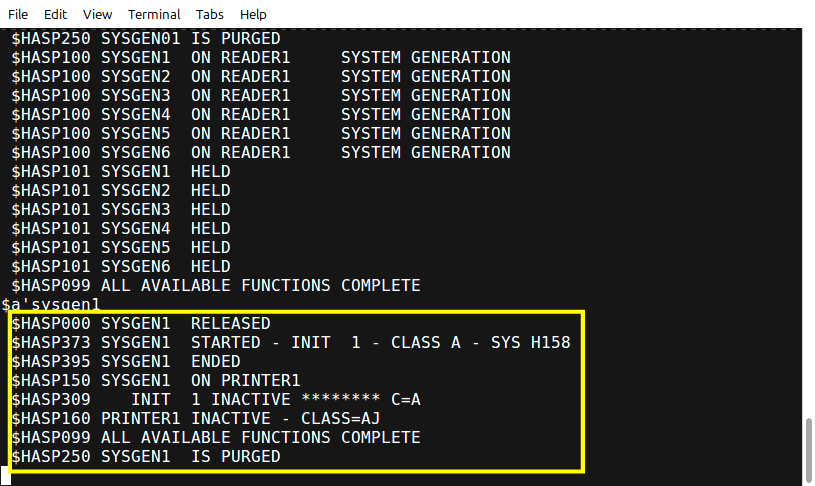
A 'held' job is one that is on the JES2 queue, ready for processing when it is released by the operator for MVS to begin execution. To release the first job for processing, on the MVS Starter System console type the JES2 command: $a'sysgen1' and press Enter:
After each job is completed, you must check the output to ensure that there are no significant errors and the completion codes received are those expected. Then release the next job in sequence - sysgen2, sysgen3, sysgen4, sysgen5, and sysgen6 - using the $a command shown above. Since the output from one or more steps in each job is usually required as input in the succeeding job, it is imperative that only one job be processed at a time, that all steps of each job are run, and that there are no unexpected completion codes.
SYSGEN1 takes 0.25 minute to run. The expected completion codes are:
The completion code of 0004 in the steps above indicate warning messages were issued during the steps. These warnings are expected and acceptable.
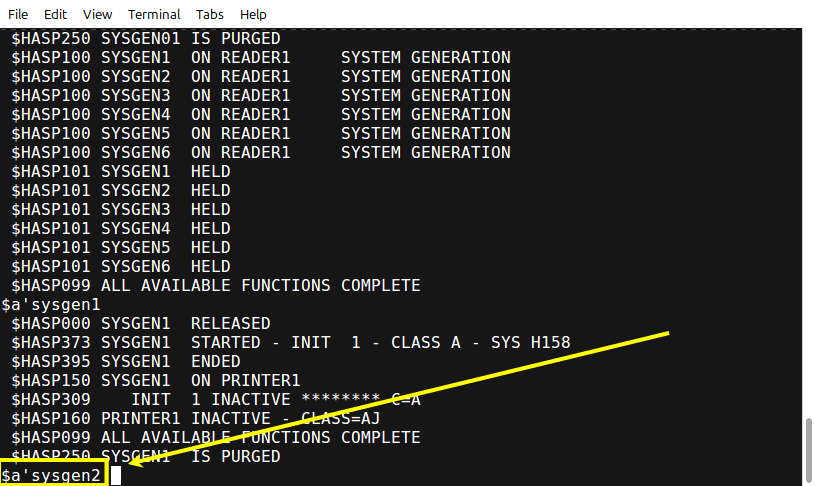
To release the second job for processing, on the MVS Starter System console type the JES2 command: $a'sysgen2' and press Enter:
SYSGEN2 takes 0.14 minute to run. The expected completion codes are:
The completion code of 0004 in the steps above indicate warning messages were issued during the steps. These warnings are expected and acceptable.
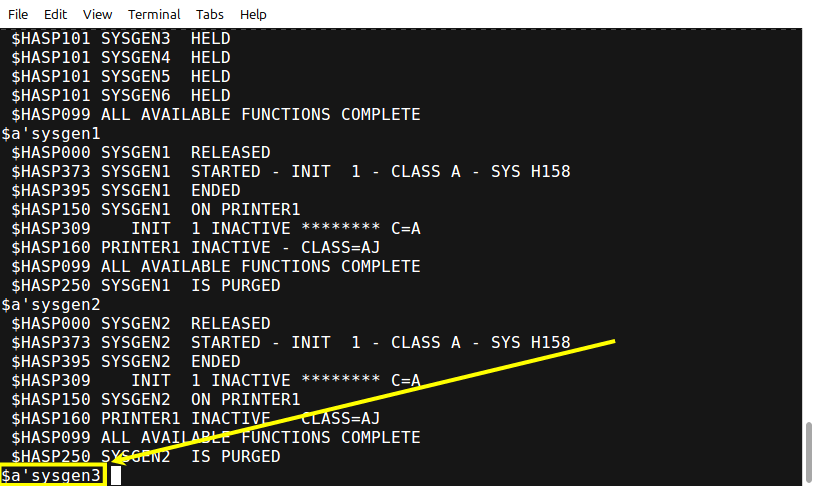
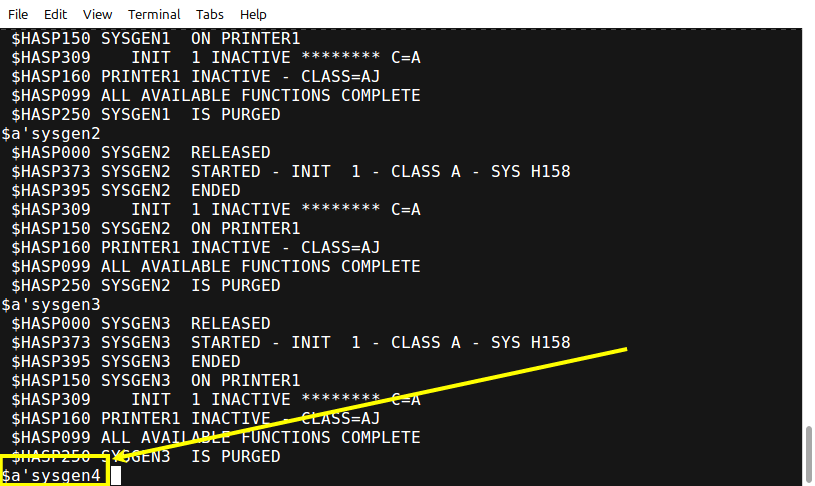
To release the third job for processing, on the MVS Starter System console type the JES2 command: $a'sysgen3' and press Enter:
SYSGEN3 takes 0.01 minute to run. The expected completion codes are:
To release the fourth job for processing, on the MVS Starter System console type the JES2 command: $a'sysgen4' and press Enter:
SYSGEN4 takes 0.08 minute to run. The expected completion codes are:
To release the fifth job for processing, on the MVS Starter System console type the JES2 command: $a'sysgen5' and press Enter:
SYSGEN5 takes 0.26 minute to run. The expected completion codes are:
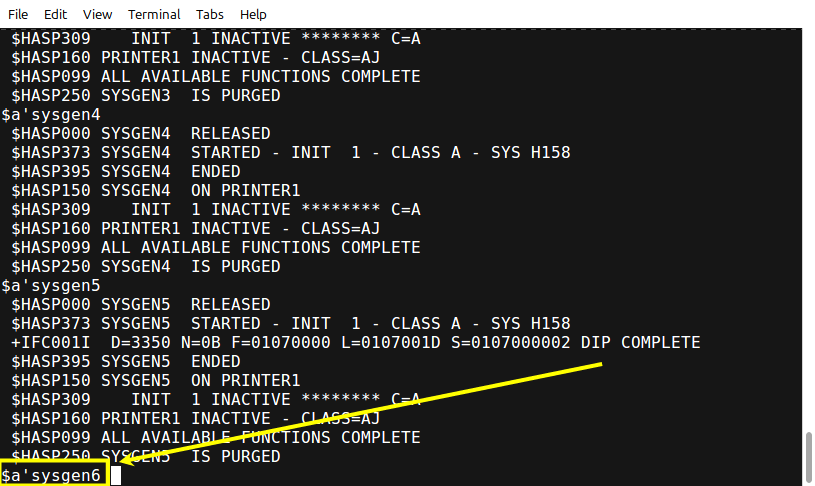
To release the sixth job for processing, on the MVS Starter System console type the JES2 command: $a'sysgen6' and press Enter:
SYSGEN6 takes 0.01 minute to run. The expected completion codes are:
The completion code of 0008 in the STEPZ1 above is caused by attempting to delete a member from a Partitioned Dataset that doesn't exist. This is expected and acceptable.
If you are at all curious, the 0004 warnings in the early jobs are generated on Linkage Editor control statements where external modules have not been found to complete the linking process. Since part of what we are building are libraries of code that will be available to be linked later into other load modules, this is normal and expected in these steps.
When the second step of SYSGEN5 executes you will see a message on the console similar to:
+IFC001I D=3350 N=0B F=00010001 L=00010018 S=0001000102 DIP COMPLETE
which is issued when SYS1.LOGREC is initialized. This does not indicate an error has occurred. Remember, for all messages issued by MVS and its components there is a unique message identifier that appears at the beginning of the message line. If the last character of the message identifier is 'I', then the message is informational. If the last character of the message identifier is 'D', then a decision must be made by the operator and action taken to resolve a problem.
When the distribution libraries are built, the elements of JES2 are loaded into libraries, but it is necessary to use the link editor to build the JES2 load modules. Also, the parameters required for JES2 operation need to be set up in SYS1.PARMLIB and a procedure to execute JES2 must be created in SYS1.PROCLIB.
The jobstream to link JES2 is included in the Base Program Directory document.
Volker Bandke posted a combined jobstream to the Hercules MVS group that includes the two link steps for JES2 from this document, and also sets up both the parmlib and proclib members. Over time I have incorporated changes suggested on the Hercules MVS discussion group into the options included in the SYS1.PARMLIB member; the result is the parmlib member that is created in step 3 of job SYSGEN02.
Tommy Sprinkle has made available the JES2 parameters (and other SYS1.PARMLIB members) he used in a production system. For more information and to download a copy of his parameters, see https://www.tommysprinkle.com/mvs/parmlib.html. If you decide to change some of the parameters for your system his information will be extremely helpful. You might also acquire a copy of the manual SC23-0046, System Programming Library: JES2 Installation, Initialization, and Tuning from a source such as http://bitsavers.trailing-edge.com/.
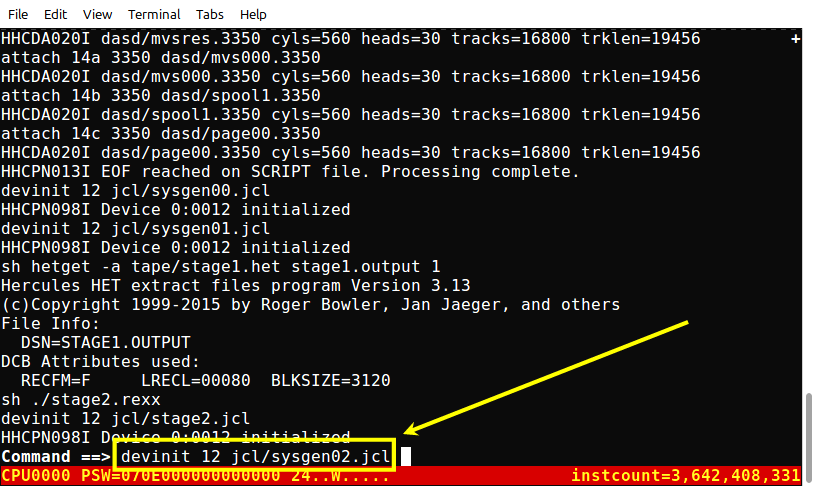
On the command line on the Hercules console, type the command devinit 12 jcl/sysgen02.jcl and press Enter:
SYSGEN02 takes 0.01 minute to run. The expected completion codes are:
Although technically the process of System Generation is complete at
this point, the generated system is not really ready to IPL until a few more
basic enhancements are applied.
In the steps following below we will be setting up the SMP datasets, which will allow any future modifications to the system to be performed by the System Modification Program. The first thing that will be loaded into the SMP datasets is a copy of the Stage 2 deck used above and the JCL used to install JES2. Then we will be installing some user modifications (USERMODs) in several jobs. You may later want to install additional user modifications, and having this system set up properly is the key to success in any maintenance to the target MVS system we are building.
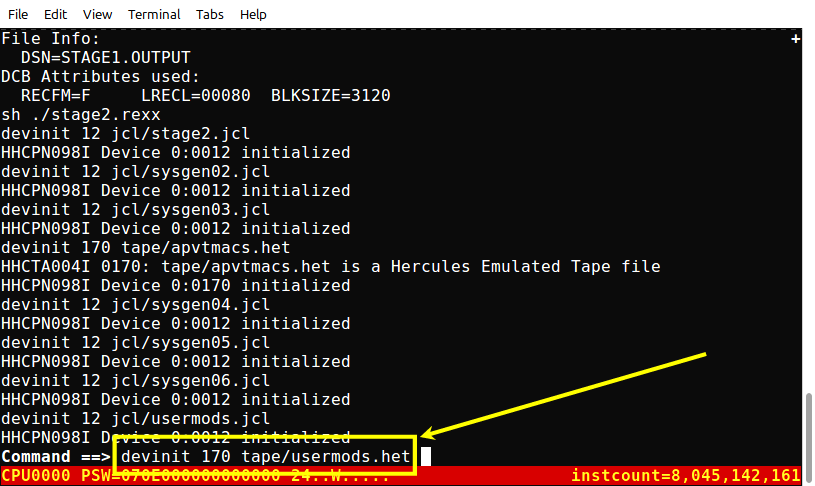
Some of the SMP procedures rely upon a large macro library that is not present in either the MVS Starter System or the basic distribution materials for MVS 3.8j. The library of macros was created by extracting unique macros (not found in other MVS 3.8j macro libraries) that were found in a library in the MVS 3.8j optional materials tapes, which some people ordered from IBM (reference: MVS Optional Materials Tapes). The contents of the macro library is large and, if submitted through a card image file, would overwhelm the small JES2 spool on the MVS Starter System. So I have provided a tape image in the installation objects archive which contains, in IEBUPDTE format, the statements necessary to create the macro library.
The job SYSGEN03 will read this tape and create the library - SYS1.APVTMACS - on the target MVS 3.8j system we are building.
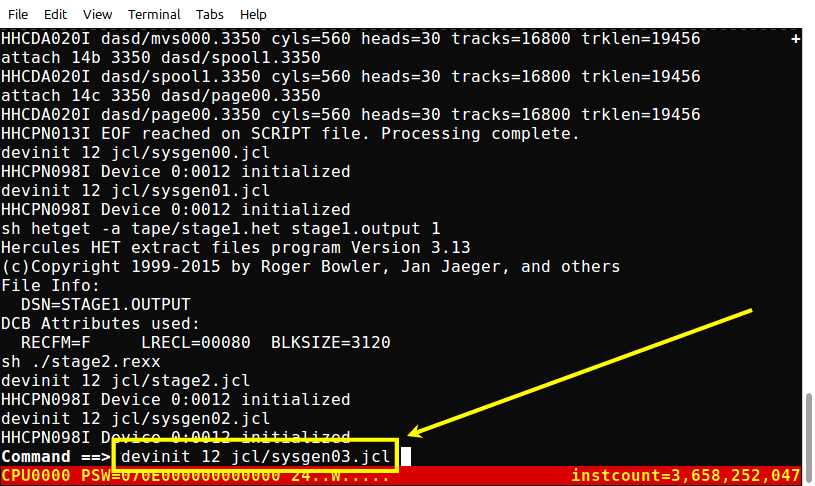
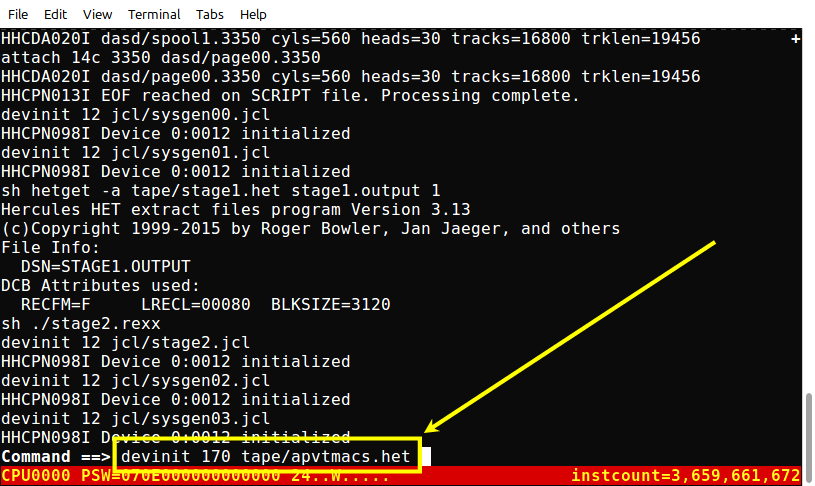
On the command line on the Hercules console, type the command devinit 12 jcl/sysgen03.jcl and press Enter:
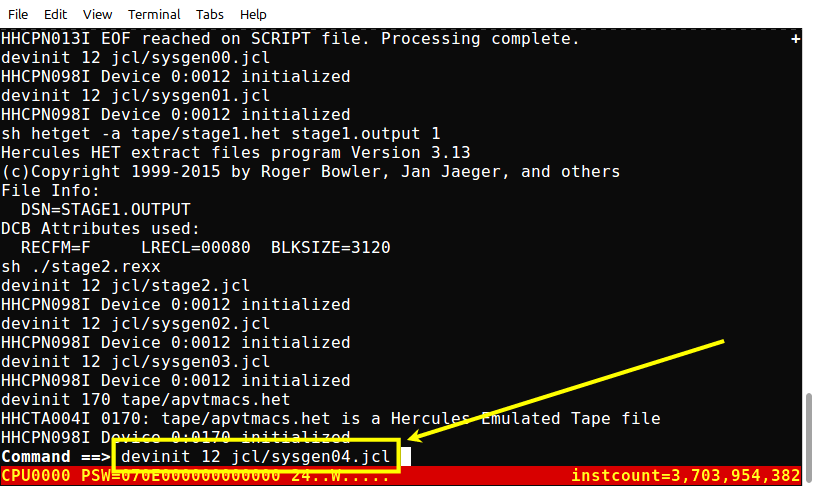
The job will request a tape, so on the command line on the Hercules console, type the command devinit 170 tape/apvtmacs.het and press Enter:
SYSGEN03 takes 0.09 minutes to run. The expected completion code for the single step is:
The jobstream SYSGEN04 (contained in file sysgen04.jcl in the jcl directory) performs the following tasks:
During IPL, the values coded in IEASYS00 are used to customize the MVS 3.8j environment. Several of the parameters contained in IEASYS00 are simply pointers to other members of SYS1.PARMLIB. Many of the parameters may be overridden at IPL time, but the IPL process is greatly simplified if the most frequently desired settings are coded in this member.
IEAAPF00 specifies the load module libraries from which authorized programs may be executed.
SMFPRM00 contains parameters related to System Management Facility, which collects and records information about MVS and the programs that are executed under its control.
IEALOD00 specifies load modules that contain part of the operating code for MVS which are to be loaded and fixed in real storage. These modules are so frequently executed, fixing them in storage can improve the performance of the system.
COMMND00 contains operator commands which are to be executed automatically upon the completion of the IPL.
SETPFK00 contains settings for the console Program Function Keys. Commands associated with the PFKeys here may be executed simply by pressing the associated PFK on the MVS console.
LNKLST00 contains load module libraries which are to be automatically searched for load modules executed in batch or under TSO.
VATLST00 specifies the Volume Attributes to be associated with all regularly used DASD volumes.
PARMTZ specifies the offset from GMT to establish local time. I have set mine up for the Central Time zone in the United States; you may wish to modify this for your geographic location before you submit this jobstream.
This library was created by SYSGEN00 to provide local SVC modules during System Generation. It is no longer needed, so this is a good place to delete it.
SYS1.LINKLIB is the main load module library and is created during System Generation. However, it is not a good idea to add your own load modules to that library, so we create SYS2.LINKLIB to have a place set up to receive any programs you write locally.
Likewise, SYS1.PROCLIB is the system's catalogued procedure library, but it is not a good idea to add your own catalogued procedures to that library, so we create SYS2.PROCLIB for local use.
As SYS1.LINKLIB is to batch load modules, SYS1.CMDLIB is to TSO load modules. SYS2.CMDLIB is created to be a repository for your local TSO load modules.
SYS2.HELP corresponds to SYS1.HELP - SYS2.HELP will contain 'help' (syntax and operand usage instructions) for your local TSO load modules.
Although a basic JES2 catalogued procedure member was created by SYSGEN02, a more customized one is created here, specifically to utilize/incorporate the SYS2.PROCLIB allocated (three bullets) above.
There are three dump datasets allocated on MVSRES to receive system dumps when a catastrophic error occurs. If all three of these fill up (are used) the system will not be able to be started, so you need to be able to clear these datasets as they are used. This procedure, which may be started from the console, clears and initializes dump datasets.
When hardware errors occur, an entry is made in SYS1.LOGREC (the environmental error recorder dataset). This dataset will hold a finite number of entries. This procedure, which may be started from the console, clears SYS1.LOGREC.
When library (Partitioned) datasets receive many updates, they frequently become in need of reorganization. If left to the extreme, they may exhaust all of their extents. This procedure, which may be started from the console, can be used to compress any partitioned dataset, reclaiming unused extents.
These catalogued procedures are used to receive, assemble, assemble/link, and apply user modifications and PTFs.
We need these to use the System Modification Program to update the target system from the MVS Starter System.
This macro acquired from one of the datasets on the MVS3.8j optional materials tapes (MVS Optional Materials Tapes) is required for some USERMODs to assemble correctly.
These datasets are used to hold user modifications.
These datasets are used to record and track modifications to the target system.
Some catalogued procedures need control cards, and, since control cards cannot be included in catalogued procedures, we create this library to hold those type of datasets.
CLS is a short program (from CBT 430, file #300) that simply clears the screen for a TSO user. It is compiled into SYS2.CMDLIB with the HELP text placed into SYS2.HELP.
This program (from CBT 249, file #295) equates operator console commands to the Program Function Keys on MVS consoles. It is compiled into SYS2.LINKLIB and a procedure to execute the program is placed into SYS2.PROCLIB. In a previous step there was a START command set up for this program in COMMND00 and PFKey definitions were placed into SYS1.PARMLIB(SETPFK00).
This program may be used to display reminders or execute MVS operator commands on a scheduled or periodic basis. It is compiled into SYS2.LINKLIB and a procedure to execute the program is placed into SYS2.PROCLIB. In a previous job there was a START command set up for this program in COMMND00. A set of commands is placed into SYS2.CONTROL(ZTIMER) for use by the STARTed process to periodically clear JES2 queues of non-processed output.
This program is used from the console to relabel (clip) offline DASD volumes. It is compiled into SYS2.LINKLIB and a procedure to execute the program is placed into SYS2.PROCLIB.
The member containing the list is simply copied from another member supplied by IBM and could have been utilized as it was, but by creating a copy of the member contents, custom modifications may be made to the 'active' copy without losing the original set supplied by IBM.
It is necessary to load the specifications of the new system (acquired from the Stage 2 jobstreams which were stored on a work DASD volume) and JES2 so that future modifications may be properly integrated into the system.
In several cases, the members to be created already exist; in these cases a backup is made of the original member, preserving the existing contents.
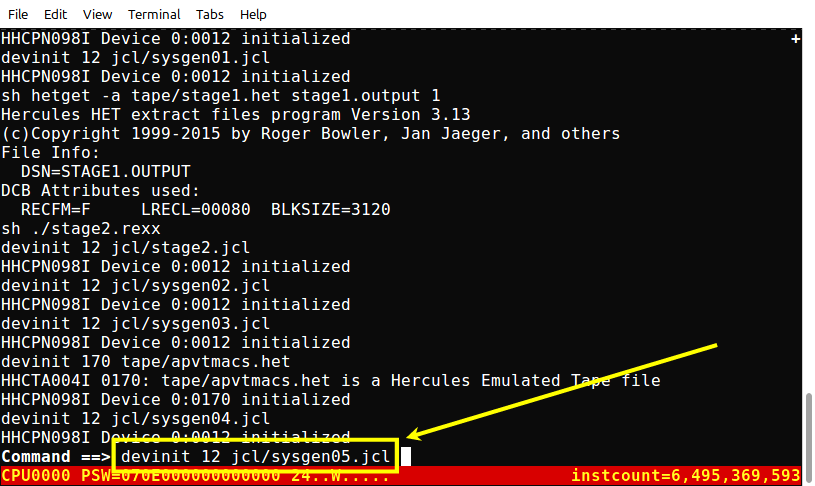
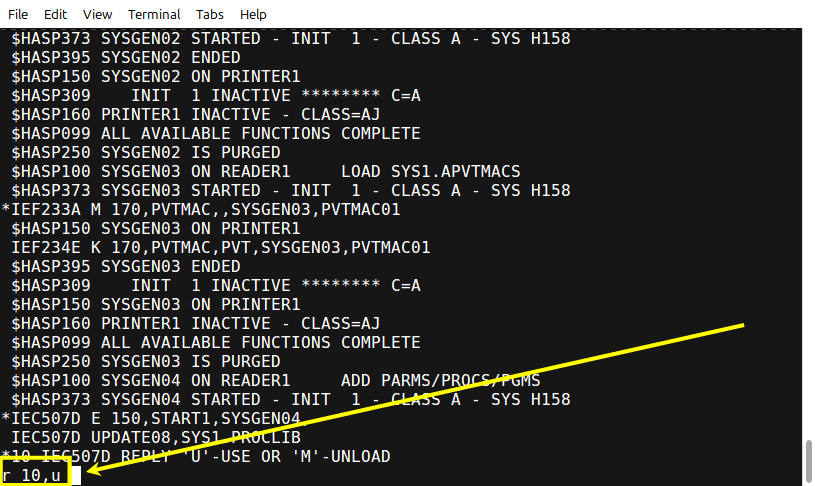
On the command line on the Hercules console, type the command devinit 12 jcl/sysgen04.jcl and press Enter:
One change is made by this job to the Starter System: the SMPASM/SMPASML/SMPAPP/SMPREC procedures that are placed in the target system are also copied into the Starter System. That is because they are used several times as we continue to set up the target system. As SYS1.PROCLIB on the Starter System is protected by an expiration date, you will receive message IEC507D when this update is attempted. In response to this message, a reply of U will allow the update, so type the command r 10,U and press Enter:
Like several of the previous jobs, SYSGEN04 submits a continuation job with the same name. This is because some of the latter tasks that need to be done have as prerequisites some of the earlier tasks listed above and the job would receive JCL errors and fail to execute if the job were submitted as a single jobstream..
SYSGEN04 takes 0.65 minutes to run, which is the sum of the times for both the primary job and the continuation job which has the same name. The expected completion codes are:
The jobstream SYSGEN05 (contained in file sysgen05.jcl in the jcl directory) performs the following tasks:
This member specifies parameters which control the execution of TSO.
This member specifies parameters which define the individual TSO Users' address spaces.
This procedure is executed to start VTAM.
This procedure is executed to start TSO.
This library will contain specifications for VTAM.
This member specifies VTAM parameters.
This members specifies the tables to VTAM for TSO applications and local 3270 terminals.
This member specifies the logon table for all local 3270 terminals. (8 defined initially, you would add more here if you need more 3270 terminals to use concurrently)
This member specifies characteristics for all local 3270 terminals. (8 defined initially, you would add more here if you need more 3270 terminals to use concurrently)
This library will contain LOGON tables for VTAM.
This member specifies the LOGON interpret table for VTAM.
This member specifies the characteristics for all variants of local 3270 terminals (and VTAM controlled printers).
This library will contain TSO command procedures (CLISTs) available to all TSO users.
Default TSO logon message.
Default TSO logon procedure.
This procedure is used to create a new TSO user's information record in the SYS1.UADS datasets and also allocates all the datasets required for a new TSO user.
This procedure is used to delete a TSO user's information record in the SYS1.UADS datasets and also (optionally) deletes all the datasets associated with the TSO user.
Almost all of the material in this jobstream was used as supplied by Jim Morrison with his 3375/3380/3390 modifications published in April, 2002.
On the command line on the Hercules console, type the command devinit 12 jcl/sysgen05.jcl and press Enter:
SYSGEN05 takes 0.02 minutes to run. The expected completion codes are:
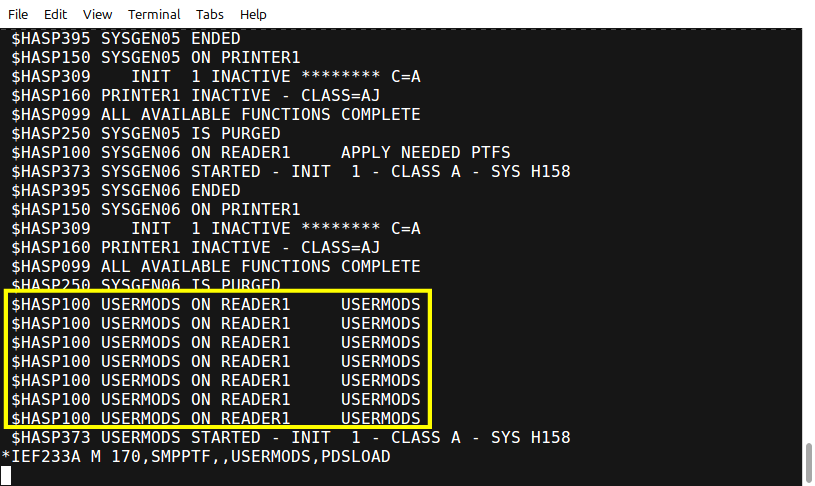
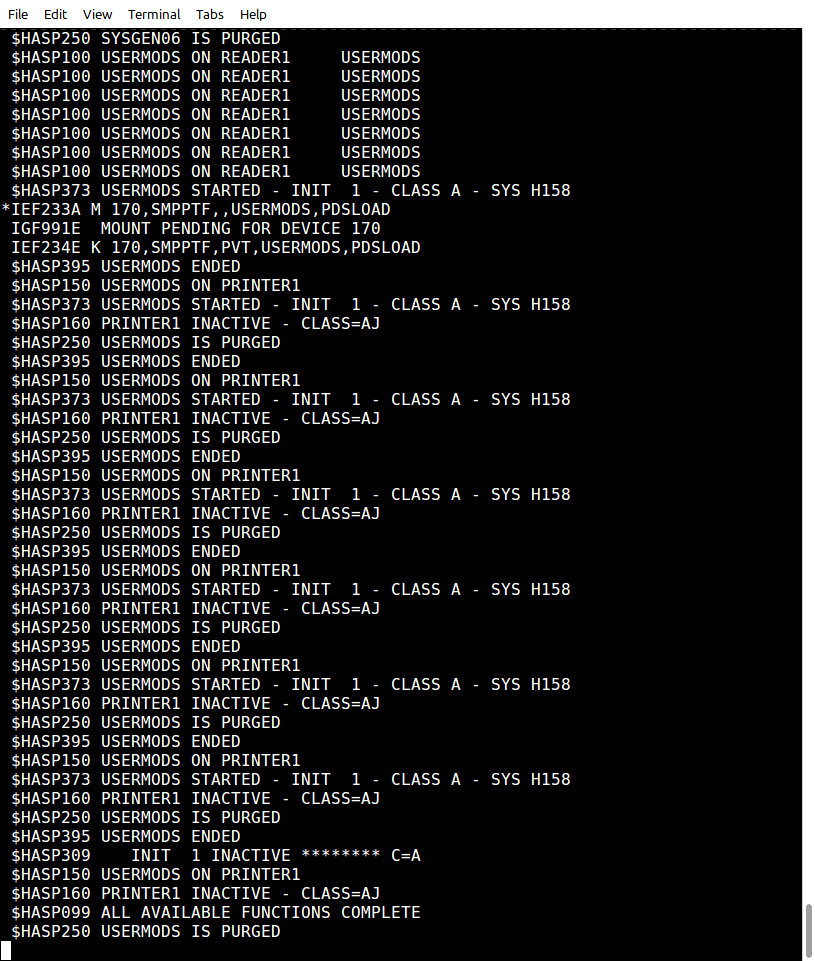
When the distribution libraries were built, we loaded all the PTFs for MVS 3.8j that have been located and shared in the Hercules forums. Some of those PTFs are necessary for the successful application of the User Modifications we will be adding to the system in the following jobs, so SYSGEN06 applies all of those required PTFs ahead of time.
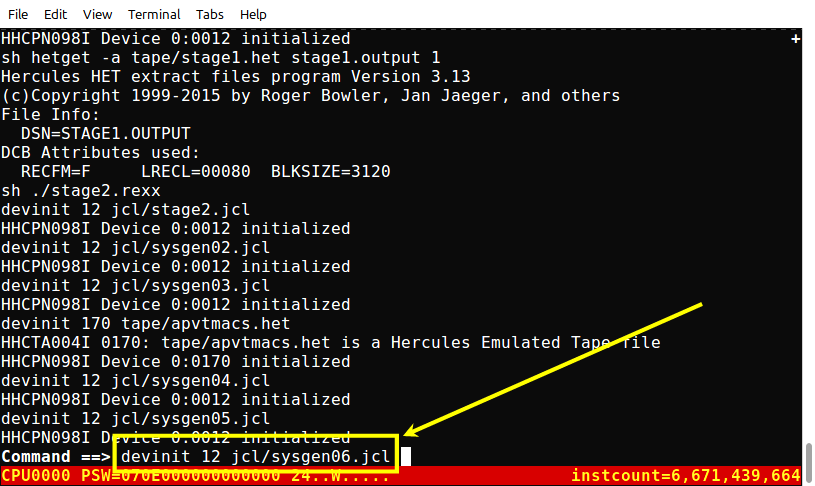
On the command line on the console, type the command devinit 12 jcl/sysgen06.jcl and press Enter:
SYSGEN06 takes 0.42 minutes to run. The expected completion codes are:
The 0004 completion code occurs because of warnings issued by the link editor. This is expected and acceptable for this step.
During the twenty years I have been involved with Hercules, and running MVS 3.8j under Hercules, there have been a number of user modifications proposed, submitted, and discussed in the Hercules discussion groups. I have selected fifty-three user modifications that will be applied in this step. Some of them I have chosen specifically to make a change to the system that I regard as pretty mandatory to the orderly and 'user friendly' operation of MVS 3.8j. There are also some for which I have received requests to add here. I have gathered those modifications into a six 'meta' jobstreams - (contained in files usermods1.jcl, usermods2.jcl, usermods3.jcl, usermods4.jcl, usermods5.jcl and usermods6.jcl in the jcl directory). The first five 'meta' jobstream contain nine separate jobs that are submitted together; the final 'meta' jobstream contains six separate jobs that are submitted together. The reason for this particular organization is that the MVS Starter System's JES2 spool is too small to accommodate extremely large jobs (or an extremely large number of separate jobs), so I have broken up the jobs into the number that is acceptable to the available spool size. Each individual job within a 'meta' job is pretty much the job that was created by the individual who put together the user modification.
31 May 2021 Note: Over the last year I have had a couple of people tell me they don't like to apply user modifications to their system unless it is their choice, and/or they don't like to see this many user modifications applied. When I was putting together this group of user modifications, I had input from several other people who also have experience with MVS 3.8j and these modifications were the most asked for; some others that I might have added I was persuaded to omit. But several of these modifications are co-requisite for each other, meaning that if you choose to omit one, it may cause the application of one or more others to fail. Also, some of these are required for the correct operation of some of the TSO applications that will be added later in this process you are following, specifically REVIEW, RPF, and QUEUE.
The user modifications included are:
SMF accounting statistics are incorrect, as the field TCTRSZ reflects the size of the private storage area, rather than the region requested. This modification corrects the contents of this field.
Prints report of SMF accounting/statistics data at the end of each job step on the SYSOUT logs for the job and issues a console message with the most relevant information, including the step completion code.
When the SMF recording log fills, this exit switches recording to the alternate log and copies the filled log to a generation dataset. Five generations are retained, which will provide quite a bit of coverage if you are interested in examining this data.
Some TSO commands need to be authorized to execute, and to accomplish that they must be placed in this table. This is a default set of commands, but would serve as a starting point if you need to add new authorized TSO commands to your system.
Similar to the above table, this table contains the names of programs which are executed as authorized progrmas. This is a default set of programs, but would serve as a starting point if you need to add new authorized TSO programs to your system.
The JOB and EXEC card REGION parameters allow the specification of size in Kilobytes (K). Later version of MVS allowed the specification in Megabytes (M). This modification adds the flexibility of using M to MVS 3.8j (one M=1024K).
This modification suppresses the inclusion of CN(00) on messages when they originate from a system task. This greatly improves the appearance of JES2 NOTIFY messages.
Modifies VTAM start-up to bypass VTAMOBJ dataset and read VTAM resource definitions from VTAMLST.
Sets subsystem ID for JES2 during JES2 initialization.
The System Generation places a START command in MSTRJCL to automatically start JES2 after IPL. That is not always a good place to autostart JES2, so this modification removes the START command (actually leaves it as a comment). In an earlier job we have already included the command to start JES2 into the COMMND00 member of SYS1.PARMLIB.
Adds external interface support for four-digit years.
Eliminates message IKT012D after TSO is shut down by the operator. This is not a useful message, at least not in our Hercules environment, so eliminating it simplifies the operation of MVS.
May fix excessive spin loop when MVS is run under VM.
Adds two JES2 commands - $U and $DP.
Adds a WTO exit to start TSO after VTAM is initialized.
Modifies TSO TEST to not stop execution after encountering an invalid opcode.
Modifies IFOX00 to accept blank statements.
Modification to display action console messages in high intensity so they are more obvious.
Modifies IOS to always maintain channel and device i/o counts.
Modifies dataset deallocation to show excp counts on deallocation messages.
Modifies TSO/VTAM to provide an option to allow VTAM trace to report the data going to and from a TSO terminal
Adds EWA and WSF support for local non-SNA 3270.
Adds NOEDIT support for TPUT and TGET to TSO/VTAM.
Captures channel program CCWS in GTF SIO trace records.
Adds reporting of interrupt code in event of an ABEND in a TSO session.
Maintain an SVC event count for each SVC number.
Adds CLIST control variable and built-in function extensions.
These two extend the JES2 job search for the STATUS TSO command.
Moves the master trace table to CSA.
Report module name/entry point if PSW address is in PLPA.
Causes recording of CPU time when TIME=1440 coded in JCL.
Removes the SYSLIN blksize limit of 3200 on the Linkage Editor.
Display keyboard characters in a printed dump.
Allow format 1 STAX parameter list to function correctly.
Adds REUSE operand to the TSO ALLOCATE command.
Adds timestamp support for Link Editor identification record.
Improves printing of the module header in printed dumps.
Customize EBCDIC <=> ASCII translate tables.
Correct MF/1 channel measurement and logging to SMF (type 73 record).
Allows type 6 and type 26 SMF records to be collected for Started Tasks.
Allows GTTERM macro to report the terminal name.
Adds support for the LOC parameter to the GETMAIN macro.
Resolve &SYSUID variable and supply USER= and PASSWORD= on JOB cards for jobs submitted through TSO.
Support any MVS-supported DASD type for LOGREC.
Adds CLIST variable processing Application Program Interface (IKJCT441).
Adds TEXT= operand to WTO and WTOR macros.
Patches the TSO modules which display incorrect century when TSO is executed under MVS with the system date set to years beyond 1999.
The names Kevin Leonard and Greg Price appear several times above, so obviously they are very supportive of the community of Hercules/MVS users. Kevin Leonard's site is @ https://www.j76.org/hercules/ where you will find his files for MVS 3.8, MVT 21.8f, HASP V4, and ASP V3.2. Greg Price' site is @ https://www.prycroft6.com.au/ where you will find all his modifications as well as the MVS applications he maintains.
As I stated earlier, when the jobstreams for all of these usermods are combined into a single jobstream, they were a bit much for the small JES2 spool of the Starter System. So I have bundled them into six, for lack of a better term, 'meta' jobstreams. You will need to submit each of the six 'meta' jobstreams and confirm that all the steps of each of the bundled jobs within finish with the expected/accepted completion code. Since we stopped all the initiators but one, the jobs within each 'meta' jobstream will execute serially, so as not to interfere with each other's use of resources. For each of the 'meta' jobstreams, below I will show the submit command followed by the expected completeion codes. I have modified the condcode.rexx script to allow you to retrieve all of the completion codes for each of the 'meta' jobstreams with a single command.
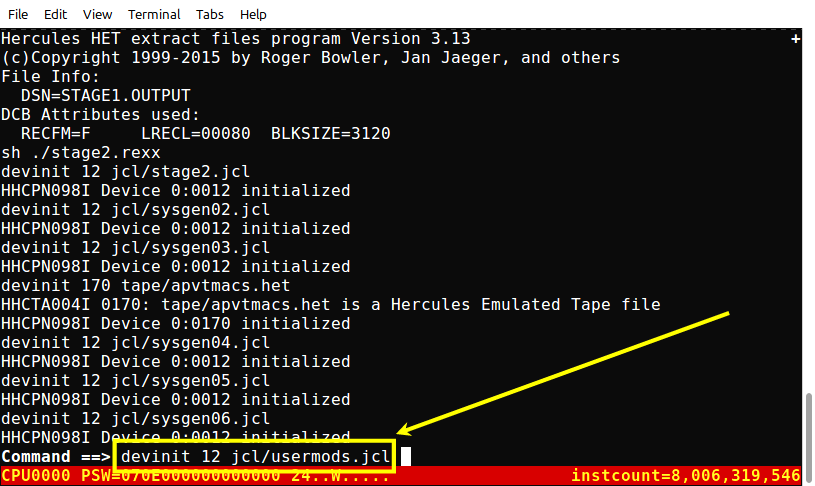
To submit USERMODs 'meta' jobstream #1, on the command line on the Hercules console, type the command devinit 12 jcl/usermods1.jcl and press Enter:
You will see this on the MVS Starter System console as the jobs are read in and begin to execute:
The message $HASP125, SKIPPING FOR JOB CARD, occurs because I have placed comments at the beginning of these jobs that are intended to convey information if the jobstreams are edited. JES2 is informing the operator that there are cards that are not expected preceding the JOB card. This is expected and not a problem requiring action.
'Meta' jobstream #1 contains nine jobs and all jobs combined take .73 minutes to run. The expected completion codes are:
To submit USERMODs 'meta' jobstream #2, on the command line on the Hercules console, type the command devinit 12 jcl/usermods2.jcl and press Enter:
You will see this on the MVS Starter System console as the jobs are read in and begin to execute:
'Meta' jobstream #2 contains nine jobs and all jobs combined take 0.69 minutes to run. The expected completion codes are:
To submit USERMODs 'meta' jobstream #3, on the command line on the Hercules console, type the command devinit 12 jcl/usermods3.jcl and press Enter:
You will see this on the MVS Starter System console as the jobs are read in and begin to execute:
'Meta' jobstream #3 contains nine jobs and all jobs combined take .75 minutes to run. The expected completion codes are:
The completion code of 0004 in the step twenty of job ZP60009 is because of warnings issued by the link editor. This is expected and acceptable for this step.
To submit USERMODs 'meta' jobstream #4, on the command line on the Hercules console, type the command devinit 12 jcl/usermods4.jcl and press Enter:
You will see this on the MVS Starter System console as the jobs are read in and begin to execute:
'Meta' jobstream #4 contains nine jobs and all jobs combined take .65 minutes to run. The expected completion codes are:
To submit USERMODs 'meta' jobstream #5, on the command line on the Hercules console, type the command devinit 12 jcl/usermods5.jcl and press Enter:
You will see this on the MVS Starter System console as the jobs are read in and begin to execute:
'Meta' jobstream #5 contains nine jobs and all jobs combined take .71 minutes to run. The expected completion codes are:
To submit USERMODs 'meta' jobstream #6, on the command line on the Hercules console, type the command devinit 12 jcl/usermods6.jcl and press Enter:
You will see this on the MVS Starter System console as the jobs are read in and begin to execute:
'Meta' jobstream #6 contains six jobs and all jobs combined take .48 minutes to run. The expected completion codes are:
I will just go ahead and apologize here for the name of this job. All the other jobs I have created for this instruction/tutorial are mnemonic and relate meaningfully to the step of the process, but when I set this job up several years (and revisions) ago, I decided to let this job stand with the IBM name for the feature. These instructions have been out for too long to revise, so I will stand behind it, but I will admit that it is a strange name. Note that the fourth character of the name is the numeral 'one' and not the letter 'ell', and the final two characters are the digits 'zero' and 'two'.
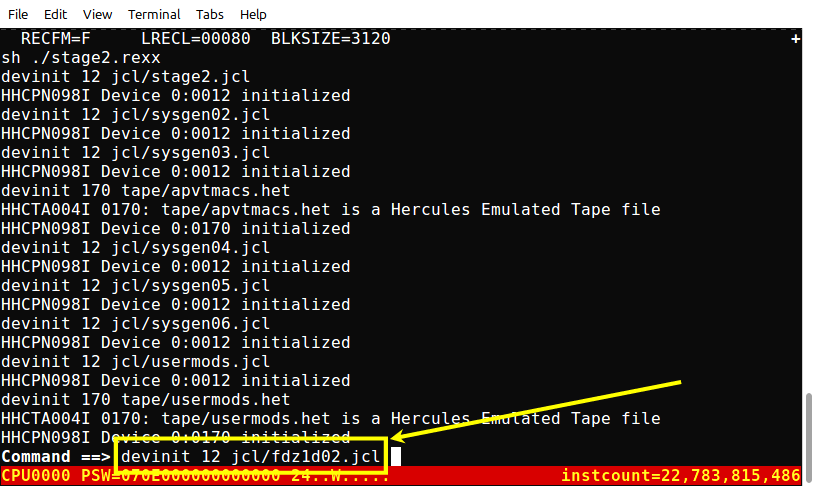
The final jobstream we will execute to complete the creation of the target MVS 3.8j system is FDZ1D02 (contained in file fdz1d02.jcl in the jcl directory).
The reason for the strange job name is that this is in fact a product element which we did not accept with all the other elements on the product tape. Why not, you may ask. The reason is that FDZ1D02 is Release 13.0 of the Device Support Facilities, or as it is more commonly known, ICKDSF, the DASD initialization program. The version we did install, way back when we built the Distribution Libraries is version 6.
Actually I can think of a couple of questions you may have at this point - Why install version 6 when we have version 13? Why do we need version 13 now? Let's take the last first.
Why do we need version 13 now? If you want to utilize 3375/3380/3390 DASD, you need version 13 to initialize them. Version 6 of ICKDSF knows nothing about device types later than 3350. Of course, you could still utilize the DASDLOAD utility that is supplied with Hercules to create perfectly usable 3375/3380/3390 DASD volumes outside of the MVS environment. But I like to find solutions that allow me to utilize MVS to do everything I need to do related to the operation of the system as it was intended.
Why install version 6 when we have version 13? Well, version 13 has a problem initializing 3350 DASD. So we need both versions of the utility to be able to accomplish everything we might want to accomplish.
I put together FDZ1D02 using the distribution libraries. In fact, the jobstream restores the TLIBs from the product tape, extracts the JCL to link-edit the utility, builds a secondary jobstream and submits it through the Internal Reader to complete the installation. The load module for the utility is placed into SYS1.LINKLIB with the name ICKDSF13, so that it does not replace the original load module which has the name ICKDSF.
This places the responsibility upon you to utilize the correct load module when you are initializing 3375/3380/3390 DASD or any of the earlier models. But I will elaborate on that later on, when we are creating some additional empty DASD volumes to use.
On the command line on the Hercules console, type the command devinit 12 jcl/fdz1d02.jcl and press Enter.
This job will require the distribution tape containing the elements for the Device Support Facilities Release 13, so you will see a IEF233A message on the MVS Starter System console:
On the command line on the Hercules console, type the command devinit 170 tape/dz1d02.het and press Enter.
There is no further response you need to make to MVS for the job to continue. MVS will see that the tape has been mounted and proceed with the job.
FDZ1D02 takes 0.10 minutes to run. The expected completion codes are:
Again, there are two jobs that execute with the name FDZ1D02: the first builds the jobstream for the second and submits it, so there are two completely distinct jobs, each with the same name. The first three steps are from the first job and the last two steps are from the second job. All should receive a completion code of 0000, as shown.
We have now completed the System Generation and tailoring of the system to the point that it will IPL, so it is time to shut down the Starter System.
It would be a great time to take another snapshot backup. There are now nine DASD volumes in the dasd directory. After you have shut down MVS and Hercules, simply make a copy of them with your favorite archive program - WinZip, PKZIP, tar - or copy them onto a CD-rom blank. Then if you encounter a catastrophic error later, it is simple to come back to this point by restoring your backup copy.
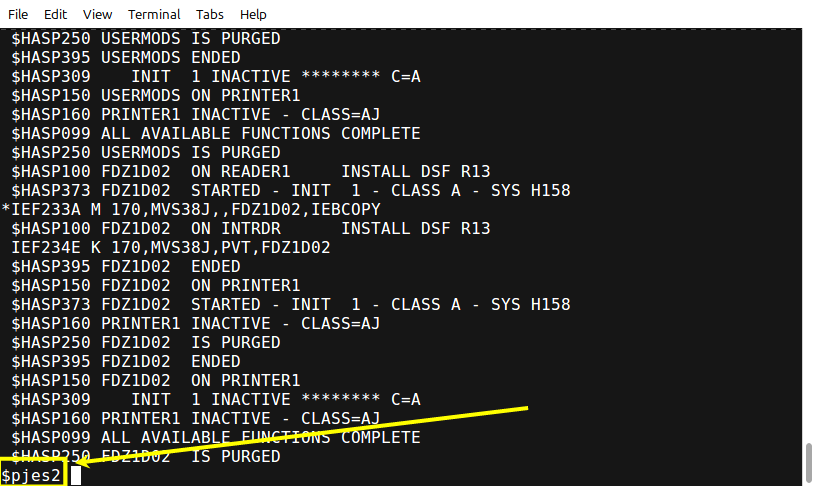
On the MVS Starter System console, type the command $p jes2 and press ENTER:
JES2 will stop all of its tasks, close its datasets, and terminate.
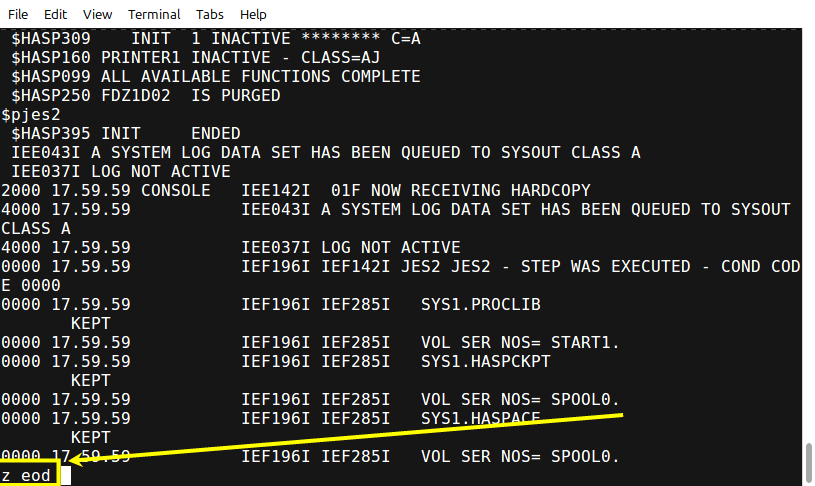
Then type the command z eod and press ENTER:
This command instructs the MVS operating system to shut down normally, finalizing and closing the System Management Facility datasets.
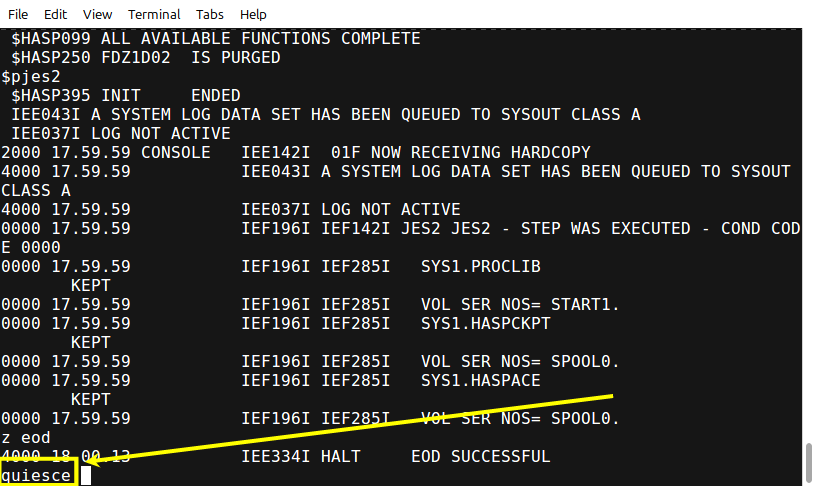
Finally, type the command quiesce and press ENTER:
This command instructs the MVS operating system to write any buffers to the DASD devices. This ensures that when you shut down Hercules any information held in memory by MVS is written to the DASD images.
On the command line on the Hercules console, type the command quit and press ENTER. Hercules will close all the files for the emulated mainframe devices and terminate. You may close your telnet client.
In this step you have built four 3350 DASD volumes and generated the target MVS 3.8j system. It would probably be a good idea to make a backup copy of those four files, because in case of a serious error you could then restore to this point without following the procedure we have just completed in order to re-create the volumes. It would be frustrating to have to go through it again when a simple backup would prevent it. You can use any means to store a backup copy of the two files - place them in a WinRar, Zip or tar archive; or burn them onto a CD-rom blank.
I strongly suggest that you save the SYSOUT listings from this process, which you have been examining to verify completion codes for each step. When you proceed with the next step and restart Hercules, the contents of this file will be overwritten. If there were errors that you did not catch that prevent a successful IPL of the newly built MVS system, having the output from the System Generation process will greatly assist you in
determining the problem and reaching a successful resolution. Simply use the command appropriate for your host Operating System to rename the file 'prt00e.txt' to some other name, such as 'SystemGenerationSYSOUT.txt'.
The next step is to IPL the newly built MVS system for the first time and do some tailoring that may only be done on the system as it is executing. So, when you are ready, proceed to the next step - Customizing Your New MVS 3.8 System.
I hope that you have found my instructions useful. If you have questions that I can answer to help expand upon my explanations and examples shown here, please don't hesitate to send them to me:

This page was last updated on September 30, 2021.