TSO is an acronym for Time Sharing Option, which is an accurate summation of the primary service that the TSO feature provides. Time sharing allows the resources of the computer – CPU, memory, and datasets – to be shared by all users by dividing up computer time into segments or slices. The program or command being executed by each TSO user is allocated a single slice of time and then that user’s program is swapped out onto paged storage and the next user is given their slice of computer resources. These time slices are extremely small, but the cycle of swapping occurs so quickly relative to human time perception that it appears to each user as though they are the only user of the computer’s resources.
TSO is a basic product
component of MVS (and also MVT). The
more recent versions of MVS (OS/390 and zOS, as well as the “for charge”
versions of MVS) also provide an extension product, TSO/E (TSO/Extensions),
however
the base component TSO is still present in these systems.
TSO/E adds additional facilities that are required for modern
applications/utilities, such as ISPF and REXX, but much of the functionality is
provided by basic TSO. Therefore we can
make use of many of the same functions on our freely available Operating Systems
(MVT 21.8f and MVS 3.8j) running under Hercules as are available on zOS. A
variety of tasks may be accomplished using basic TSO features:
My goal in writing this tutorial is to provide at least the minimum instruction required to begin using TSO to perform the tasks shown above. As I wrote this tutorial I drew upon my own work experience using TSO for a number of years in development environments. The basic outline for what I decided to include was constrained by an an OS/VS2 TSO Command Language Reference Summary (IBM publication number GX28-0647-3) from my library. All material presented in this tutorial has been verified under MVS 3.8j running under Hercules (version 3.13). The 3270 terminal emulator I use on my Linux machine is X3270. When this page was first written, I was using Tom Brennan's Vista (version 1.24) on a Windows machine and I highly recommend Vista if you are a Windows user. As I refresh this material (June 2020) the screen captures are done with X3270. The case of commands and operands typed during a TSO session is generally irrelevant; however in this document I have capitalized commands and operands, or portions thereof, when command syntax is being given to connote the required (or minimal) syntax required for recognition by TSO. The order in which I have chosen to present TSO commands in this tutorial is that which seems most logical to me and is what I would deem useful if I were using TSO for the first time. There is an Index at the bottom of this page which contains links by which a number of topics may be rapidly accessed.
Although the TSO monitor program may be run as a batch process, it is designed to function as an interface between the user, through a video display terminal, and the operating system. The actual management of the display system input/output is handled for TSO by either VTAM (under MVS) or TCAM (under MVT or through remote communication facilities under MVS). A rudimentary security system is implemented by TSO, although in a production environment a more robust security application would probably be active (RACF, ACF, or similar third party product). When a user logs on to TSO through a terminal, an address space is created in which the user may execute programs, some basic datasets are allocated for the user, and a VTAM session is initiated between the address space and the user’s terminal.
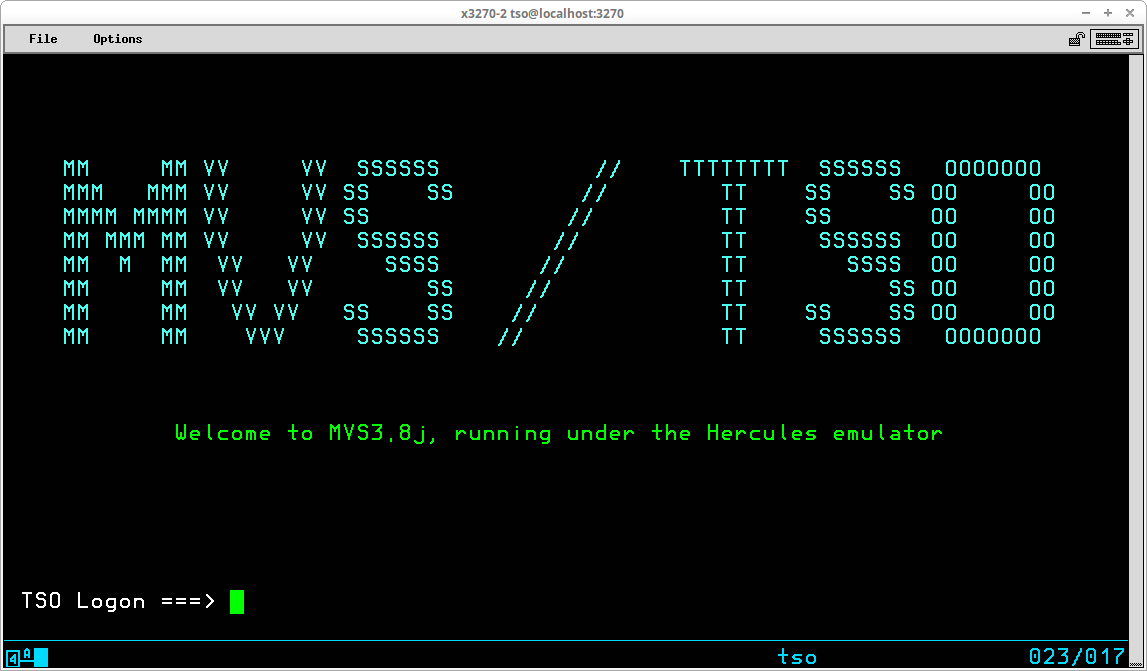
In order to use TSO, a network communications program must be running in the MVS system. Under MVS 3.8j the local network is managed by VTAM. VTAM (Virtual Telecommunications Access Method) is an IBM application program interface (API) for communicating with telecommunication devices and their users. VTAM is simply a program which is executed as a Started Task by MVS. If you are executing an MVS 3.8j system built using my Installing MVS 3.8j tutorial/instructions, the jobname of the VTAM task is NET. The catalogued procedure that starts VTAM may be found in the NET member in SYS1.PROCLIB. When VTAM is started, all terminals connected to the system and defined in the VTAM parameters, contained in SYS1.VTAMLST, are allocated to VTAM and the screens will display the Network Solicitor screen:
The Network Solicitor screen contains a single unprotected field for entering theTSO LOGON command and its parameters. The other information presented on the Network Solicitor screen is determined by installation preferences and may be changed by modifying a macro, contained in the NETSOL member in SYS1.MACLIB, and reassembling a load module, ISTNSC00 in SYS1.VTAMLIB.
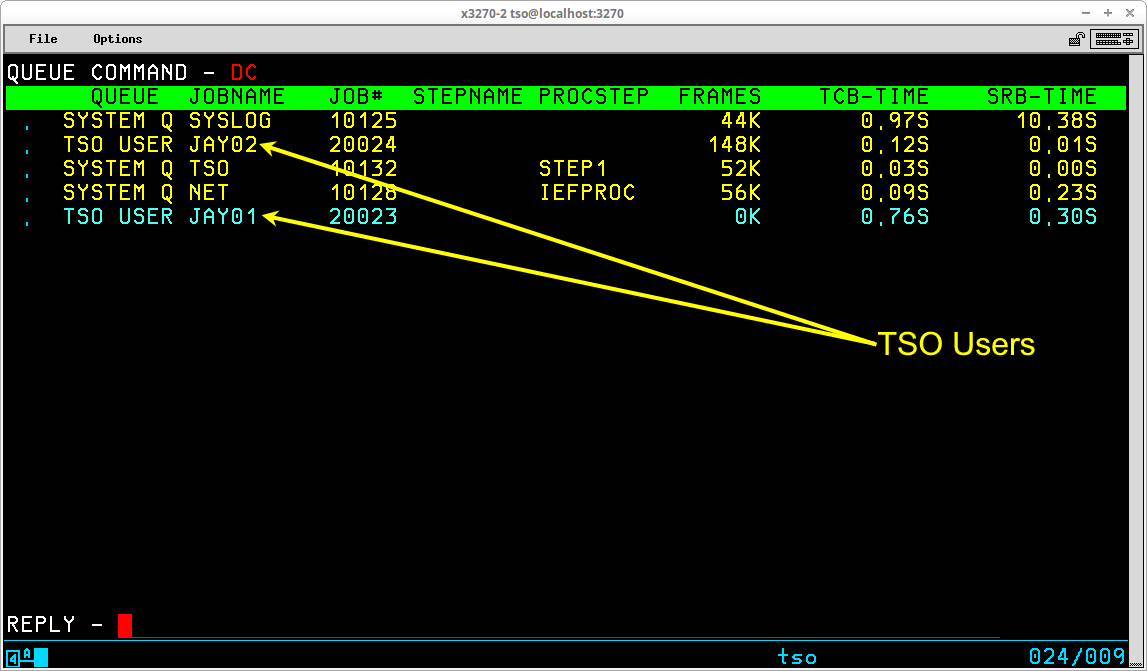
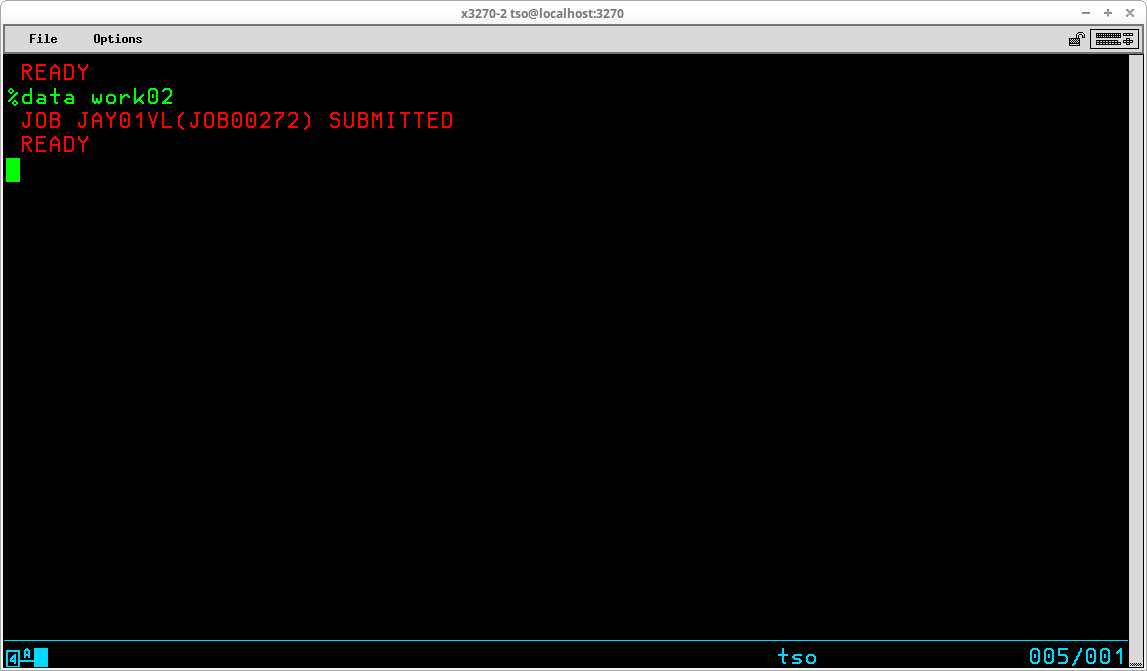
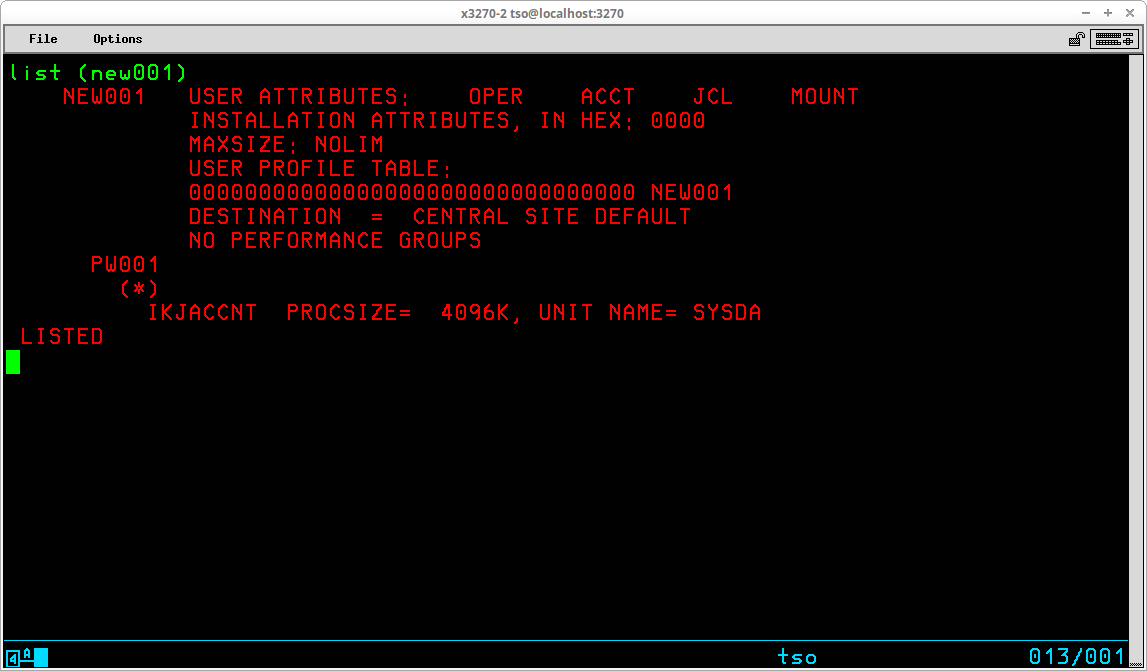
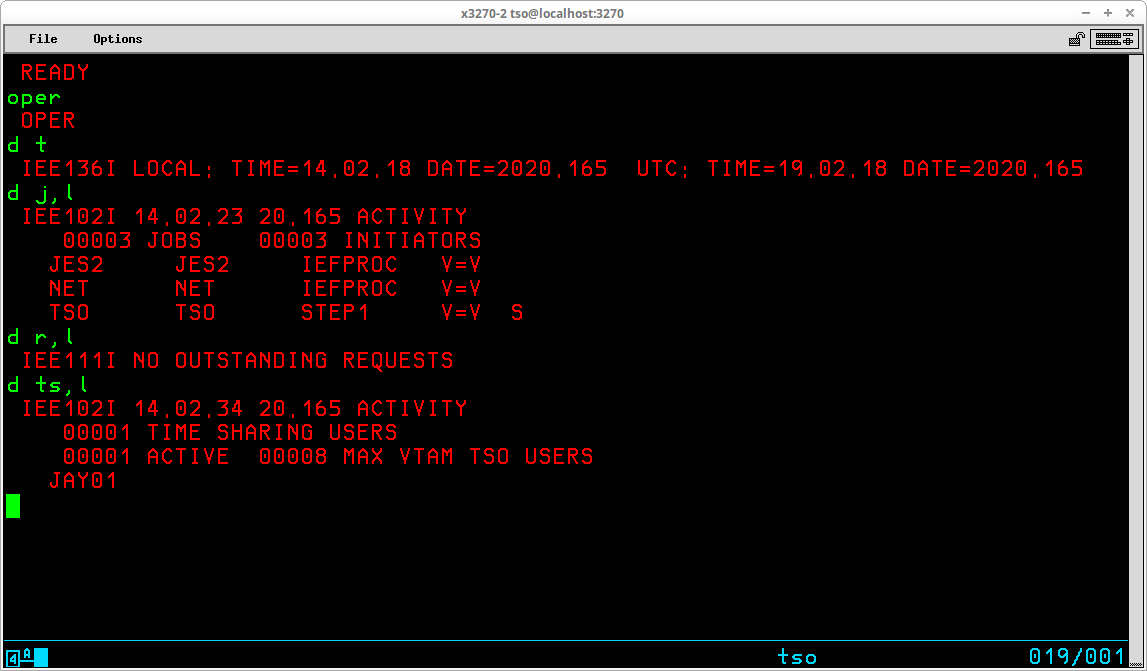
Like VTAM, the TSO monitor program also executes as a Started Task by MVS. The jobname of the TSO task is TSO, and the catalogued procedure that starts TSO may be found in the TSO member in SYS1.PROCLIB. When a valid TSO User ID is used to log on to TSO, an address space is started for the user. The catalogued procedure used to start each TSO user session may be found in the IKJACCNT member in SYS1.PROCLIB. Each user appears as a job in displays of system activity:
In the Queue display above, one TSO user (JAY01) is swapped out and the other is swapped in. In between the two TSO users, the NET (VTAM) and TSO monitor Started Tasks are displayed.
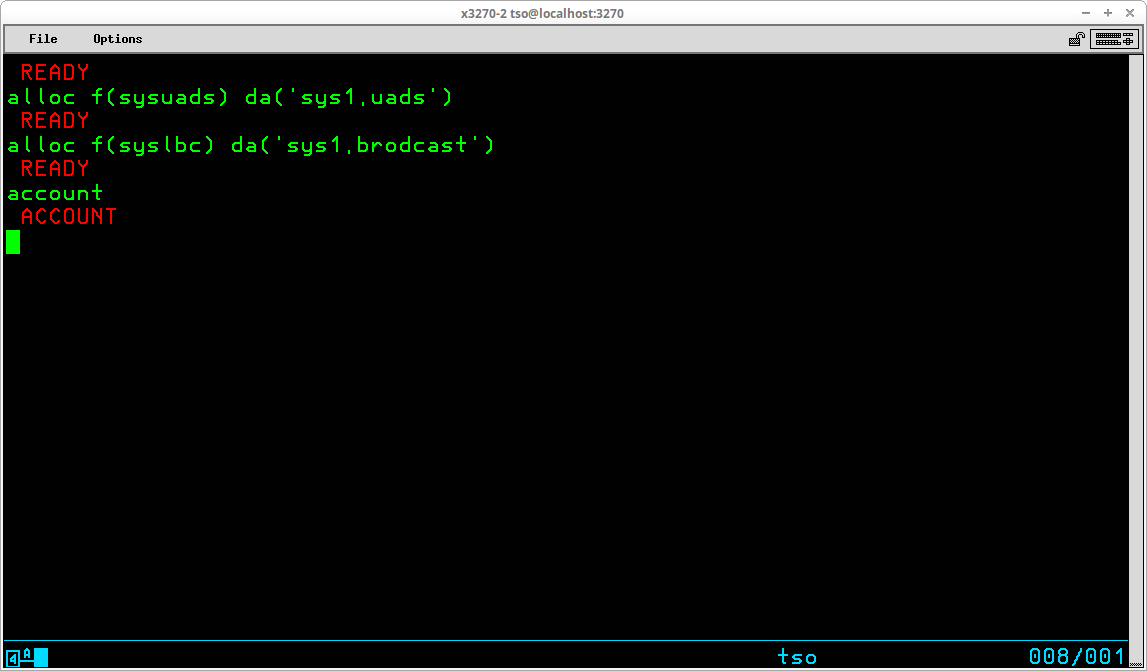
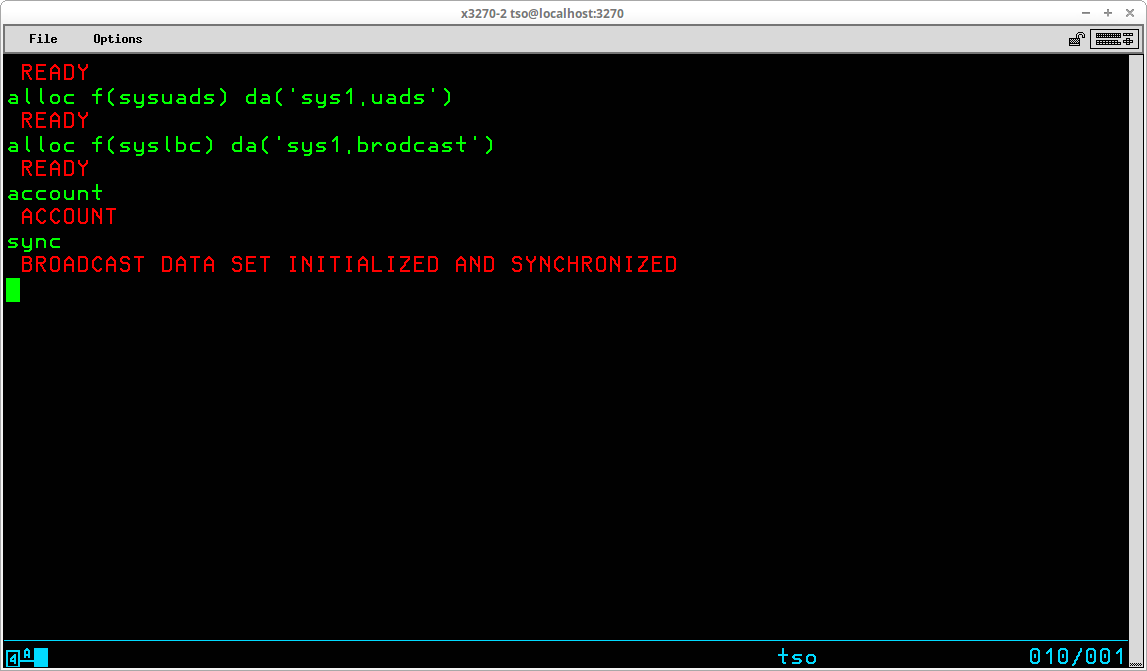
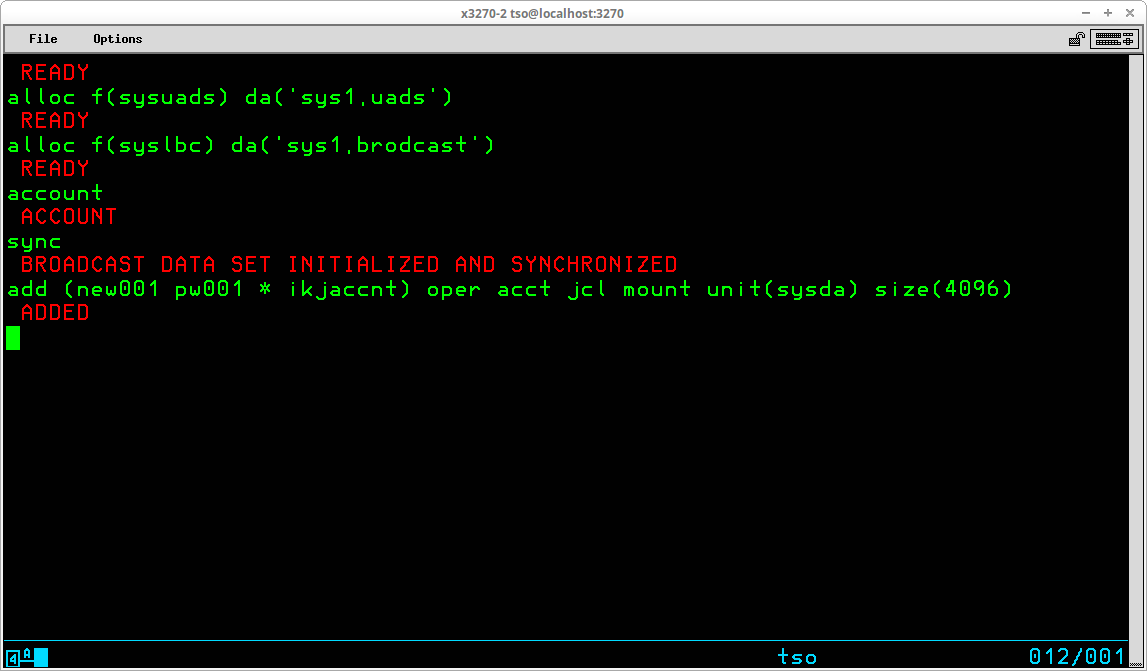
TSO provides a rudimentary security and access control implemented through the use of the TSO User Attribute dataset, SYS1.UADS, which is created during System Generation. TSO User IDs are administered (added, changed, and deleted) by using the Account TSO command. Access to the TSO system, and the functions the user is allowed to execute once access is granted are controlled by settings in the profile of the ID record in this dataset. Before any TSO commands may be entered, the LOGON command must be used with a valid TSO User ID.
In order to use TSO, a valid TSO User ID and, if required, the valid password defined for that User ID must be submitted to the TSO monitor via the Logon TSO command. (The requirement of a password may be optional, depending upon settings specified when the User ID was created.) The syntax of this command is:
LOGON <id>[/<password>] [other optional operands]
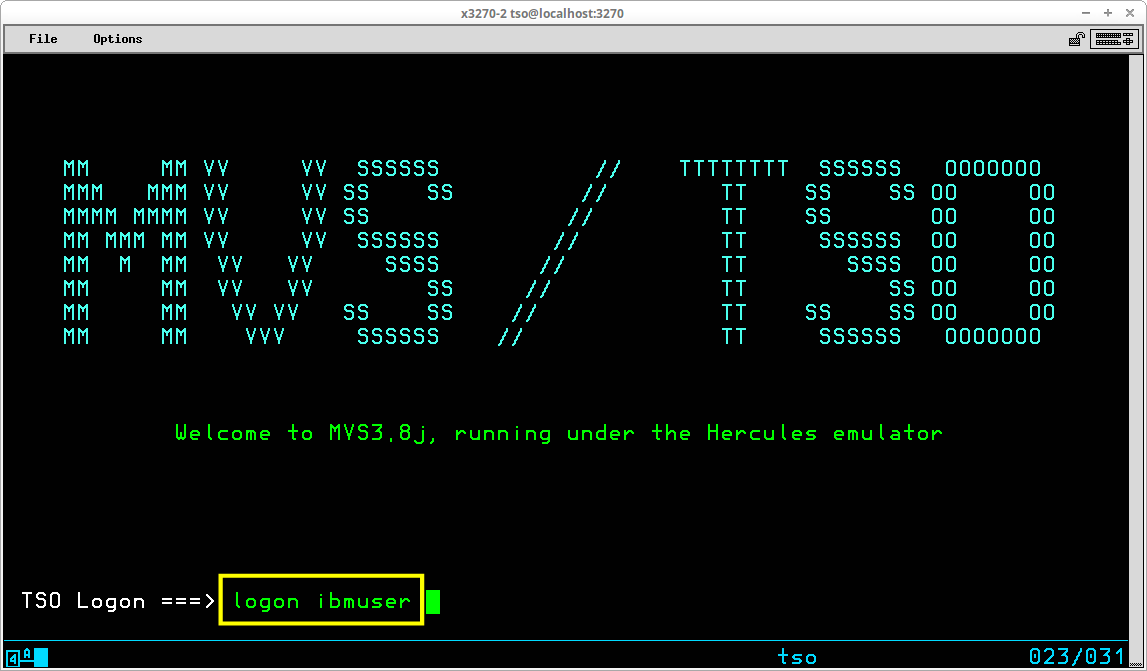
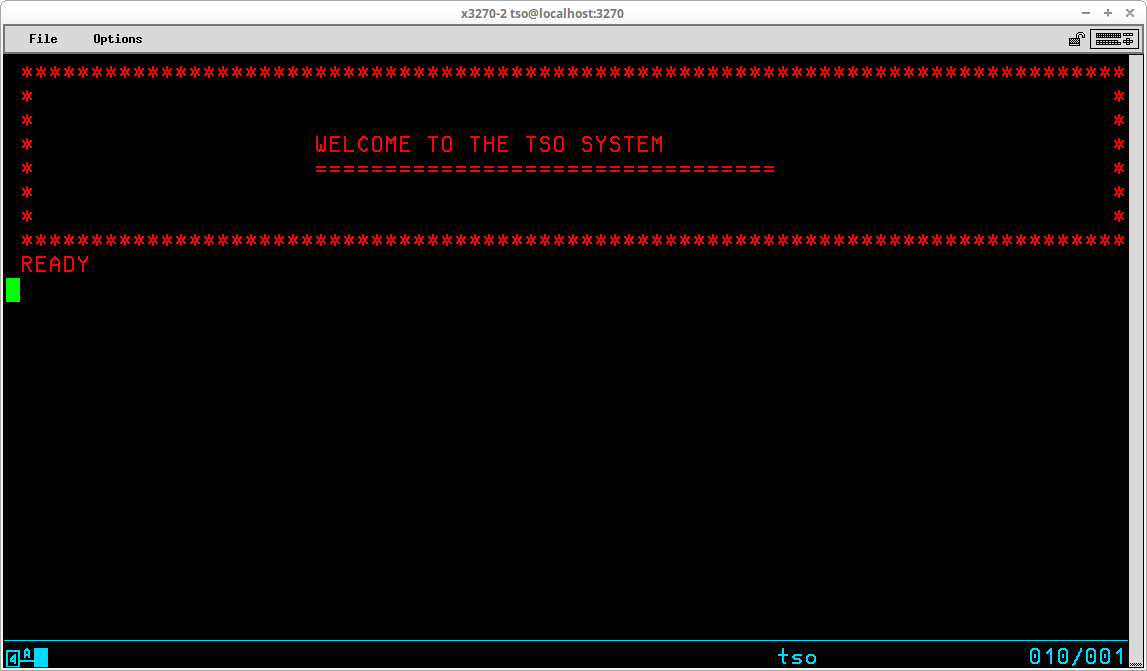
A standard User ID - IBMUSER - is always installed in the system during System Generation. To log onto TSO using this User ID, you would type logon ibmuser and press the ENTER key:
The IBMUSER User ID is installed without the requirement of a password. In a real world business environment, this would be considered a security hole, and would most likely be altered after the MVS installation is completed.
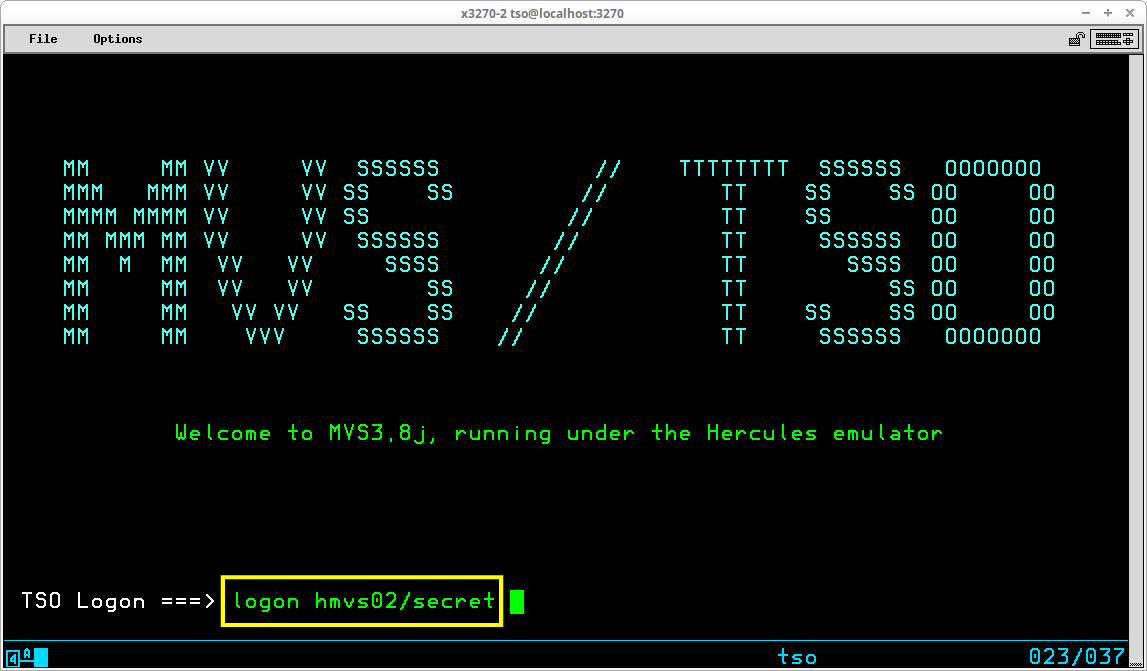
If you are logging onto TSO with a User ID which requires a password, you may enter the password at the same time you enter the User ID, by including the password and separating it from the User ID characters with a forward slash - logon userid/password and press the ENTER key:
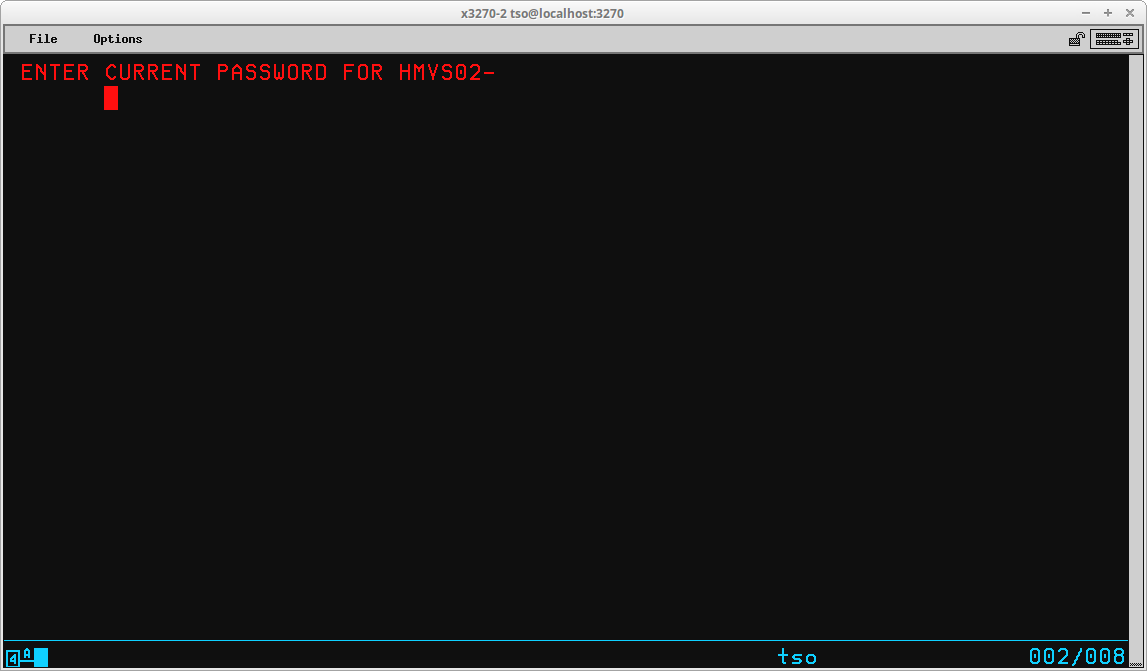
Entering the password in this manner is not particularly secure, since the password will appear on the screen alongside the User ID, visible to anyone nearby the terminal. A secure approach would be to enter the logon command with only the User ID - logon userid and press the ENTER key:
The TSO monitor program will then prompt you to enter the password in a secure (invisible) field:
There are several optional operands that may be entered with the LOGON command. The ones which may be of occasional use under Hercules/MVS 3.8j are SIZE, PROC, and ACCT.
The SIZE operand allows you to specify the amount of virtual memory to allocate to your TSO address space. The integer value you provide with the SIZE
operand indicates the amount of memory allocated to the virtual region in which
your TSO session will execute. The amount specified, less some overhead
required for control blocks used to manage your TSO session, becomes the maximum memory available for use by programs and buffers during your session. To logon with the IBMUSER ID and allocate
4,096k region, type logon userid size(4096)
and press ENTER:
The 4096 in this example is not an arbitrary number; 4096k is the minimum required storage to utilize VSAM components of the system.
If you do not specify the SIZE operand, the default value used is the value
stored in the User Attribute Dataset for the User ID. Note: In the case of IBMUSER, the default
(44k) is too small to provide the necessary buffer space to access VSAM objects
(which precludes the use of IDCAMs commands) - the reason for this is that the IBMUSER ID is intended for emergency use only; not for productive work.
The PROC operand allows you to specify the name of the catalogued procedure used to allocate system datasets
and control other characteristics of the address space created for your TSO session.
If you do not specify this operand, the default procedure used is the one that is
stored in the User Attribute Dataset for the User ID. If you have multiple
logon procedures catalogued, you may use the PROC operand to select the one to
be used for a particular session. The default procedure created during
System Generation is IKJACCNT. The logon procedures are contained
SYS1.PROCLIB; the default procedure is created in member IKJACCNT. Note:
When making changes to logon procedures, you should make a copy of the procedure
to be changed, make the changes in that copy, and logon using the PROC operand
to specify the modified procedure and verify that the changes work; then you can
replace the original catalogued procedure with the changed procedure which has
been tested and verified to work correctly. If you make unrecoverable errors while
changing an active logon procedure, you might find yourself without access to
TSO to correct the errors.
The ACCT operand allows you to specify the accounting information that is written to SMF records created during your TSO session.
If used, up to 40 characters may be specified. The default string used is
the one stored in the User Attribute Dataset for the User ID.
After successfully logging on to TSO, the logon procedure (IKJACCNT or a custom procedure used on your system) will probably execute a CLIST (Command List) contained in SYS1.CMDPROC. SYS1.CMDPROC is the system library where system TSO CLISTs are stored; typically the CLISTs contained in this dataset are only modified by system administration personnel (System Programmers). A CLIST executed from SYS1.CMDPROC during log on may be used to allocate additional system libraries and will then probably execute a CLIST contained in the CLIST dataset defined for the TSO User ID which has logged on.
If you are using an MVS system built using my Installing MVS 3.8j tutorial/instructions, this is the sequence that occurs during logon:
- the procedure in SYS1.PROCLIB(IKJACCNT) is used to start the TSO user's address space,
- the CLIST contained in SYS1.CMDPROC(TSOLOGON) is executed to allocate additional Help text and Load libraries,
- and the <userid>.CLIST(STDLOGON) is executed to allocate datasets required for various specialized TSO commands. This last CLIST displays a welcome message:
If you wanted to change the message displayed after log on, you could make changes to the contents of the user CLIST, in the STDLOGON member, contained in the dataset identified by <userid>.CLIST.
If you are using a system build using my Installing MVS 3.8j tutorial/instructions, there are four datasets created when a new TSO User ID is added to the system:
- <userid>.CLIST - which will contains CLISTs (Command Lists) written by the user,
- <userid>.CNTL - which will contain JCL (jobstreams) written by the user,
- <userid>.SOURCE - which will contain source programs (Assembler, COBOL, PL/1, FORTRAN, RPG, etc.) written by the user, and
- <userid>.LOAD - which will contain assembled/compiled load modules created by the user.
In each of these dataset names, <userid>, the high-level qualifier of the dataset name, represents the TSO User ID. When a new TSO User is added to the system, a procedure is executed - contained in the TSONUSER member in SYS2.PROCLIB - which will:
- add the User ID into the SYS1.UADS dataset with the proper logon defaults,
- create an ALIAS for the user so that datasets created by the user will be catalogued in the User Catalog UCPUB000,
- these four datasets are created;
- and the CLIST called by SYS1.CMDPROC(TSOLOGON) - STDLOGON - is created in the user's CLIST dataset.
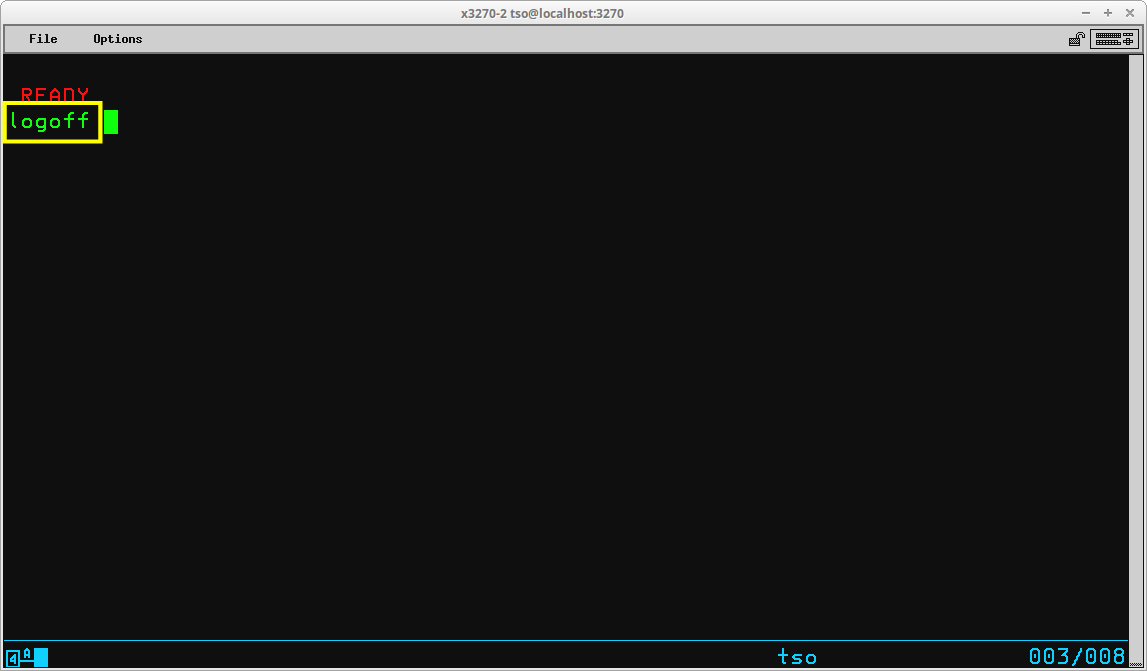
When you have logged onto TSO, the terminal remains connected to your TSO session until you terminate the session with the LOGOFF command or until the terminal remains idle for the default idle time and MVS automatically terminates your session. The syntax of this command is:
LOGOFF
Although there are two optional operands, they are not relevant in the Hercules/MVS 3.8j local terminal environment. To terminate your TSO session, simply type the command logoff and press the ENTER key:
The LOGOFF command releases system resources allocated to your address space, frees virtual memory and terminates the address space. In order to issue further TSO commands, it is necessary to issue the LOGON command again.
Note: If your terminal is allowed to remain idle for a period of time, MVS will automatically
terminate your session. This is the equivalent of a batch job exceeding
its allowed wait time and receiving a S522 abend. The amount of idle time allowed is determined by the TIME= parameter on the EXEC
statement in the IKJACCNT member in SYS1.PROCLIB. By default this
parameter is omitted. If you add the TIME= parameter with a time period
specified in seconds, your TSO session will be allowed to remain idle for this
period of time before it will automatically be logged off. Specifying a
value of 1440: TIME=1440, effectively specifies that the TSO user session is never to be
cancelled, regardless of how long the terminal remains idle.
There is one final topic I will address before I move on from LOGON/LOGOFF. If you accidentally close your terminal emulator program, but you have not logged off and have some unit of work you are doing, it is possible to recover your session. Open a new terminal emulator window (X3270 / Vista / whatever you use) and, when it connects to Hercules, press the CLEAR key to display the Network Solicitor screen. Then type LOGON <userid> RECONNECT. The RECONNECT parameter instructs TSO to reconnect to your previous address space if it is still active and your screen will be redisplayed exactly as it was before you closed the terminal emulator program. There is a window of time when this will be successful, because if a large amount of time has elapsed, MVS will have terminated the address space and freed its resources for other use. So if you accidentally close your tn3270 emulator program, act immediately to recover and restore your TSO session.
A typical 3270 display screen consists of 24 rows of 80 characters; a 3279 model 2 has these characteristics. The screen is divided into fields which have specific characteristics, the most important of these determine whether the field is used for output - characters written onto the screen by the active program - or input - characters typed by the terminal operator (user). In the screen images captured for use in this tutorial, characters written to the screen by the active program appear in red and characters typed by the terminal operator appear in green.
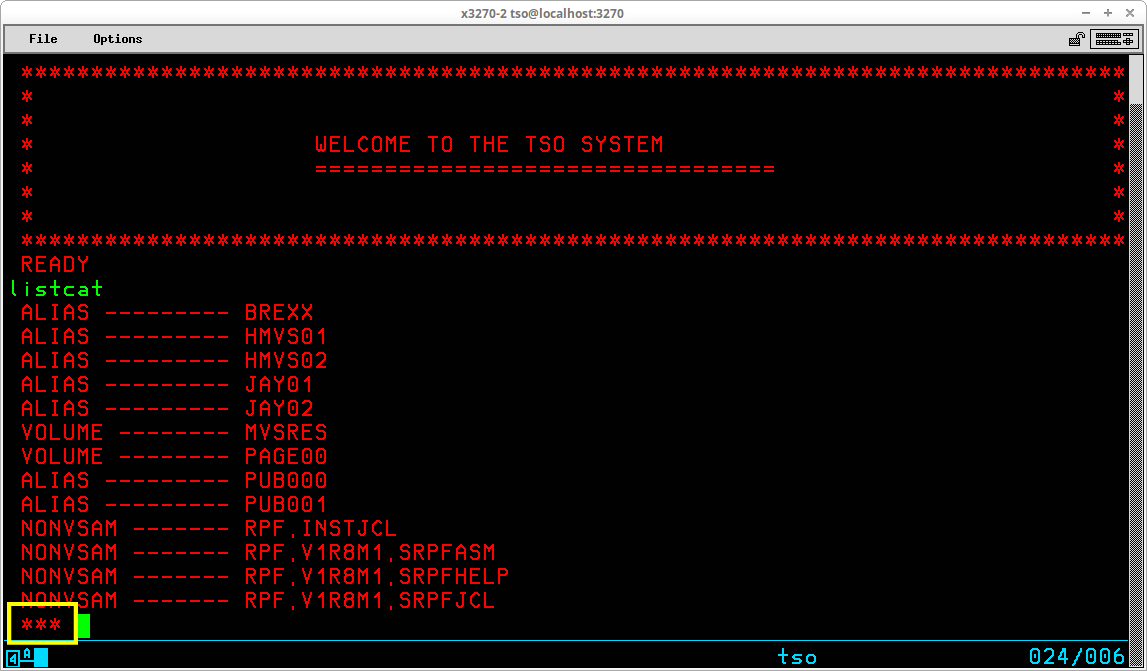
During a TSO session, information appears on the display as a conversation. Characters are typed by the user and sent to the computer when an attention key is pressed. The computer responds to the input by writing characters on the display screen; at the conclusion of the output the cursor remains positioned under the last output and the keyboard is unlocked to await the next input from the operator. The process repeats with the exchange progressing from the top of the screen until the bottom is reached. When the bottom of the screen is reached, the TSO monitor writes three asterisks on the bottom line of the display screen:
This is a signal to let you know that more information is available from last entered command than will fit on the screen. To retrieve the additional output the ENTER key should be pressed; the screen will be cleared and the output will resume at the top of the screen. If you are not interested in viewing additional output from whatever command/program is executing, the output may be interrupted (see PA1 key description in the next section).
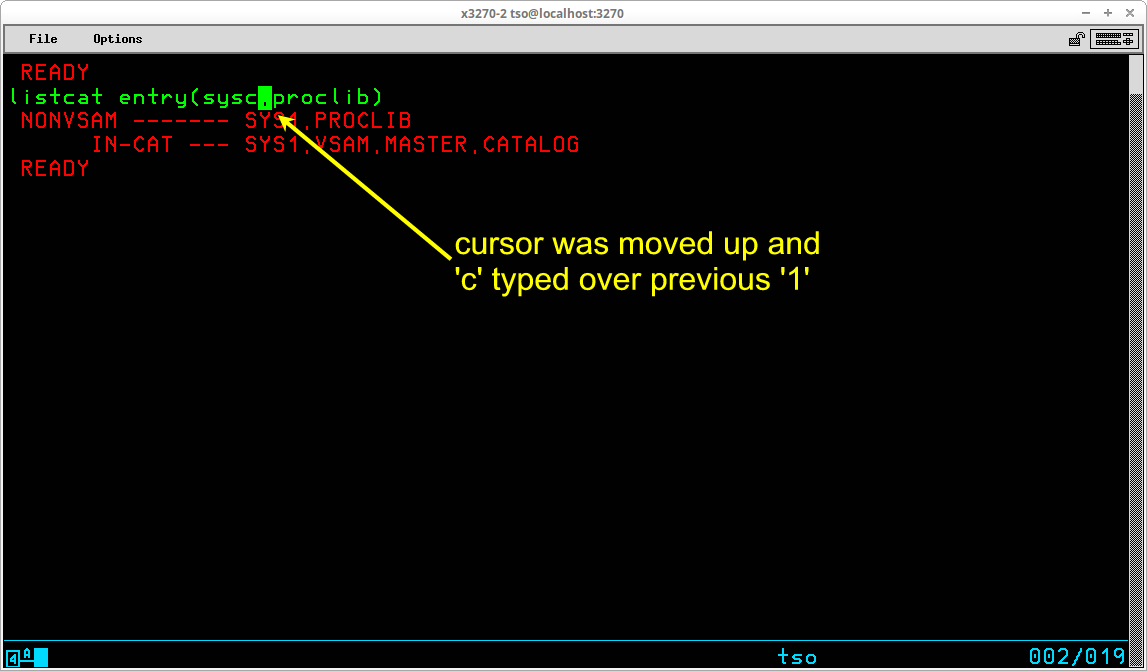
If an input field is still visible on the display screen that closely matches information that is needed again, the cursor position keys may be used to move the cursor from the current line back into the prior input field. By typing any character into the field area, the prior input field is tagged for transmission to the system the next time the ENTER key is pressed. Any required changes to the input characters may be made before the ENTER key is pressed:
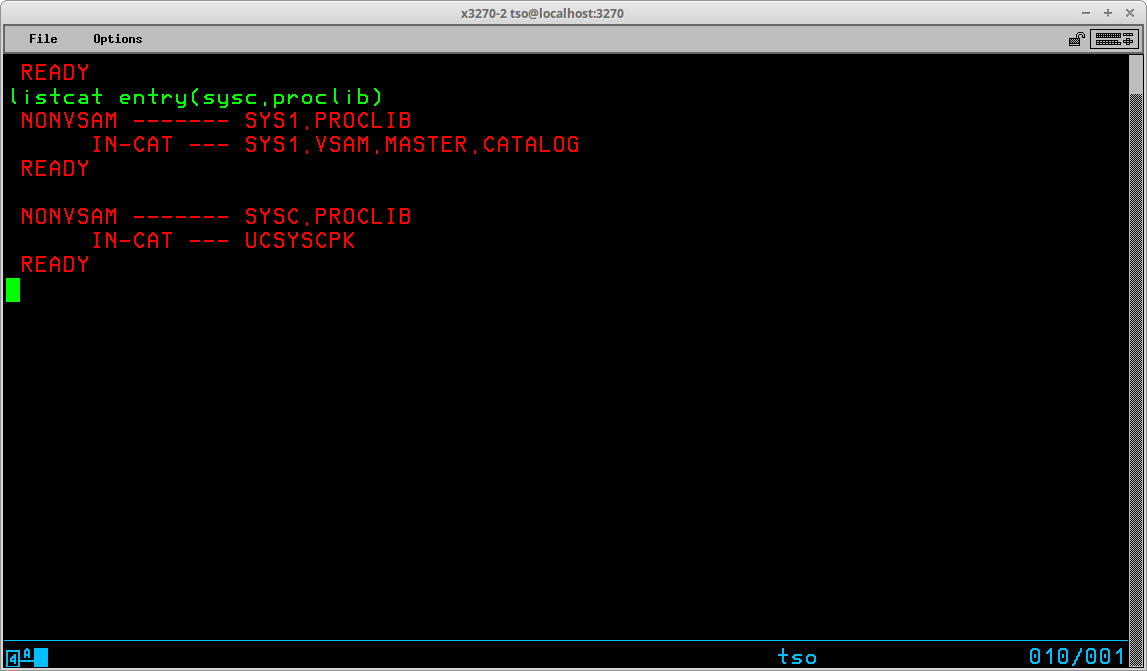
In this example, the prior input command -- listcat entry(sys1.proclib) -- is being changed by altering the sys1 high level index to become sysc (the cursor remains on the period following sysc after the change). When the ENTER key is pressed, the entire input field -- listcat entry(sysc.proclib) -- will be transmitted as though it had been typed in its entirety following the prior output:
The 3270 display terminal's interaction with TSO functions quite differently from what many people have come to expect from their experience using a personal computer. When characters are typed on the screen by the user, they are not read and processed by the computer as they are typed. Instead, they are held in a buffer in the display terminal (or in the 3270 client, since it is unlikely that many in the Hercules' community are actually utilizing a physical 3270 terminal). The accumulated characters are sent to the computer for processing only when an attention key is pressed. The most frequently used attention keys are ENTER, CLEAR, PA1, and PA2.
The ENTER key, which may be the Carriage Return key (usually regarded as the ENTER key in the personal computer world), provides the same function in TSO as in the personal computer world. On some 3270 clients, the ENTER key is mapped to an alternate key on the keyboard. In X3270, key mapping may be changed in the profile file (.x3270pro). In the Vista emulator, key mapping may be changed in the Options (alt-Z will open the Options panel). When the ENTER key is pressed, all input fields tagged for transmission to the computer for processing are sent as a single stream.
The CLEAR key performs exactly the function it describes, the terminal screen and character buffer are cleared. The CLEAR key is an attention key because input/output occurs to inform TSO that you have cleared the screen and the output position maintained by the TSO monitor should be reset to the top of the display screen. Since there is no CLEAR key on most personal computer keyboards, the function of the CLEAR key is mapped to another key (or key combination).
The PA1 key (Program Access 1) interrupts the current command or program. When you press this key, the current command or process is interrupted. If you are executing a subcommand, you will receive a prompt for the parent command. If you are executing a command or program, you will receive a READY prompt. If you want to resume the interrupted command (or subcommand), you may press the ENTER key. Since there is no PA1 key on most personal computer keyboards, the function of the PA1 key is mapped to another key (or key combination).
Other attention keys that are less frequently used are PA2 (redisplay last screen sent from the computer) and the Program Function Keys (1 through 24).
PA2 is an important key to be aware of. If you have begun making changes to data on the screen, for example while editing a dataset in REVIEW, and decide you have made some mistakes and would prefer to have the original data restored, pressing the PA2 key instructs TSO to retransmit the prior screen contents from storage to your terminal, overwriting the changes you have made to the screen.
No data is transmitted to the computer from input fields, even if it is tagged, when the CLEAR, PA1, PA2, or PA3 keys are pressed.
Although it is not an attention key, another key which is frequently useful is the RESET key. There are circumstances in which your terminal keyboard becomes locked. For example, when you attempt to type characters at a position where input is not permitted. You can use the RESET key to unlock your terminal keyboard without generating an attention interrupt. Since there is no RESET key on most personal keyboards, the function of the RESET key is mapped to another key (or key combination).
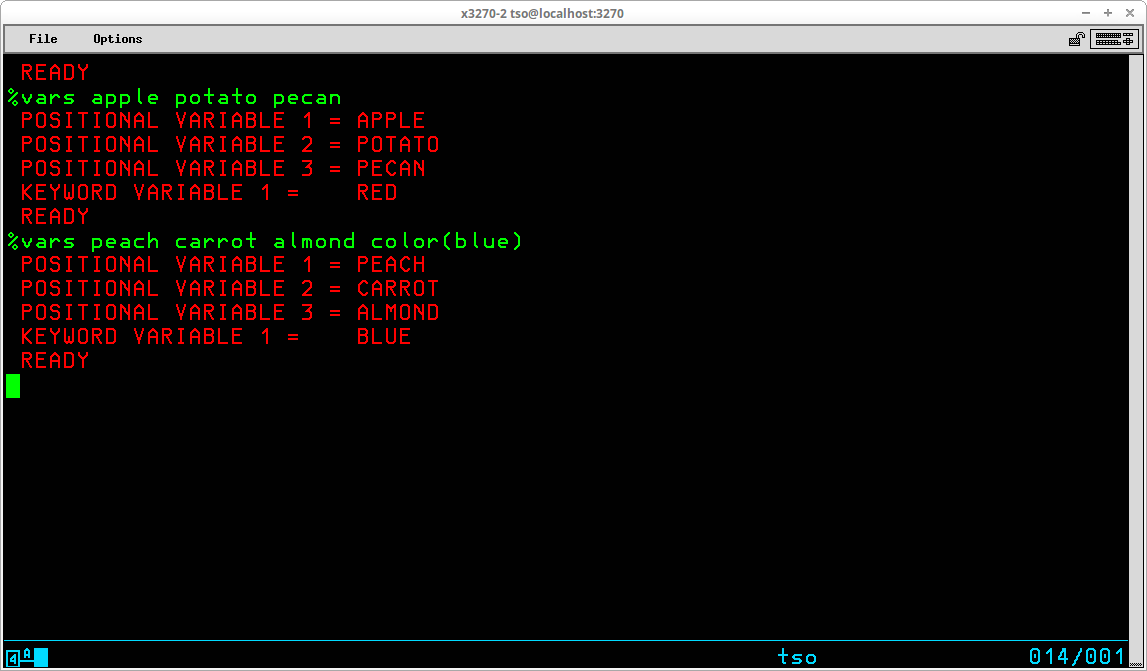
TSO Commands are free form and consist of a command name which may be followed by one or more parameters (which I have tried to consistently refer to hereafter as operands in this document). Examples of this can be seen in the description of the LOGON and LOGOFF commands described above. Operands may be either positional or keyword. In the LOGON command, the User ID is a positional operand. The operand is recognized as the User ID by the fact that it is entered immediately following the LOGON command. The SIZE operand is a keyword operand - it is recognized by the inclusion of the keyword SIZE and the value given for the operand is typed enclosed in parenthesis following the keyword.
TSO employs a liberal abbreviation policy for its commands and keyword operands. Any command (or keyword operand) may be abbreviated to the shortest form that eliminates ambiguity. As long as TSO can differentiate the command (or operand ) you are typing from similar commands (or operands in the same context), it will accept the command you intend. Some examples:
Command
Acceptable
AbbreviationsDELETE DEL LISTCAT LISTC EDIT E SUBMIT SUB
Some behavior of a user's TSO session is determined by settings that are maintained in the user profile, which is stored in the dataset SYS1.UADS. These settings persist from logon to logon. They are initially set to defaults when the User ID is created. If they are subsequently changed by use of the PROFILE command, the new settings specified will remain in effect until they are changed again. The settings are displayed and changed with the PROFILE command (which may be abbreviated PROF). The syntax of this command is:
PROFile [zero or more optional operands]
To display the current settings, type the command with no operands and press ENTER:
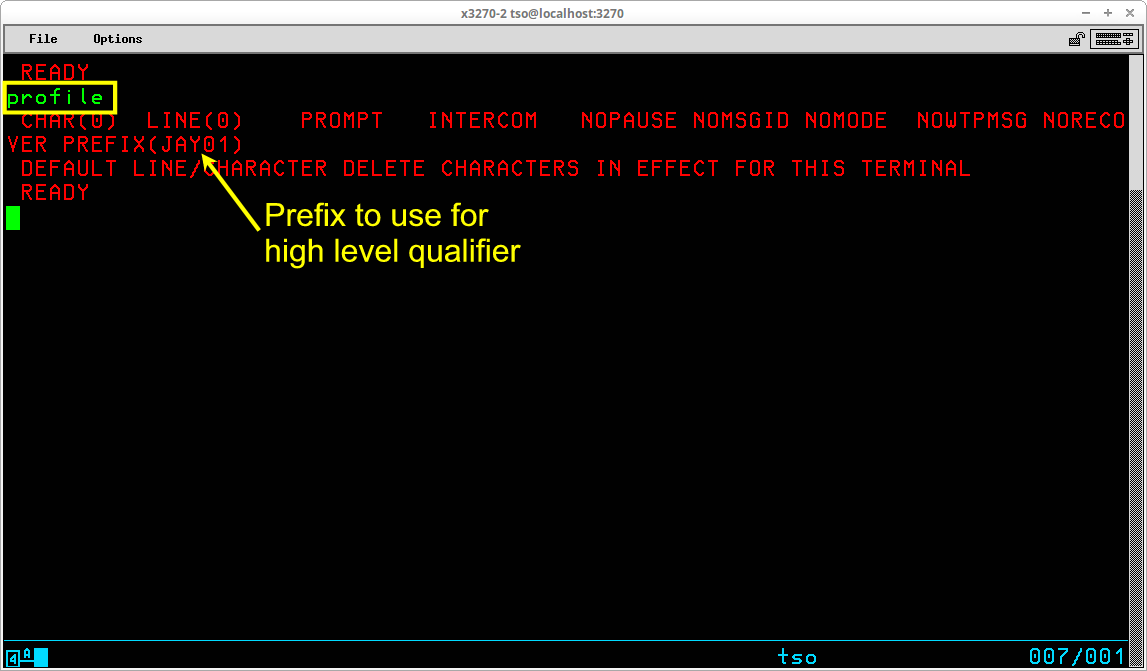
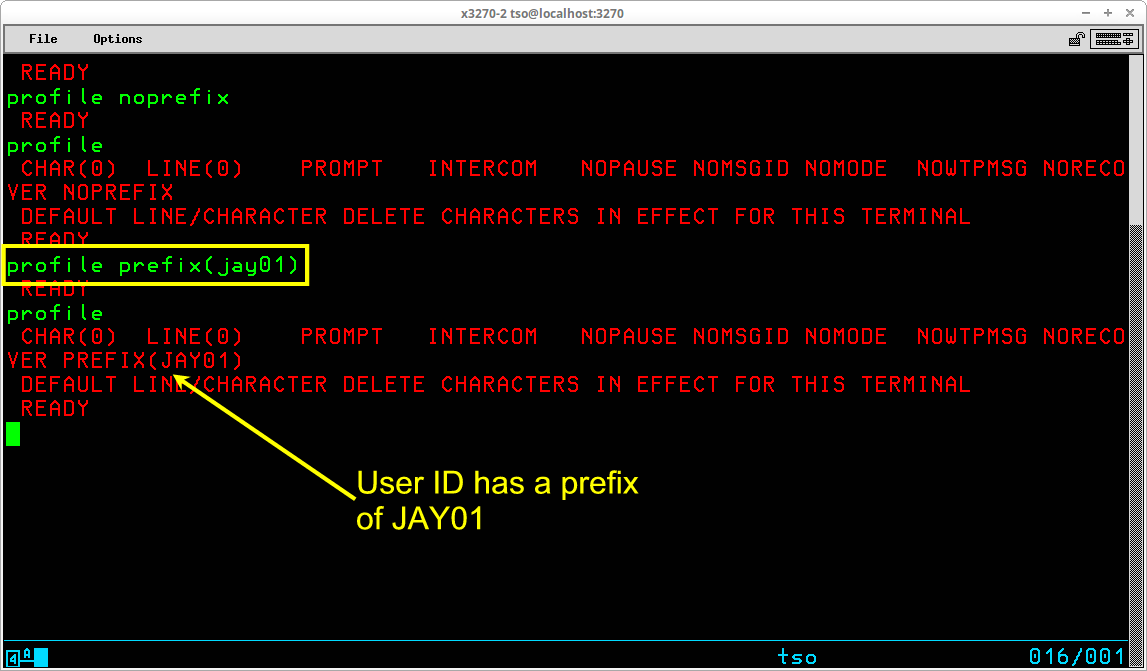
Some of the settings maintained in the profile originate from when line mode (non-display) terminals were in wide use and will not be utilized in a 3270 environment. Probably the most significant setting in the user profile is PREFIX.
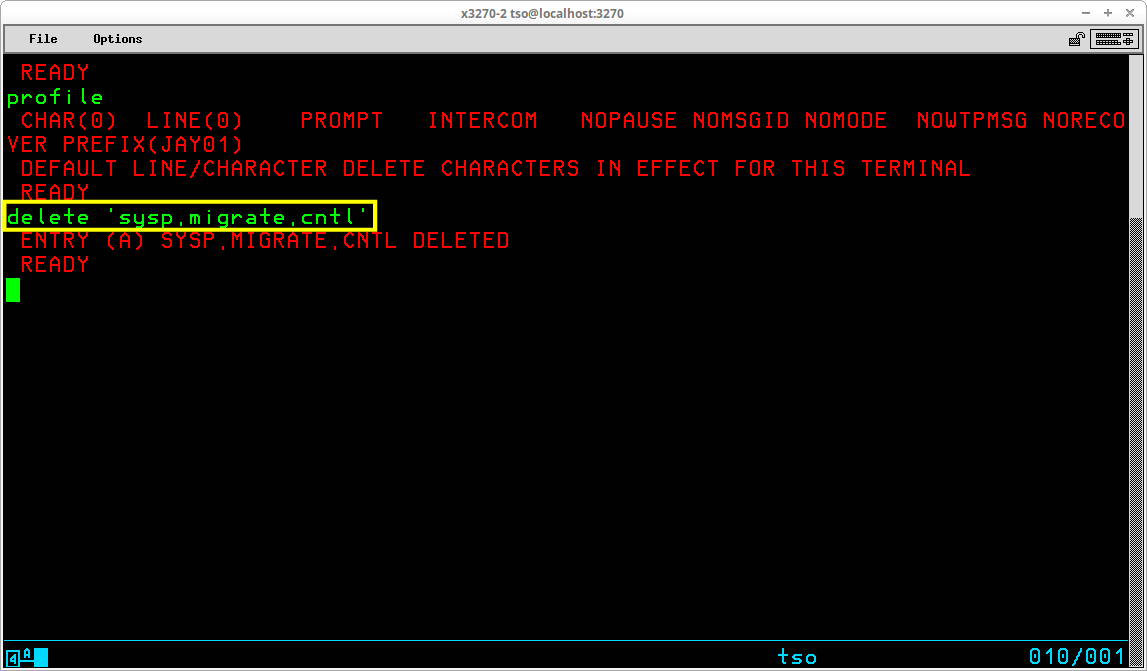
When specifying datasets in a TSO session, a dataset name may be supplied as fully qualified or not. If you supply a fully qualified dataset name, you supply the entire name and enclose it in single apostrophes:
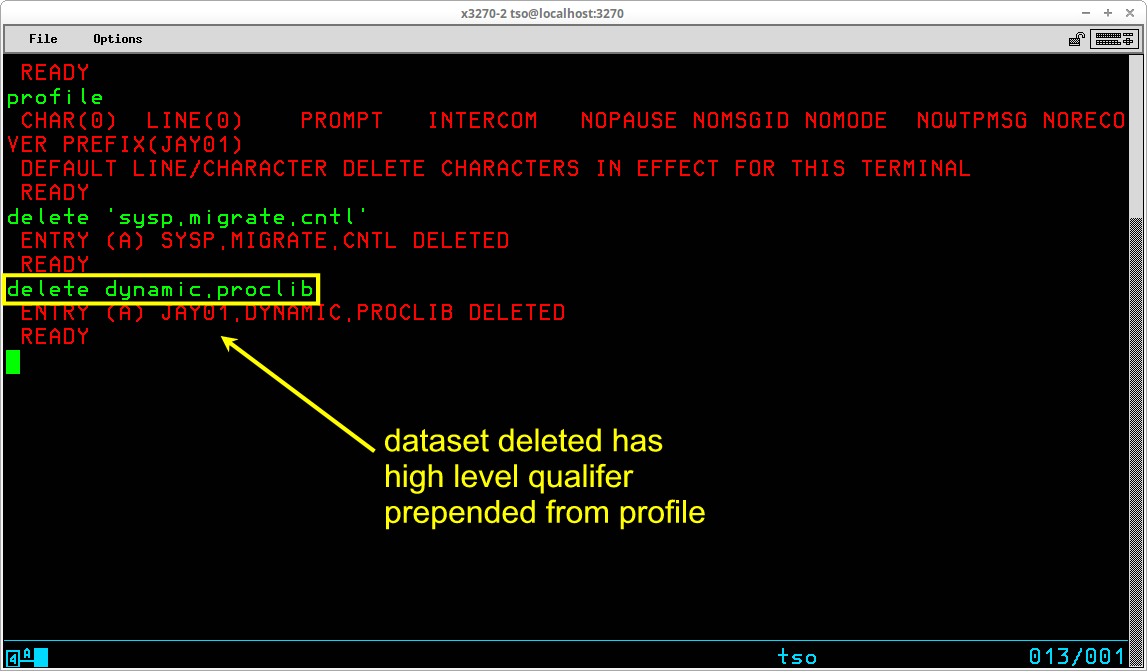
If you omit the apostrophes, TSO will supply additional qualifiers for the dataset name. The most significant of these is the high level qualifier (located at the left most position of the name), which will be taken from the prefix setting of your user profile:
As you see in the example above, the user ID - JAY01 - has been prepended to the portion of the dataset name entered by the user - dynamic.proclib - to form the complete dataset name used by the command - jay01.dynamic.proclib.
The prefix is usually set to your User ID. Typically your User ID is set up as an alias to a User Catalog in order to exert some control over where datasets are cataloged (and thus prevent extraneous user datasets from being cataloged in the Master Catalog). With the prefix set to your User ID, it ensures that datasets you create during your TSO session will be cataloged in the appropriate User Catalog. There are two circumstances in which you might want to temporarily change the prefix:
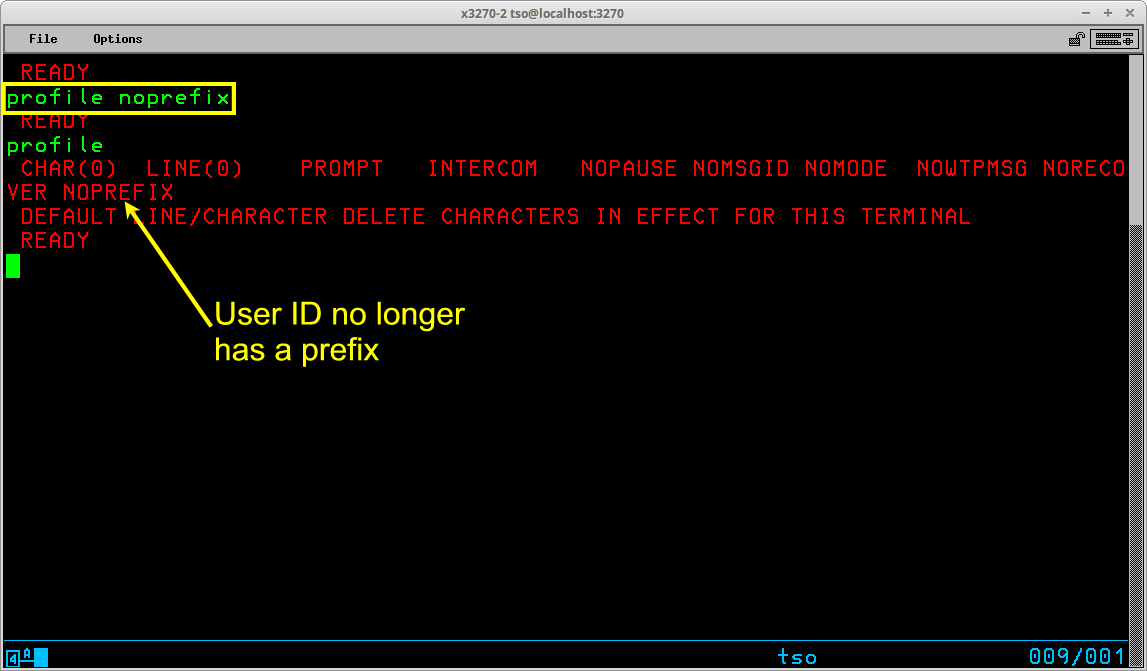
In order to remove the prefix, you use the NOPREFIX operand of the PROFILE command:
After setting the profile to noprefix, subsequent dataset names not enclosed in apostrophes will have no high level qualifier prepended to them. To again set the prefix (either to your User ID or some other relevant value), use the PREFIX operand of the PROFILE command:
Other settings in the user profile that might be useful to a typical user include PAUSE, MSGID, and WTPMSG, but I will not be discussing them here. To obtain more information use the HELP PROFILE command.
TSO conveniently provides a HELP command that may be used to obtain information about the function, syntax, and operands of commands and subcommands. The source of this information is contained in the members of the partitioned dataset SYS1.HELP, which is created during System Generation. (It is a convention followed by many Systems Programmers to place help text for user written commands in a secondary dataset -- SYS2.HELP -- which is also accessed by the HELP command.)
The syntax of this command is:
HELP [zero or more optional operands]
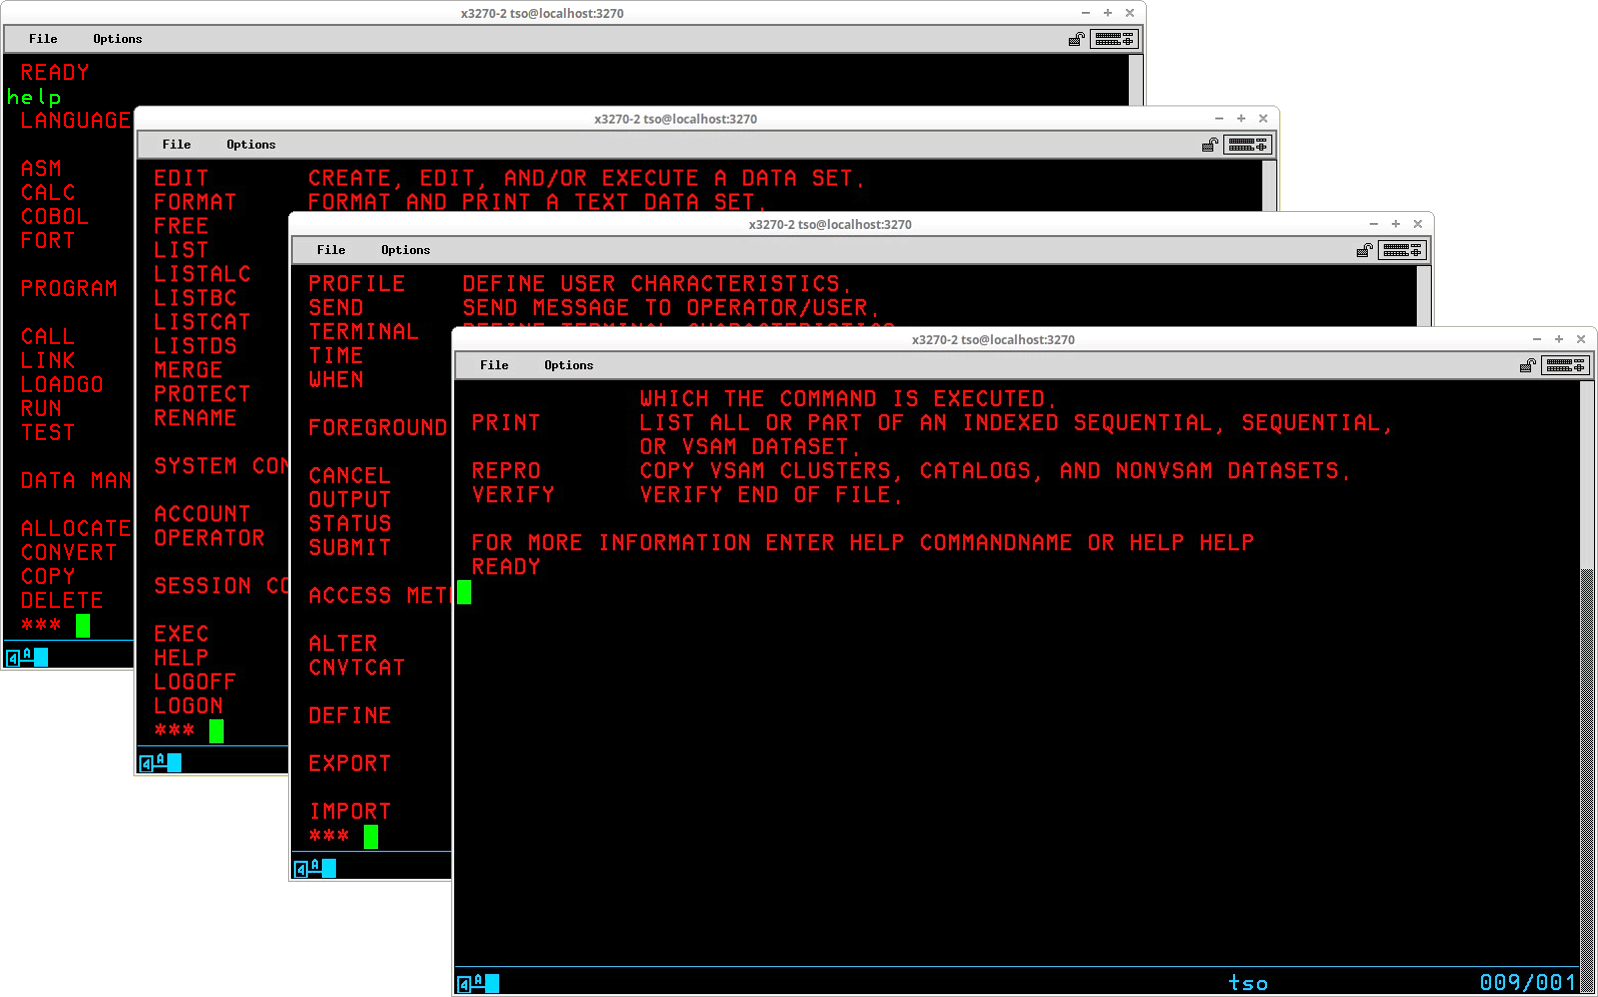
The HELP command with no operands displays a list of valid commands (note that this list is produced solely from SYS1.HELP so it will not include user commands for which help text resides in SYS2.HELP unless it has been specifically updated to do so). To obtain additional information about a particular command, enter the HELP command and specify the name of the command for which you want additional information displayed as an operand. The following overlapped screen captures show the four screens of output produced by the HELP command with no operands:
For any individual command, typing HELP along with the command name, will display an overview of the command and its operands. Here is the first screen of output for HELP LISTCAT:
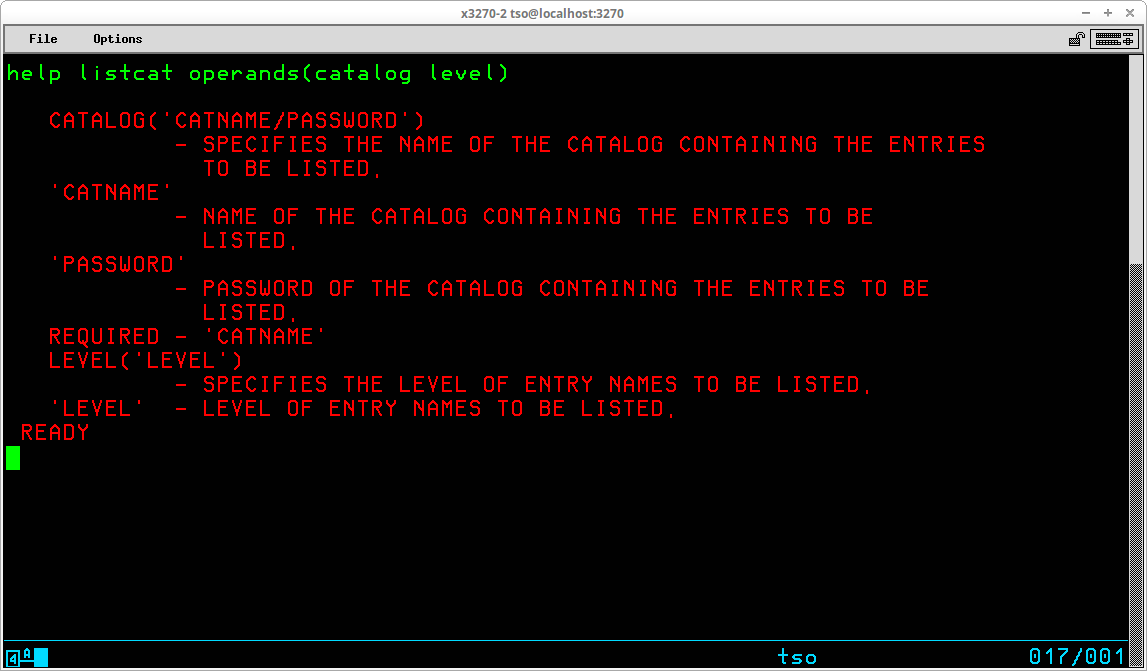
For the specified command, you will be shown a brief description of the function(s) of the command, the syntax of the command, and a description of each operand. Keyword operands for the HELP command -- FUNCTION, SYNTAX, OPERANDS -- may be specified to limit the output displayed by the HELP command. FUNCTION limits the output displayed to the description of the function; SYNTAX limits the output displayed to the syntax required for the command, and OPERANDS limits the output displayed to the operands available for the command. OPERANDS will also accept one or more keywords specified in parentheses to request information on specific operands:
TSO most closely resembles the Command Line environment of Linux or Windows, in that it provides a rich set of commands that may be used to investigate and modify the environment accessible by the user from their TSO session. In fact, almost the entire set of IDCAMS commands (the VSAM Access Methods Services utility) may be executed directly from the TSO session prompt to manipulate Catalogs, Datasets, Aliases, and other VSAM objects. The following section describes some of the basic data management tasks that may be accomplished from the TSO session.
The LISTCAT command (which may be abbreviated LISTC) is one of the most frequently used TSO commands. It is used to list information contained in the Master and User Catalogs of the system for non-VSAM datasets and VSAM objects. The syntax of this command is:
LISTCAT [zero or more optional operands]
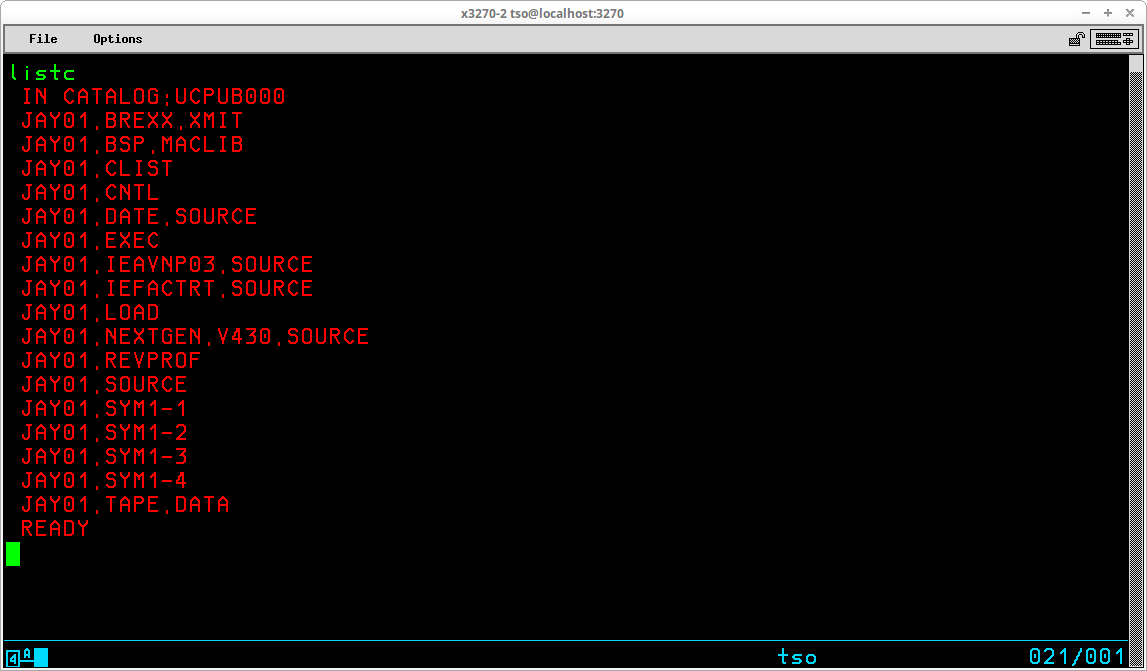
Issued with no operands, the command will use the current value of the prefix from the User's profile to list catalogued datasets for that user:
The first line of the output shown above indicates that the User ID prefix has been used to select the User Catalog UCPUB001 based upon the prefix value JAY01. This association is specific to this particular User ID on an MVS system generated following my Installing MVS 3.8j tutorial/instructions and will most likely differ on other systems. The second and following lines are the datasets from this catalog in which the high level qualifier match the prefix. There may be additional non-VSAM datasets (as well as other VSAM objects) catalogued in the User Catalog that are excluded from this list, which is illustrated by setting the prefix to NOPREFIX and listing the contents of the User Catalog by specifically selecting the catalog to be listed:
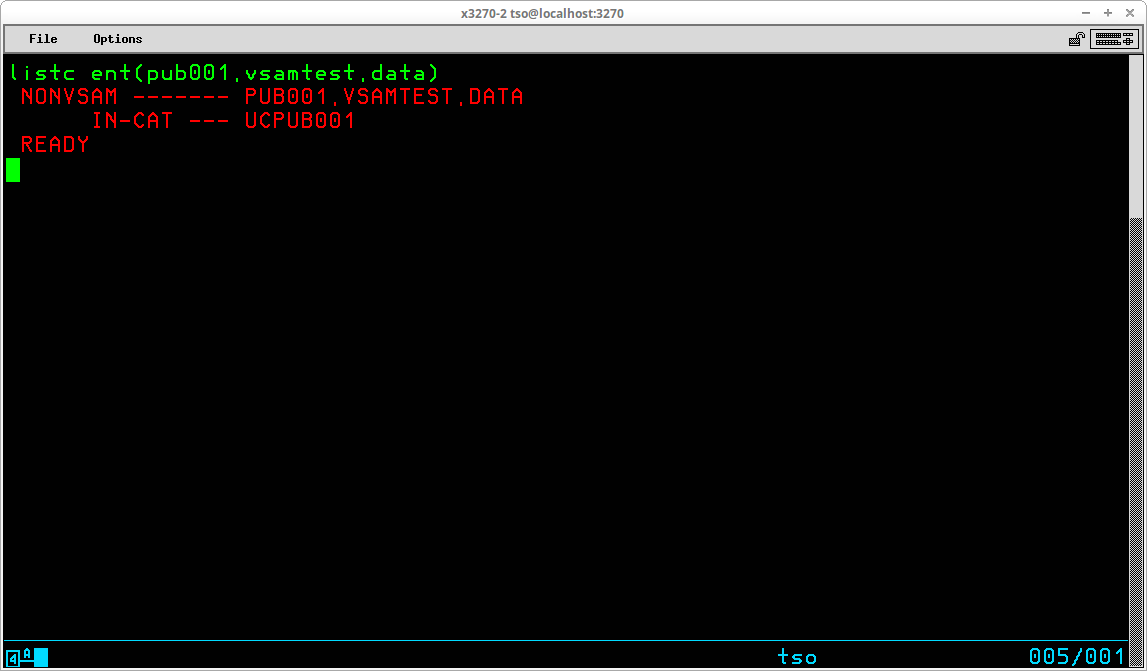
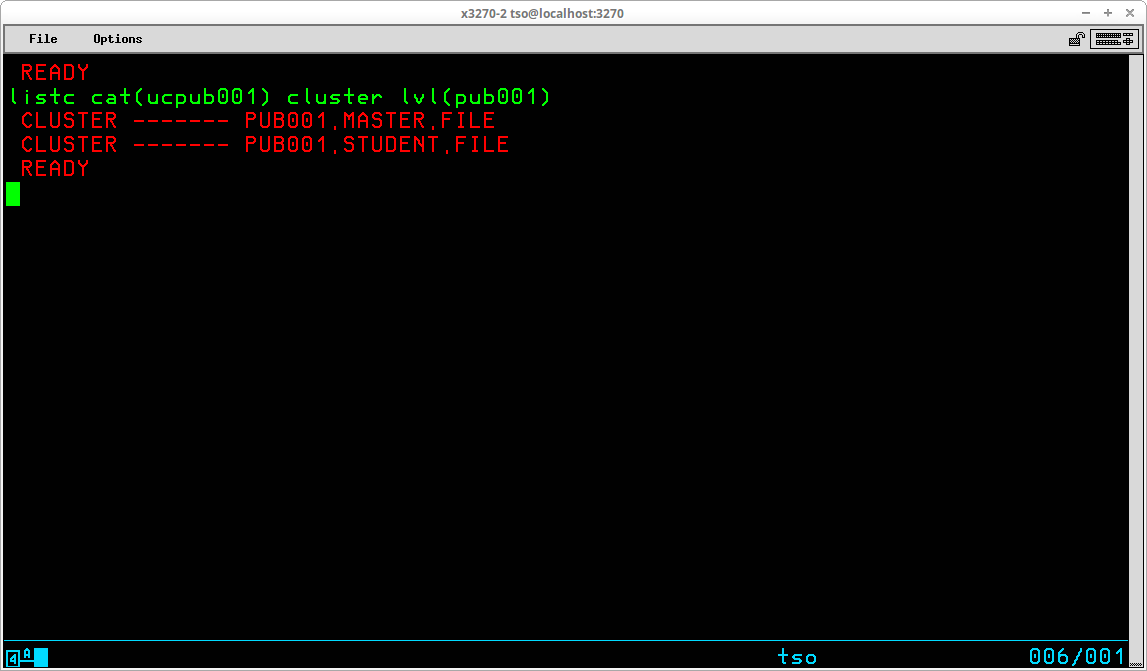
Frequently the goal will be to have a smaller, more relevant, list returned by the LISTCAT command instead of having all objects included from the catalog that match the User ID prefix. Two operands allow you to limit the information selected: ENTRIES and LEVEL (which may be abbreviated to ENT and LVL, respectively). ENTRIES is used to limit the information returned to that for specific objects named in parentheses following the operand. Usually this operand is used to return information for a single object:
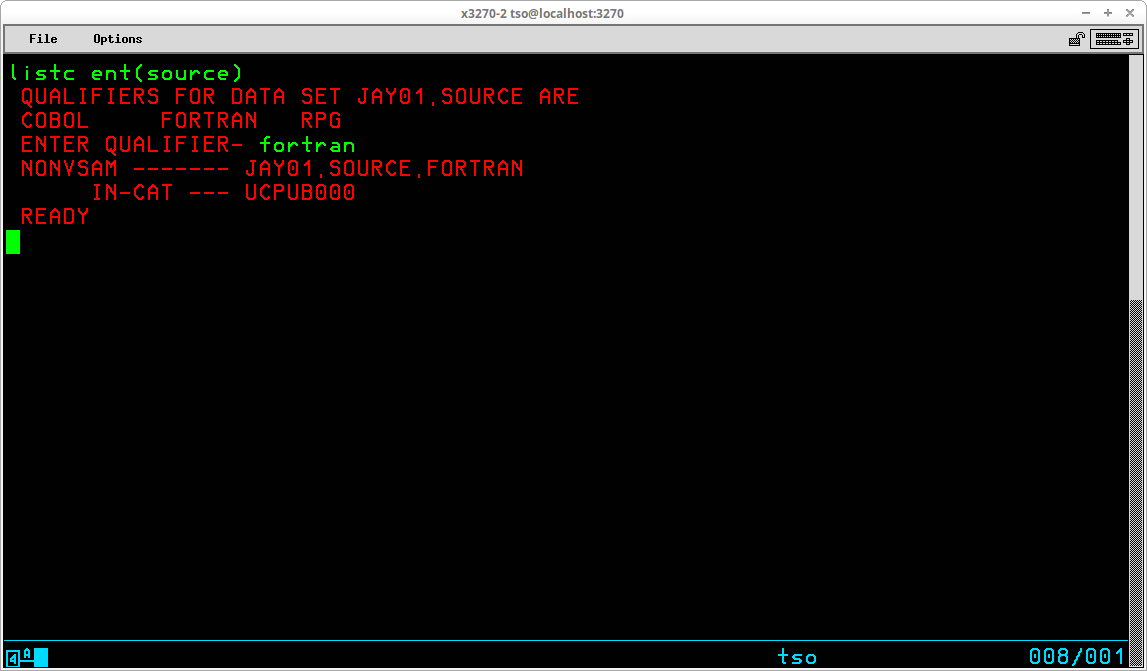
If the value you specify for the ENTRIES operand is ambiguous (more than one object in the catalog matches the value you enter, but with different lower level qualifiers), you will be prompted with a list of those lower level qualifiers so that you may specify which qualifier is to be used to complete the execution of the command:
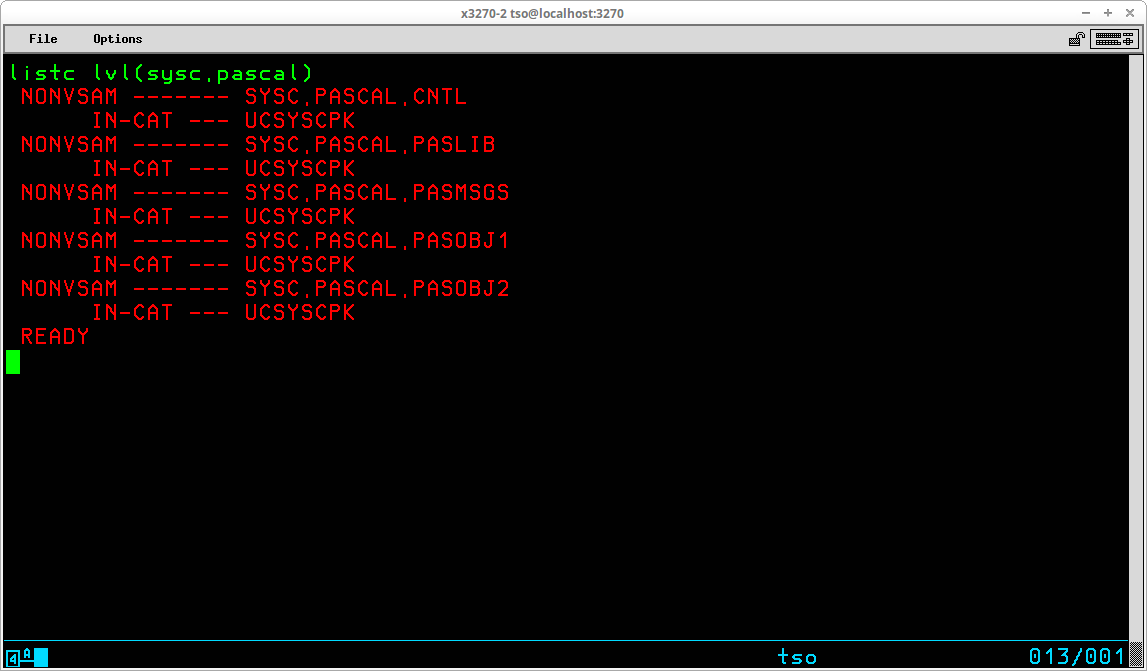
In order to list a group of objects from the catalog matching a specified qualifier level, you use the LEVEL operand:
Because you are specifying the high level qualifiers to be used to filter the output returned, the prefix value is not relevant when the LEVEL operand is used. However, the prefix value is still used to select the User Catalog from which the entries are listed.
Other operands may be specified to designate the exact user catalog from which listings are made and the type of objects to be listed:
To learn more about the LISTCAT command, enter HELP LISTCAT at the TSO READY prompt.
The LISTDS command (which may be abbreviated LISTD) is used to list attributes of non-VSAM datasets. The syntax of this command is:
LISTDS [zero or more optional operands]
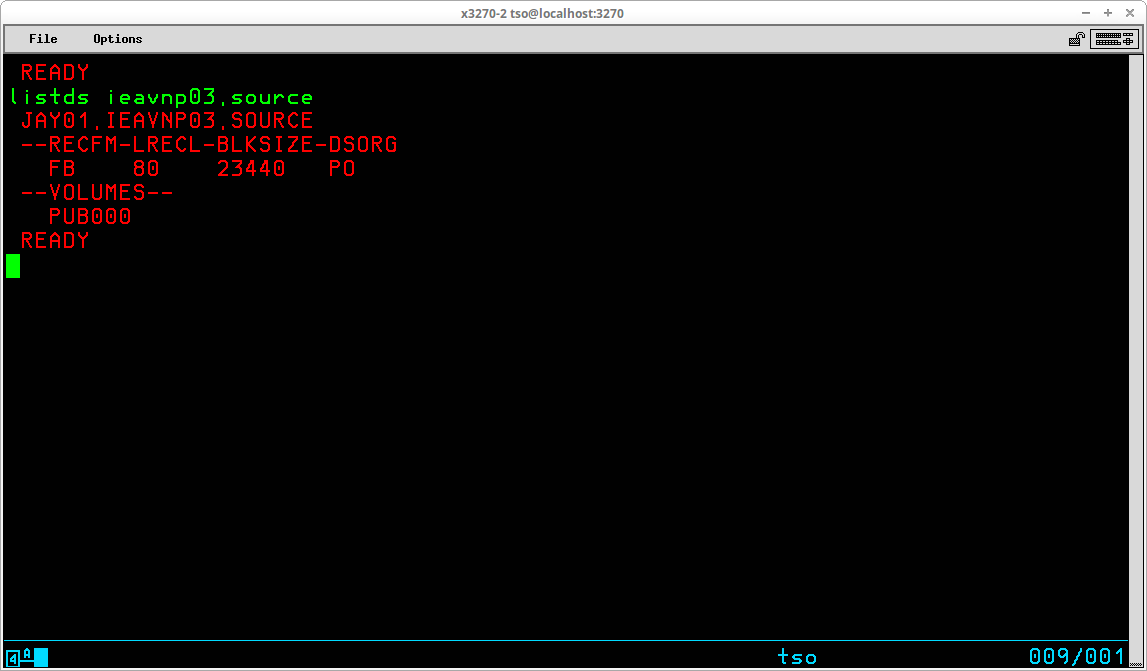
If the command is entered with no operands, you will be prompted for a dataset name; however, it is typical practice to enter the name of the dataset for which attributes are to be listed as an operand of the command:
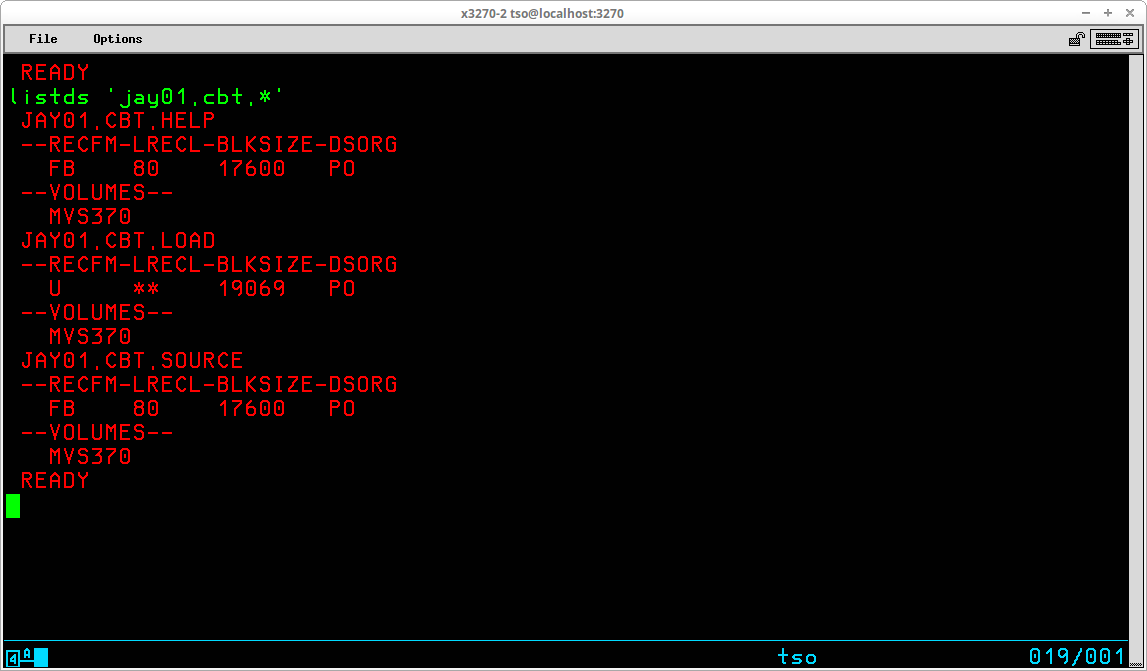
You may list more than one dataset by replacing one or more levels of qualification in the dataset name with an asterisk (*):
The attributes listed by default for the specified dataset(s) include Record Format (RECFM), Logical Record Length (LRECL), Block Size (BLKSIZE), Dataset Organization (DSORG), and the Volume Serial identifier(s) on which the dataset(s) reside. Additional attributes may be displayed by including additional operands; a frequently used operand - MEMBERS - will return a list of the members for partitioned datasets:
To learn more about the LISTDS command, enter HELP LISTDS at the TSO READY prompt. You might also want to investigate the DD, FINDFILE, LISTVOL, LM, PDSBLKS, and SHOWDS commands from the CBT Tape.
The RENAME command (which may be abbreviated REN) is used to rename either a physical sequential dataset or a member of a partitioned dataset. The RENAME command may not be used to rename a VSAM object (you must use the IDCAMs ALTER command to accomplish that). The syntax of the RENAME command is:
RENAME [zero or more optional operands]
The name of the dataset is changed in both the VTOC and the catalog in which the dataset is cataloged.
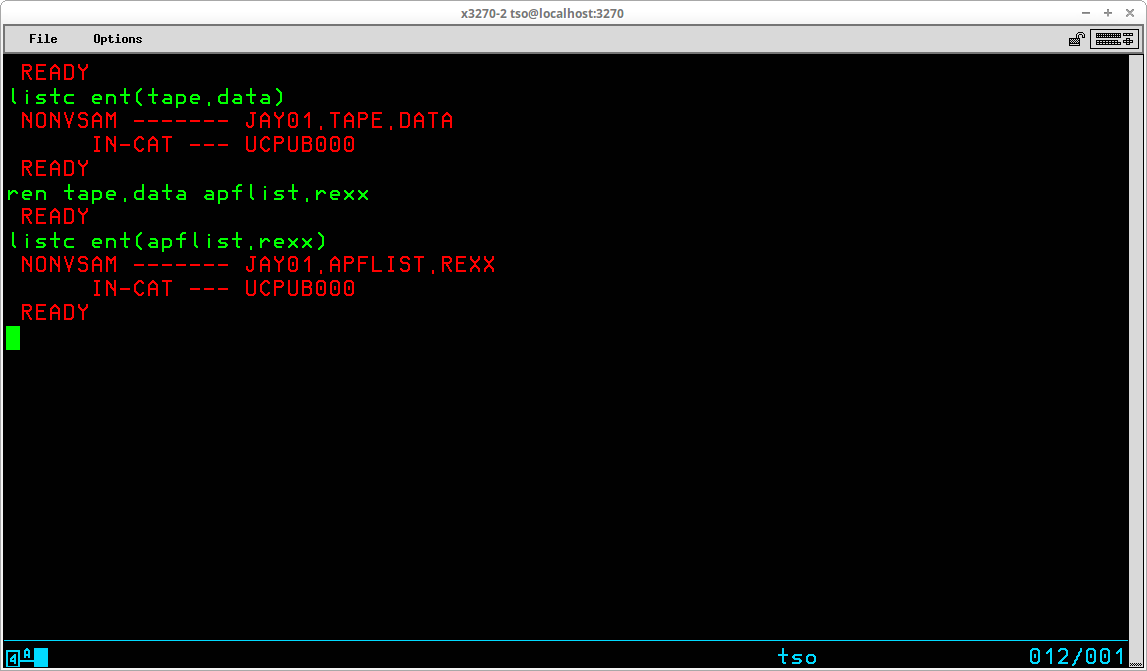
If the command is entered with no operands, you will be prompted first for the name of an existing dataset which is to be given a new name, followed by the new name the dataset is to be given. However, the typical practice is to enter both the old and new names for the dataset as operands of the command:
In the display above the RENAME command is preceded and followed by a LISTCAT command to show the catalog entries for the dataset before the RENAME command is entered and after. Note that for a successful RENAME operation, there is no output produced for the command.
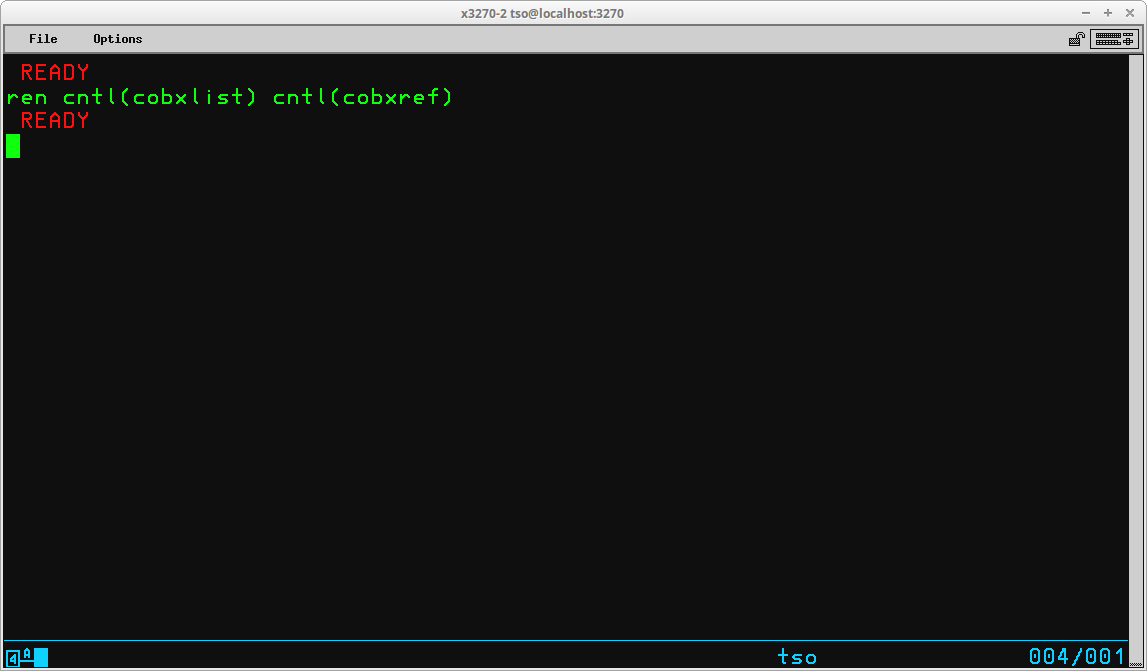
The RENAME command may also be used to rename members of a partitioned dataset. In that context, the operands given for both the old and new dataset name must include the name of a single member of a partitioned dataset:
Instead of modifying the name of the dataset in the VTOC and catalog, the name of the member is changed in the directory of the partitioned dataset.
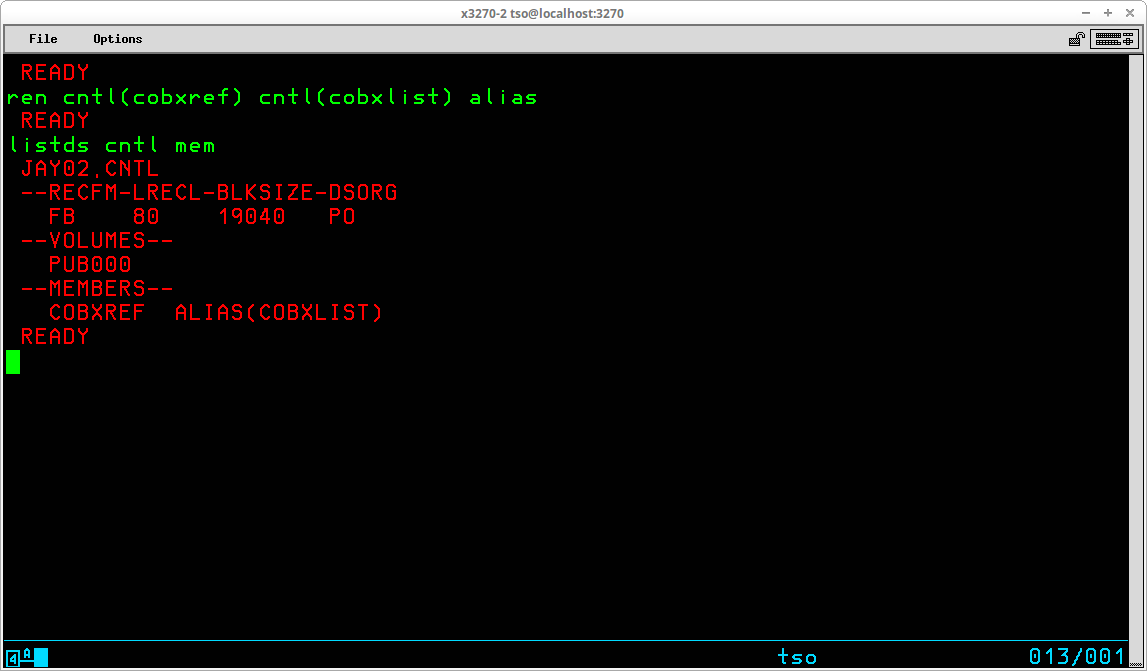
Another optional operand - ALIAS - may be specified for partitioned datasets and is used to create a new directory entry for an existing member of the dataset while leaving the original directory entry intact. This new entry, or alias, may then be used to access the contents of the member interchangeably with the original member name:
In the display above the LISTDS command is used following the RENAME command to show that an alias has been created - COBXREF - for the existing member COBXLIST. Subsequent to the execution of the RENAME command, either member name, COBXLIST or COBXREF, may now be used to access the contents of the member.
The DELETE command (which may be abbreviated DEL) is used to delete either VSAM objects or non-VSAM datasets from the catalog and VTOC and free the space occupied by their contents for reuse. The syntax of this command is:
DELETE <object or dataset name> [optional operands]
The most common use of the DELETE command is to remove a non-VSAM dataset that is no longer required. By default, the command removes both the catalog entry for the dataset and the VTOC entry, freeing the space that was used by the dataset for reuse. An optional operand - NOSCRATCH - may be specified to remove the catalog entry while retaining the dataset contents and its entry in the VTOC.
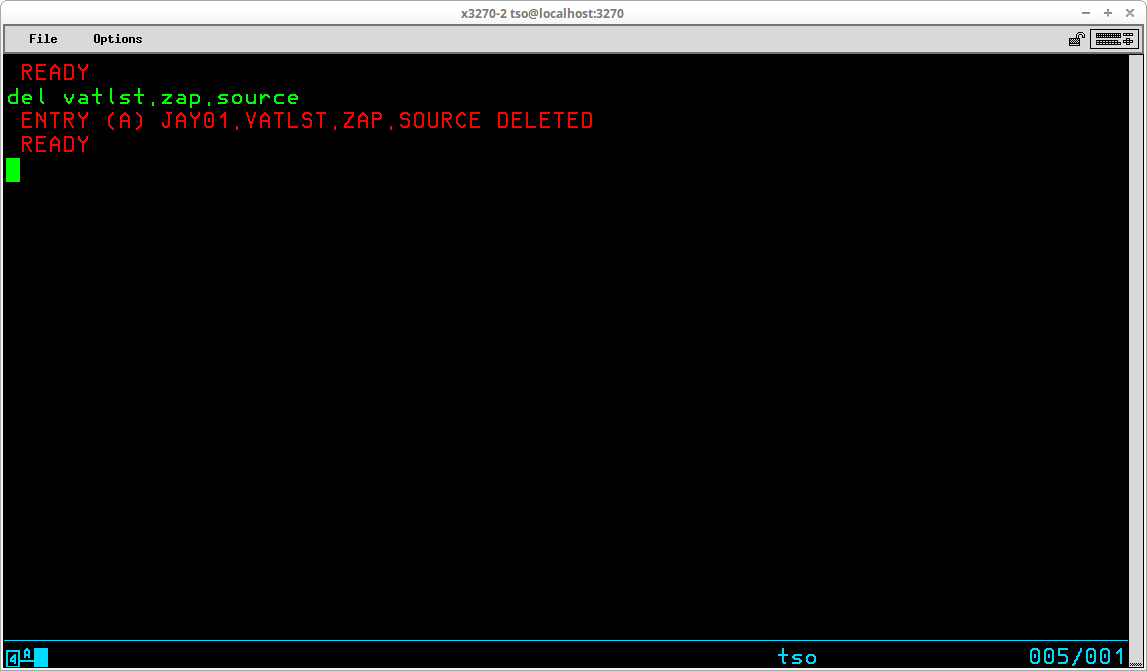
The outcome of the DELETE command in the display above is the removal of the catalog entry for the specified dataset. The entry for the dataset remains in the VTOC and the contents of the dataset remain intact on the DASD volume. If the noscratch operand is omitted, the default action, scratch, is in effect:
The entry for the dataset is removed from the VTOC and the space formerly occupied by the contents of the dataset are available for reuse. Note that the output from the command is identical regardless of whether scratch or noscratch is specified.
The DELETE command may also be used to remove VSAM objects:
In the display shown above, the VSAM object specified for deletion was a VSAM cluster. The VSAM cluster also had associated VSAM objects. The single delete command caused first all associated VSAM objects to be deleted, then the subcomponent of the cluster, the data object, was deleted before the cluster object was deleted.
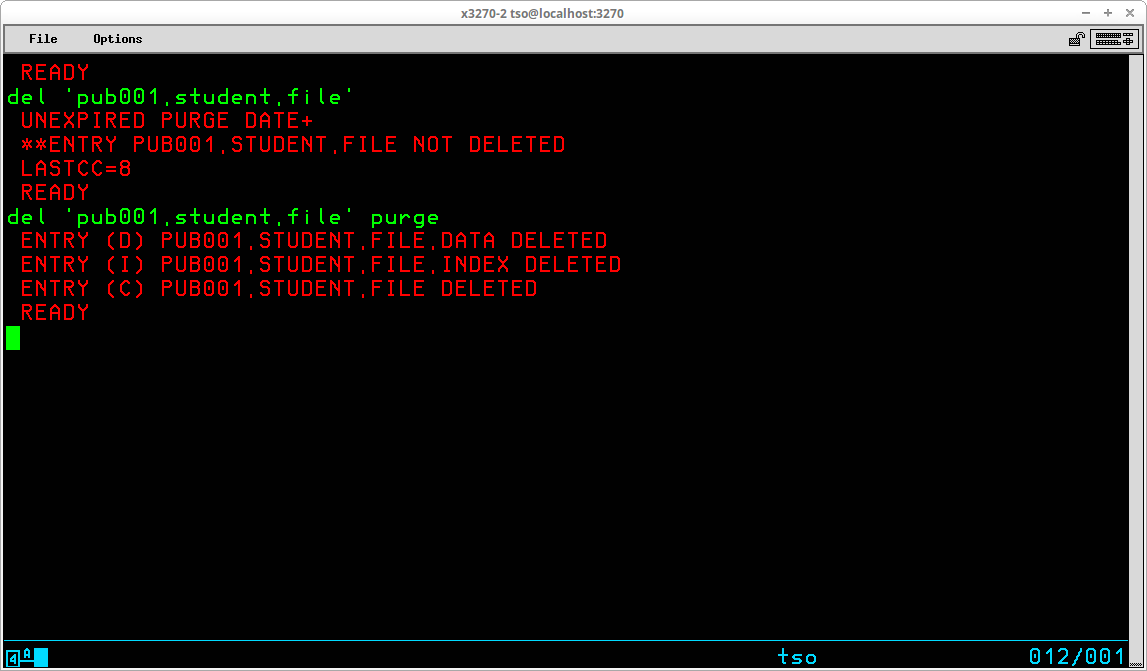
Another operand that may be used frequently is PURGE. The opposite of this operand, which is the default, is NOPURGE and specifies that the object will not be deleted if the expiration date specified when the object was created has not yet been reached. Specifying the PURGE operand overrides the expiration date, allowing the object to be deleted anyway.
As shown in the display above, if DELETE is specified for an object which has an expiration date that has not yet passed, an error message is issued and the object is not deleted. Adding the PURGE operand to the delete command causes the deletion to proceed regardless of the expiration date.
The EDIT command (which may be abbreviated E) is used to create and modify data contained in user datasets. It has very basic capabilities and in the real world has mostly been replaced by ISPF. In the Hercules/MVS3.8j community, much more robust editors are available: RPF and REVIEW. Both of these editors, and in both cases the programs are much more than just editors, provide an editor that functions much like ISPF. However, there are times when EDIT is all that is available and can save the day. I am only going to cover the very basics of EDIT as it is most likely you will be using RPF or REVIEW if you regularly create or edit data under TSO.
The most basic syntax of the EDIT command is:
EDIT <dataset>(<member>) [<type>] [OLD | NEW]
Dataset and member specify the partitioned dataset and member that is to be edited. EDIT can modify physical sequential datasets, but the majority of its use is in maintaining source code or JCL libraries (another name used frequently to refer to partitioned datasets).
Type specifies the type of records contained in the dataset and is used by the EDIT command to interpret where sequence numbers can be expected. Some valid types are:
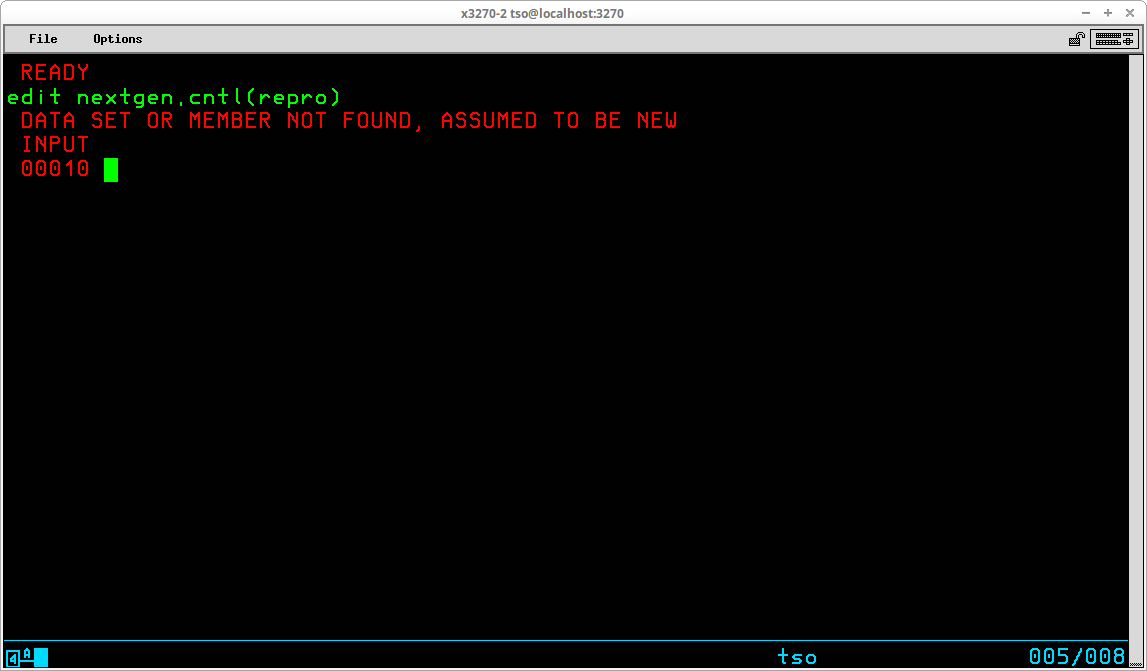
Old or New designate whether the dataset (or member if editing a partitioned dataset) already exists or is being created. Usually this operand can be omitted as EDIT will make the correct assumption based upon the existence of the dataset (or member) when EDIT is invoked.
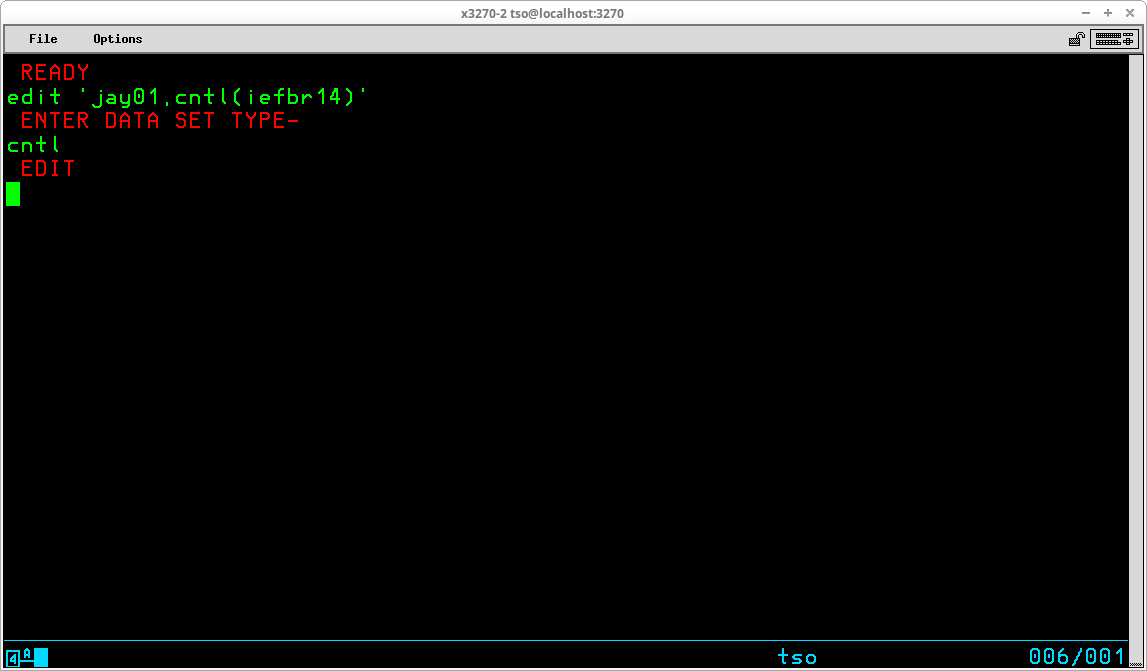
If the dataset name is specified without enclosing quotes (ie. is not qualified), EDIT will attempt to use the last qualifier of the dataset name to determine the type of records contained in the dataset:
If the dataset name is enclosed in quotes and the dataset type is omitted (or EDIT is unable to determine a valid type from the dataset name), EDIT will prompt for the type:
EDIT operates in two basic modes - INPUT or EDIT. The initial mode is determined by whether the data being edited is NEW or OLD. As shown above, since the member - iefbr14 - already exists, the initial mode is EDIT, which is indicated by the prompt. If the data being edited is NEW, the initial mode is INPUT:
In INPUT mode, the sequence number for the next available data record is displayed and the cursor is positioned at the beginning of the record awaiting input of the data for the next record to be typed.
The mode is switched between EDIT and INPUT by pressing ENTER at the prompt without typing any other characters.
EDIT is line mode oriented, since it dates from the time when line mode terminals were the majority of devices in use. The commands you enter will identify one or more lines to which they will be applied. The current line in the dataset you are editing is referenced by the current line pointer, which is specified with an asterisk (*) when it is referenced in EDIT subcommands.
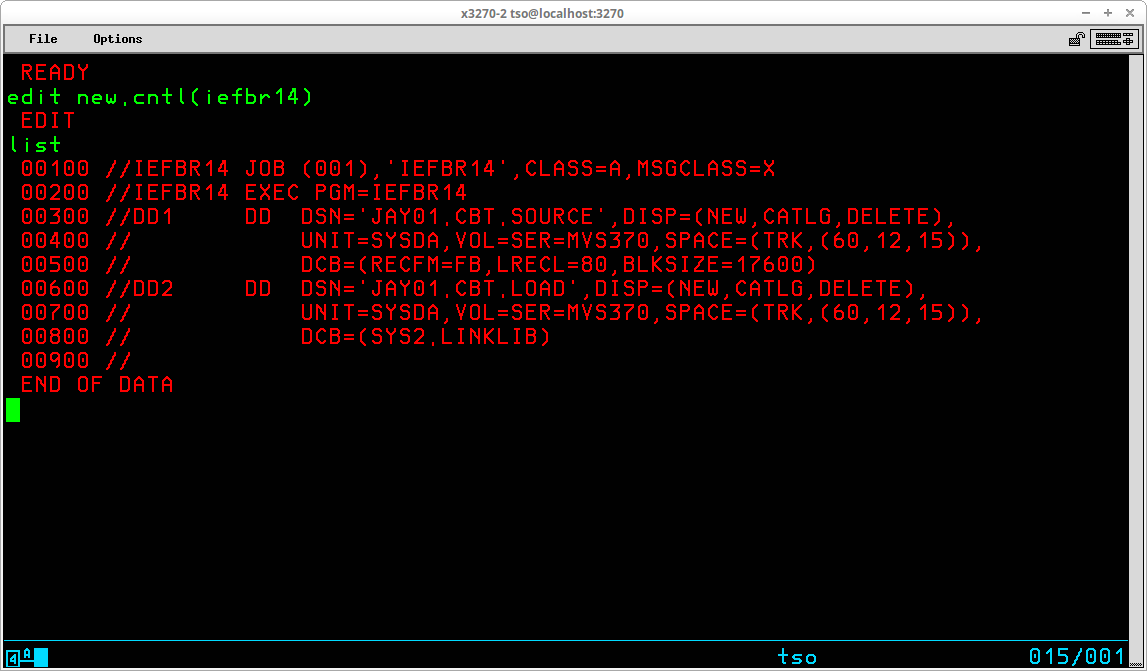
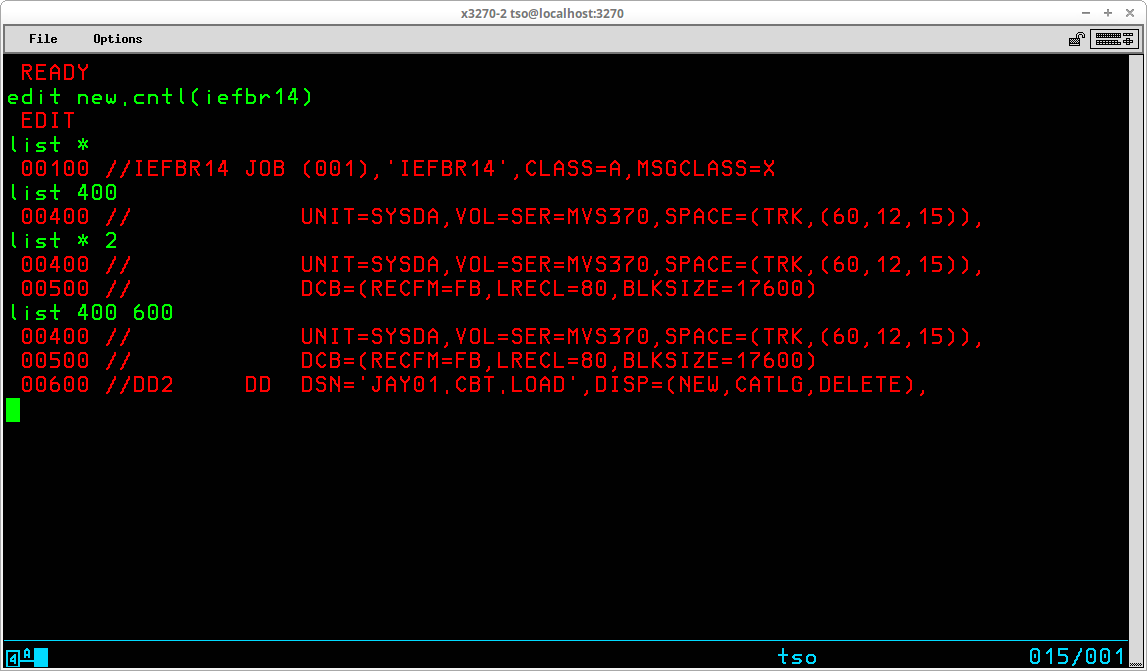
To display the data currently existing in a dataset, use the LIST subcommand:
LIST [ {<starting line sequence number> [<ending line sequence number>] |
* [number of lines] }
If no operands are included, the entire dataset is listed. If the dataset is large, this can result in numerous screens of output. A single line can be displayed by specifying either the line sequence number or the current line pointer (*). A range of lines may be displayed by specifying either a starting and ending sequence number pair or the current line pointer and a number designating the number of lines to display.
Below, LIST is specified with no operands, so the entire contents of the member are listed:
Below are four examples of the LIST command -
- using * to designate the current line pointer,
- using a specific line number,
- using * to designate the current line pointer, plus the number of lines to display, and
- using a specific beginning and ending line number to display:
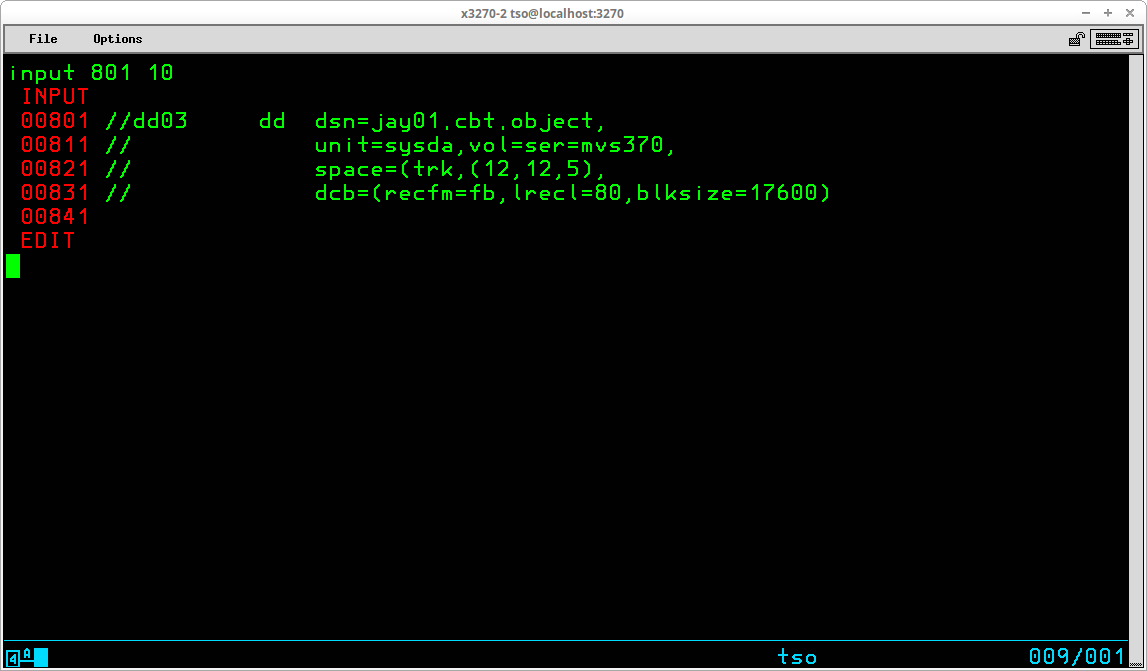
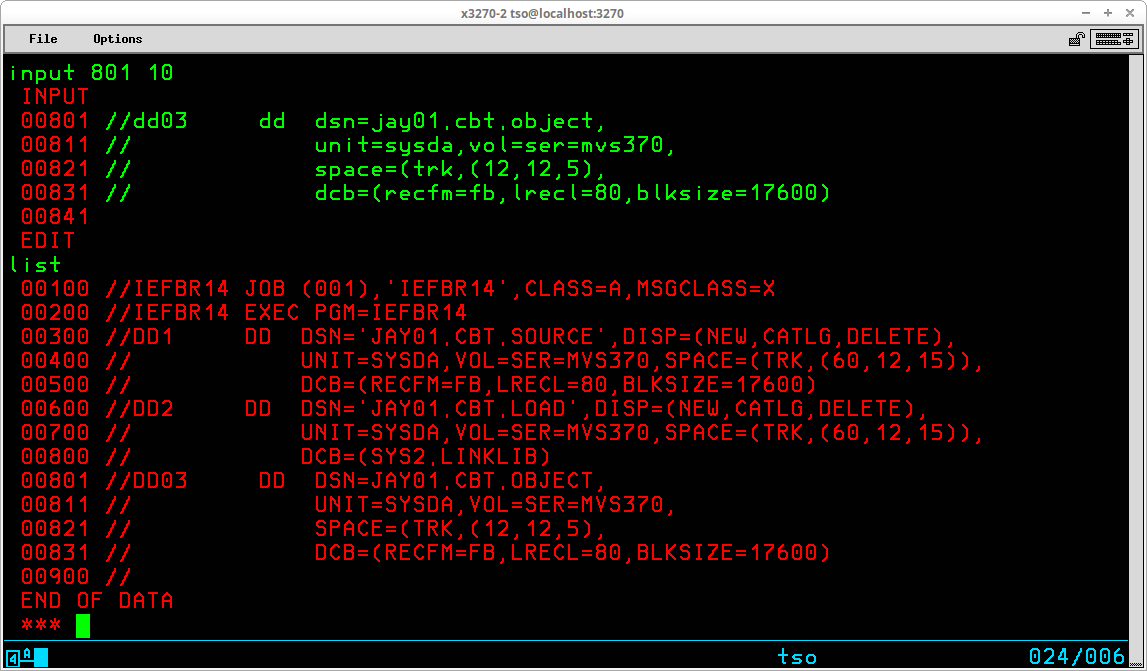
To insert lines, the mode must be switched to INPUT. If you press ENTER without typing anything when you are in EDIT mode, you will be placed in INPUT mode and the lines typed will be added at the next available line number (usually the end of the dataset). If you use the INPUT subcommand and specify a line number, the lines are added at the position indicated by the line number you have specified. The syntax of the INPUT subcommand is:
INPUT <line sequence number> [<increment>]
The line sequence number operand specifies the line number at which the first new line is to be inserted. The optional increment operand specifies the value to be used to increment the line sequence number for subsequent lines.
After all new lines have been entered, the mode is switched back to EDIT by pressing ENTER without typing any additional characters at the input prompt. LIST can be used to view the member with the new lines inserted:
When inserting new lines between existing lines of a dataset, you must have enough unused line numbers to accommodate the new lines you are adding. When all available sequence numbers have been added, an error message will be displayed and the mode will switch back to EDIT. In order to insert additional lines when you have used all available sequence numbers, you must RENUMber the dataset.
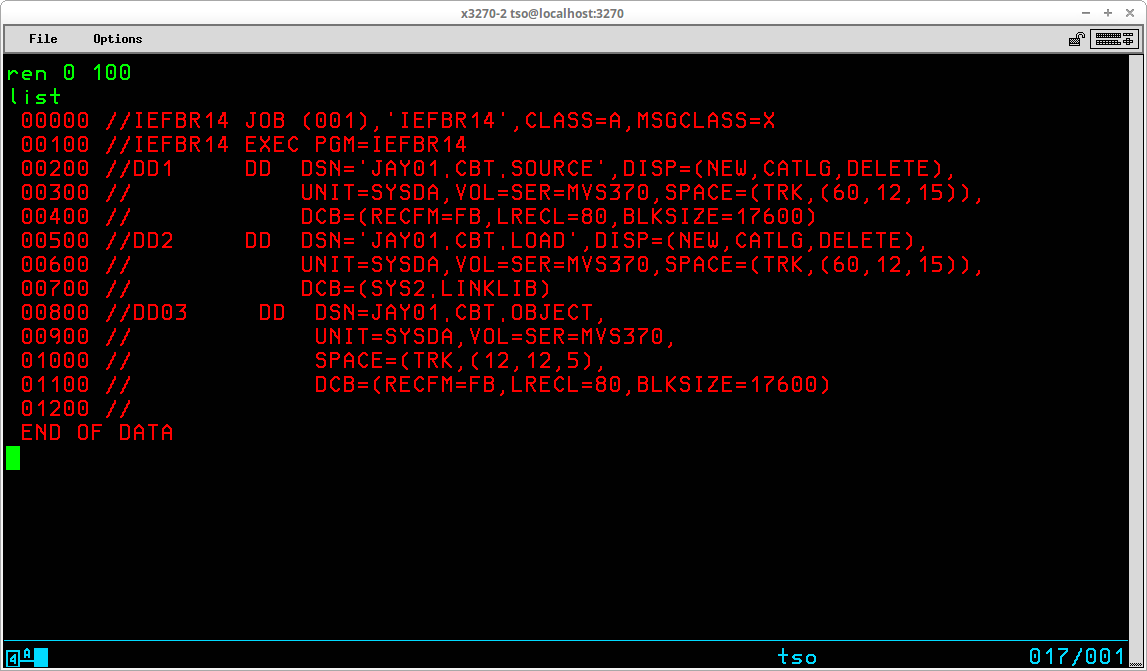
The RENUM subcommand (which may be abbreviated REN) is used to renumber the lines of a dataset in order to make room for additional new records. The syntax of RENUM is:
RENum [beginning sequence number] [increment]
The beginning sequence number operand specifies sequence number to be assigned to the first line of the dataset. If omitted it defaults to the value 10. The increment operand specifies the value to be added to each previous sequence number to derive the sequence number of each successive line. If omitted, the increment value will default to the value 10.
The display above shows the RENUM subcommand specifying a starting sequence number of 0 and an increment value of 100, and a LIST subcommand showing the dataset with the new sequence numbers.
The DELETE subcommand (which may be abbreviated DEL) is used to remove records from the dataset. The syntax of the subcommand is:
DELete { [starting sequence number] [ending sequence number] |
[*] [count of records to delete] }
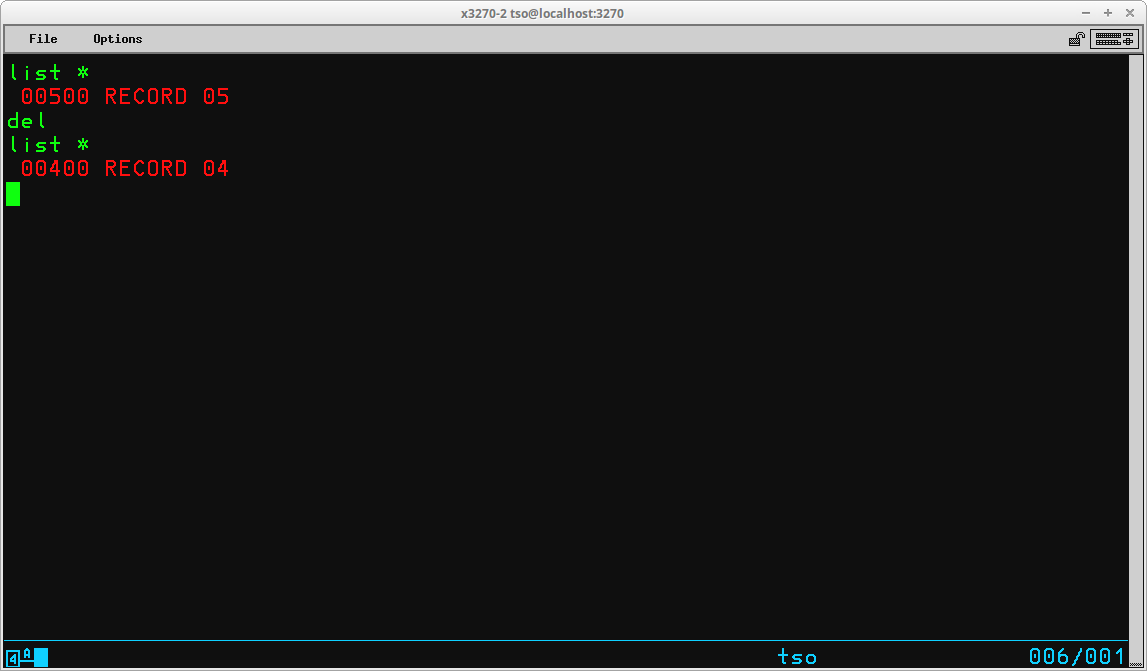
Like the LIST subcommand, the optional operands may be specified using sequence numbers of records in the dataset or by reference to the current line pointer. If no operands are included, the record referenced by the current line pointer is deleted. The screen below shows deletion of a single record using the current line pointer; after the deletion the current line pointer moves to the preceding line. LIST with the current line pointer shows the before and after:
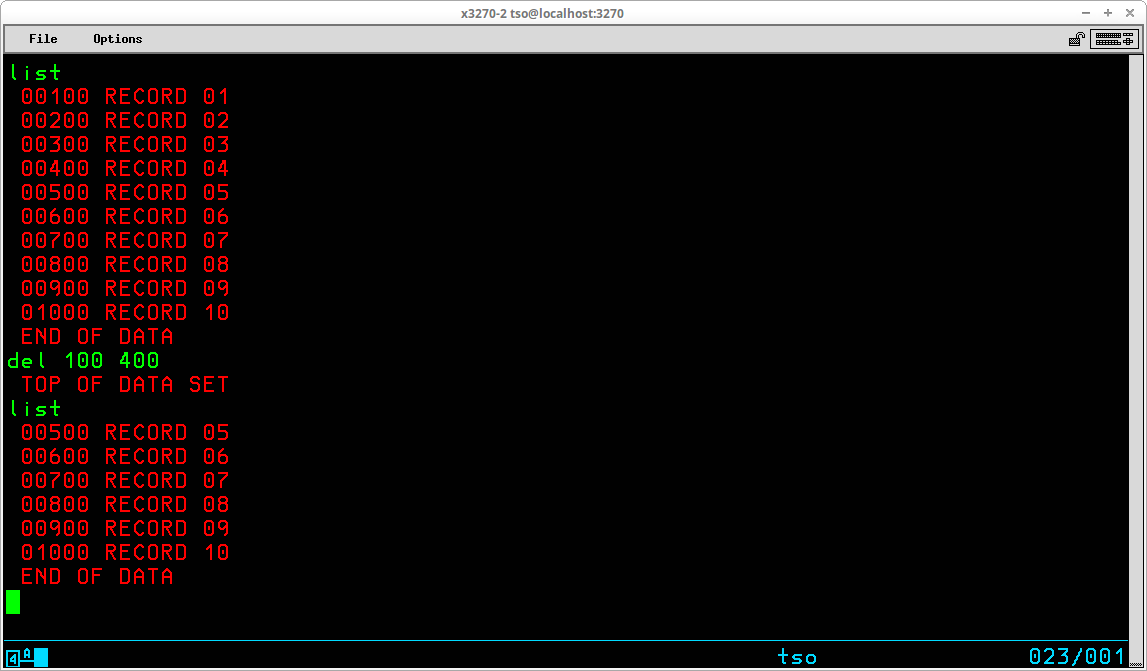
If a single sequence number is included, the record containing that sequence number is deleted. If a beginning and ending sequence number are included, the records containing those sequence number and all records located between them are deleted. The screen below shows deletion of a group of records using record numbers from the member. LIST shows the before and after:
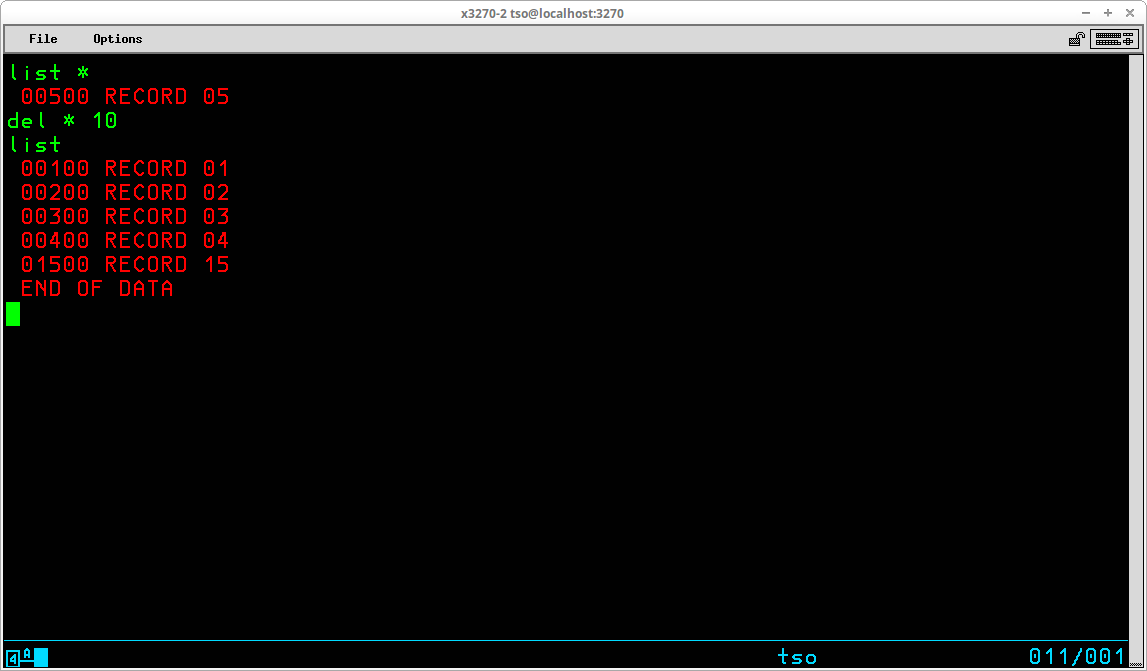
More than a single record may also be deleted using the current line pointer by including the current line pointer indicator, an asterisk (*), followed by an integer indicating the total number of records to delete. LIST with the current line pointer shows the before and LIST shows the entire member after:
Four subcommands are provided to allow you to reposition the current line pointer:
The subcommands used to reset the location of the current line pointer are most often used in conjunction with the FIND and CHANGE subcommands.
A subcommand that is very useful when doing FIND and CHANGE subcommands is VERIFY (which may be abbreviated V). The syntax of the subcommand is:
Verify [ON | OFF]
The subcommand changes the verify setting for the current edit session. When Verify is on, each time the current line pointer is changed or changes are made to a dataset record, the record is displayed. With Verify set to off, the records are not displayed.
The FIND subcommand (which may be abbreviated F) is used to search for a specified character string in the records of the dataset. The search begins with the current line. If the string is found the current line pointer is left positioned at the first record that contained the string being searched for. If the string is not found, the current line pointer is left positioned at the last record in the dataset. The syntax of the subcommand is:
Find <character string> [<position>]
The character string operand may be delimited by any non-numeric character which does not appear within the specified character string, except blank, comma, tab, parenthesis, asterisk, apostrophe, or semicolon.
If the optional position operand is specified, each record is tested for the specified character string only beginning at the specified character position. If omitted, each character position of each record is tested for the presence of the character string.
After executing a FIND subcommand, the same search may be repeated without respecifying the character string by entering the subcommand with no arguments.
If the FIND subcommand does not find the specified character string and the end of the member is reached, the message TEXT NOT FOUND will be displayed.
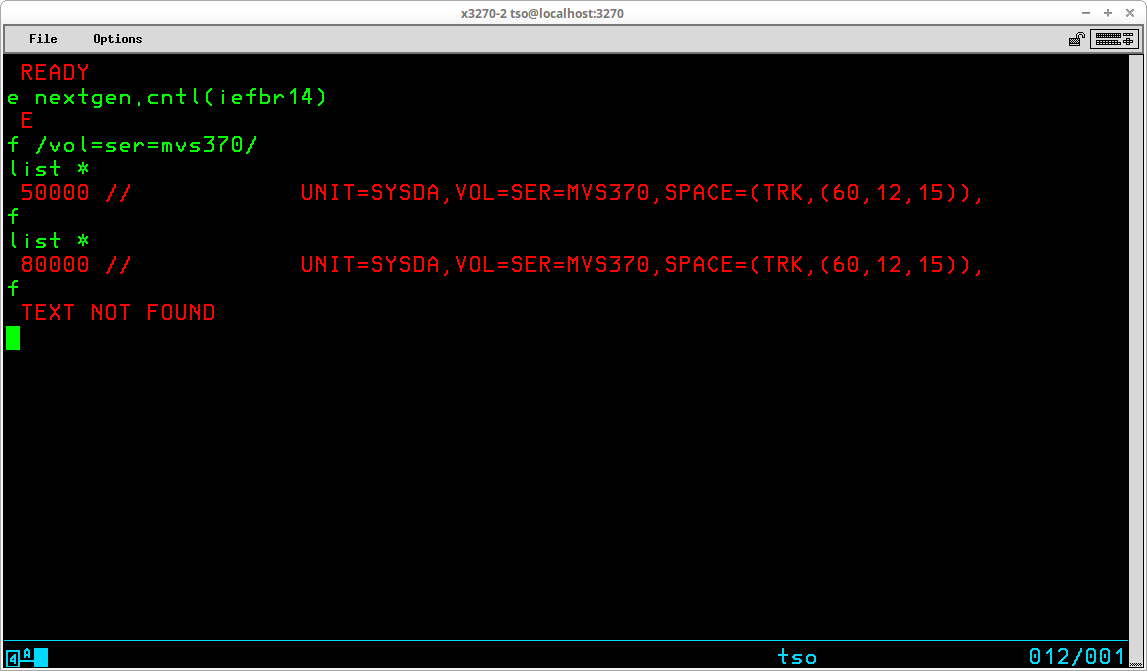
The display below illustrates a FIND subcommand using the forward slash (/) as a delimiter of the character string to be searched for. Following the first execution, LIST is used to display the record which satisfied the search. A second FIND command with no operands continues the search using the same string; the second search begins with the record following the one which satisfied the previous search. Again LIST displays the record where the search was satisfied. A third execution of FIND results in the string not being found before the end of the member is reached.
The CHANGE subcommand (which may be abbreviated C) is used to modify a character string in one record, or a range of records, in the dataset. The syntax of the subcommand is:
Change <line specification> <change specification> [ALL]
The <line specification> may be one of the following:
The <change specification> is a pair of character strings, delimited and separated by a unique delimiter character. The delimiters may be any non-numeric character which does not appear within the specified character strings, except blank, comma, tab, parenthesis, asterisk, apostrophe, or semicolon. Some examples:
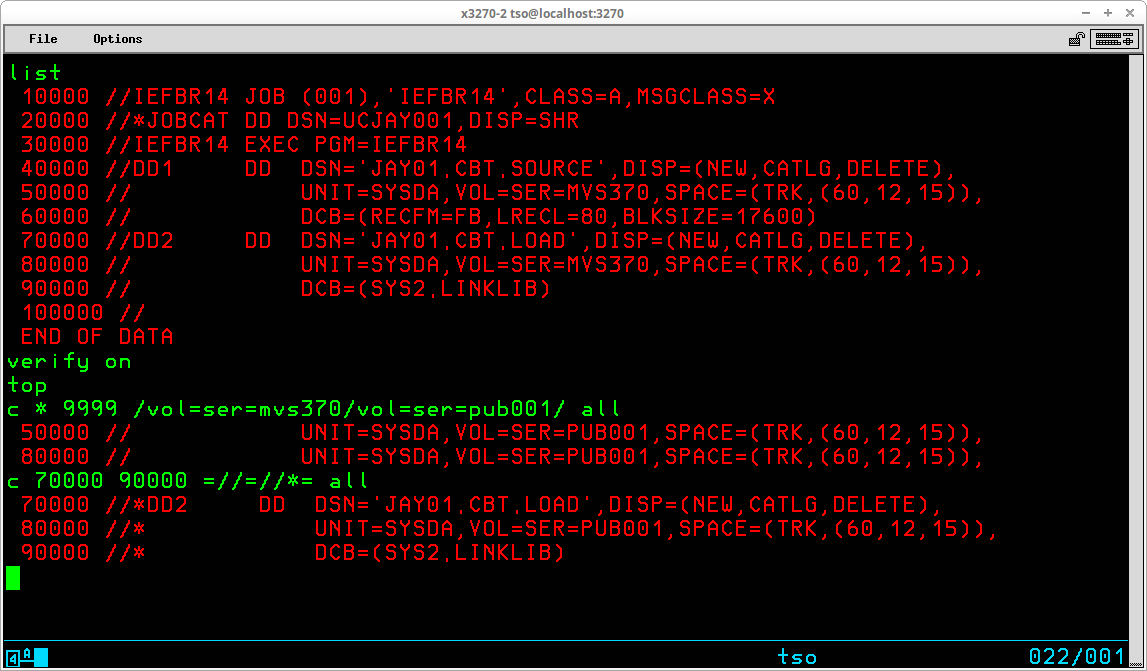
/VOL=SER=MVSRES/VOL=SER=SMP001/
search for VOL=SER=MVSRES; if found change to VOL=SER=SMP001 %DSORG=PS%DSORG=PO% search for DSORG=PS; if found change to DSORG=PO =//SYSGEN06=//SYSGEN6A= search for //SYSGEN06; if found change to //SYSGEN6A /RETAIN// search for RETAIN; if found remove it
Note in the last example: if the second string is omitted, the first string, if found, is removed from the record.
If the third operand, ALL, is specified, all occurrences of the search string found are replaced. If ALL is omitted only the first occurrence found will be replaced.
All changes made to the dataset during the Edit session are made in a work space. In order to write the changes back to the dataset, you must specify the SAVE subcommand (which may be abbreviated S). The syntax of the subcommand is:
Save [<dataset name>]
If the optional <dataset name> operand is included, the changes are written to this dataset rather than to the dataset specified at the beginning of the edit session.
The Save subcommand may be issued any number of times during the edit session to provide a snapshot of changes up to that point in the session.
To terminate the edit session, the END subcommand is used. If there have been changes made to the work space without issuing a SAVE subcommand, you will be prompted to SAVE the changes or lose them. You can use one of the optional operands for the END subcommand to explicitly SAVE or abandon the changes you have made:
END SAVE - saves changes made to the dataset and ends the session
END NOSAVE - abandons changes made to the dataset and ends the session
There is a situation in which EDIT can be very useful. If you need to deploy changes to datasets that reside on someone else's system and don't want to have to write a program to make those changes, one solution is to write a batch jobstream that executes TSO in batch to utilize EDIT commands to apply the changes. To achieve the desired results, you must be certain that you know exactly what the contents of the datasets to be modified on the target system are and be very careful to construct EDIT commands in the jobstream that change only what you want change, and nothing more. Here is an example of such a jobstream:
//TSOBATCH JOB (SYS),'TSO IN BATCH',CLASS=S,MSGCLASS=X,TYPRUN=HOLD
//*
/*MESSAGE LOG OFF TSO AND RELEASE TSOBATCH
//*
//* ***************************************************************** *
//* As installed, RFE user profiles are not integrated into the TSO   *
//* logon, and the REVINIT CLIST requires a VOLUME parameter to       *
//* allocate the profile on the same volume as the other user's       *
//* datasets. This procedure completes two steps:                     *
//*                                                                   *
//*   1) modifies the REVINIT member of SYS1.CMDPROC to add a VOLUME  *
//*      parameter when the profile dataset is initially created;     *
//*   2) for each user id (HMVS01 & HMVS02), and for the template for *
//*      adding new user ids, an invocation of REVINIT is added to    *
//*      be executed during logon.                                    *
//* ***************************************************************** *
//*
//TSO     EXEC PGM=IKJEFT01,REGION=1024K,DYNAMNBR=50
//SYSPRINT DD  SYSOUT=*
//SYSTSPRT DD  SYSOUT=*
//SYSTERM  DD  SYSOUT=*
//SYSTSIN  DD  DATA
EDIT 'SYS1.CMDPROC(REVINIT)' CNTL NONUM
LIST
TOP
F =ALLOC F(REVPROF) DA('&PROFDSN') NEW USING=
C * =TR  =TR +=
INSERT       VOLUME(PUB000)
LIST
END SAVE
EDIT 'HMVS01.CLIST(STDLOGON)' DATA NONUM
LIST
BOTTOM
INSERT REVINIT
LIST
END SAVE
EDIT 'HMVS02.CLIST(STDLOGON)' DATA NONUM
LIST
BOTTOM
INSERT REVINIT
LIST
END SAVE
EDIT 'SYS1.CMDPROC(STDLOGON)' DATA NONUM
LIST
BOTTOM
INSERT REVINIT
LIST
END SAVE
/*
//
In my professional experience, other than maintenance of the MVS Operating System, the main use of TSO has been the development and testing of user programs for eventual use in a production environment. Since just about everything that happens during a TSO session involves the execution of a program, it goes without saying that TSO is designed for executing programs in the time shared environment. So in this section I will discuss some of these aspects of using TSO.
In a typical real world environment, every TSO user has allocated for their personal use a set of partitioned datasets, usually referred to as libraries. These libraries contain source code for programs in a variety of languages, job control language for running batch jobs, collections of data for testing programs, etc. The structure of dataset names in MVS isn't just a random arrangement; by design the naming structure fits and supports the TSO user's environment. An MVS dataset name is composed of one or more qualifiers separated by periods. Each qualifier consists of one to eight characters (A through Z, 0 through 9, or national characters - #, $, @), and the first character of each qualifier may not be numeric. The length of the entire dataset name, composed of the individual qualifiers separated by periods, must not exceed 44 characters.
By convention, the first qualifier of a TSO User's dataset consists of the TSO User ID. The second qualifier is chosen to designate a project or function as a means of collecting related groups of data together. The third qualifier designates the type of data contained in the dataset. Of course, in a real world environment where ISPF is being used, there could easily be more than three qualifiers, but the convention of first and last indicating the TSO User ID and the last the data type would probably still apply. So examples of the types of datasets (libraries) a typical TSO User might have are:
<userid>.PROJECT1.COBOL - a library of source programs in COBOL
<userid>.PROJECT2.RPG - a library of source programs in RPG
<userid>.PROJECT3.PLI - a library of source programs in PL/I
<userid>.JCL.CNTL - a library Job Control Statements for batch jobs
<userid>.TEST.DATA - a library of test data
<userid>.CLIST - a library of the user's Command Lists
<userid>.PROJECT1.OBJLIB - a library of compiled programs
<userid>.LOADLIB - a library of executable programs
When you are creating datasets in your own Hercules/MVS3.8j environment, if you maintain an organizational structure similar to this you will find that at times the final qualifier of the dataset will be used by TSO to correctly determine the type of data contained in the dataset. Also, you should find this to be a very intuitive means of organizing your datasets.
Although I have described the basics of the EDIT command in the previous section, I would strongly recommend using Rob Prins' RPF or Greg Price's REVIEW/RFE to edit datasets. EDIT was designed in the days of line mode terminals and is just too awkward to be very productive. If you are using an MVS system generated using my Installing MVS 3.8j tutorial/instructions, these programs are already installed for your use.
Although the HELP system lists the foreground compiler commands - ASM, COBOL, FORT - these commands are not included in the basic operating system. You can write your own Command Lists that will implement the equivalent functionality and I believe some members of the Hercules' community have made some effort in that area. There are also some of these programming language "command prompters" available on the CBT Tape, but the versions there may require modifications to work with MVS 3.8j and the early versions of the compilers we have available for use from MVT.
But, since these commands are not available in the basic system, I will not be discussing them and recommend you use batch jobs to assemble, compile, and link your programs. The main focus of this section is allocating the required datasets for testing and executing programs which are already compiled and link-edited. (For a discussion of batch procedures available to assemble, compile, and link-edit programs, see Assembling, Compiling, Link-Editing ...)
Almost any program can be executed in foreground, even if it was written to be executed in a batch jobstream. The prerequisite to loading the program and beginning execution is that the datasets that are expected by the program, which would normally be set up by the batch scheduler using parameters provided by Job Control Language statements, are your responsibility. Most TSO Commands are in actuality nothing more than specialized programs written in assembler. These programs, simply by virtue of the fact that they are designed and written to be run in the TSO environment, allocate the datasets they require dynamically before the program begins interacting with the user session. They also do the required cleanup before terminating, which includes de-allocating datasets that were dynamically allocated by their code initially. The commands you need to be familiar with that provides these functions are ALLOCATE, ATTRIB, and FREE.
The ALLOCATE command (which may be abbreviated ALLOC) is used to perform two separate functions, although there are times when both are performed simultaneously. Most frequently, the ALLOCate command is used to perform the functions of the DD statement in Job Control Language. That is to provide the parameters necessary for a program to open a dataset using the DD Name that was assigned in the Dataset Control Block when the program was compiled/assembled. The ALLOCate command may also be used to create a new, empty dataset, even though the user doesn't intend to execute a program immediately to utilize it.
Many years ago I taught classes to accountants and clerical type employees at the company where I worked who needed to use TSO to execute programs through remote terminals that were sometimes located remotely from the data center and the programming staff. I found they easily grasped the concept of the ALLOCate command if I had them visualize their terminal screen surrounded by hooks and then had them visualize that the ALLOCate command was used to hang tags onto the hooks prior to executing their programs. The first, and most important, tag was the DD Name, in order to allow the program to locate a particular file by name. The second most important tag was the dataset name, which allowed the operating system to associated the physical dataset with the file name. Of course, any other tags that were required could also be placed on the hook for a particular DD Name - dataset organization, disposition, volume serial number, etc - in order to provide the necessary attributes for the dataset. The syntax of the command is:
ALLOCate DSName(<dataset name to allocate>)
[{ DDName(<dd name>) | File(<dd name>) } ]
[ { NEW | OLD | SHR | MOD } ]
[ { KEEP | DELETE | CATALOG | UNCATALOG } ]
[ UNIT(<unit name>) ]
[ VOLume(<volume serial number>) ]
[ SPACE(<primary quntity> [<secondary quantity>] ]
[ TRACKS | CYLINDERS ]
[ DIR(<directory blocks>) ]
[ USING(<attribute set name>) ]
There are additional operands for the command, but these are the most frequently used for datasets other than print/punch datasets that are to be handled by JES2. Not all operands are used every time, in fact some are mutually exclusive, and in many situations only a very few operands are necessary to provide the required information to execute a program. Remember, for an existing dataset, many of the Dataset Control Block fields are populated from the dataset label, not from the JCL statement or ALLOCate command. So, to allocate a catalogued dataset for input, it can be as simple as:
The complexity of the operands required for the ALLOCate command vary from the simple:
to the most complex, which would be creating a member in a new partitioned dataset that is to be allocated when it is opened and catalogued when it is closed, with DCB attributes provided by the ALLOCate statement rather than relying upon the program code to provide them.
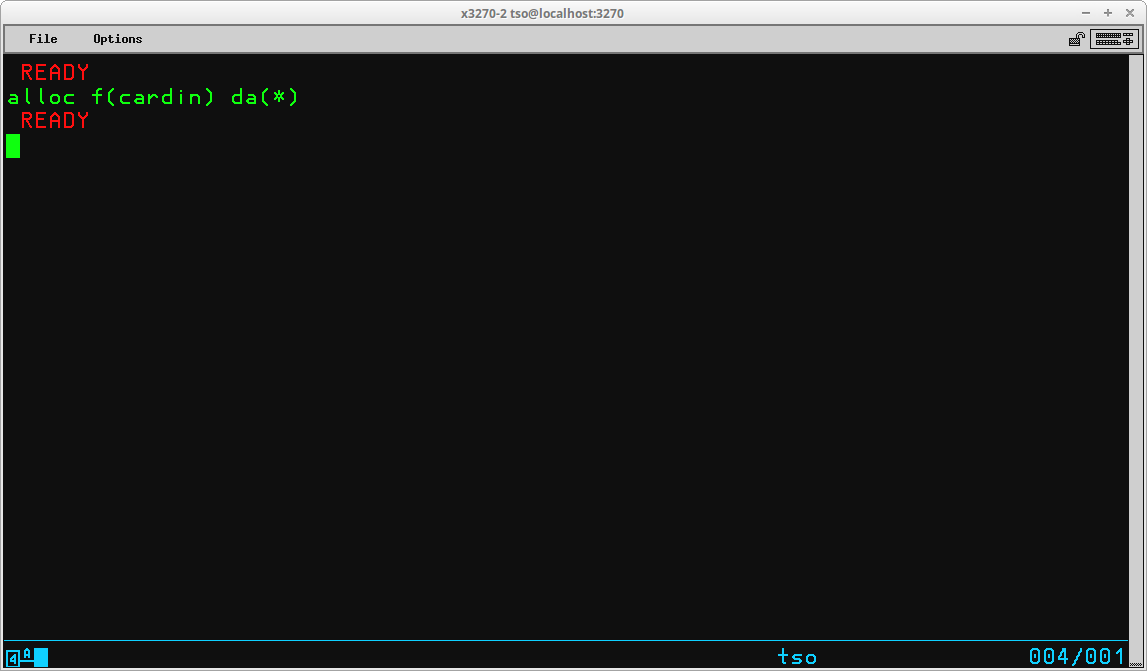
Files which a program expect to read card image data provided by JES2 may easily be ALLOCated to receive input from the TSO User's session:
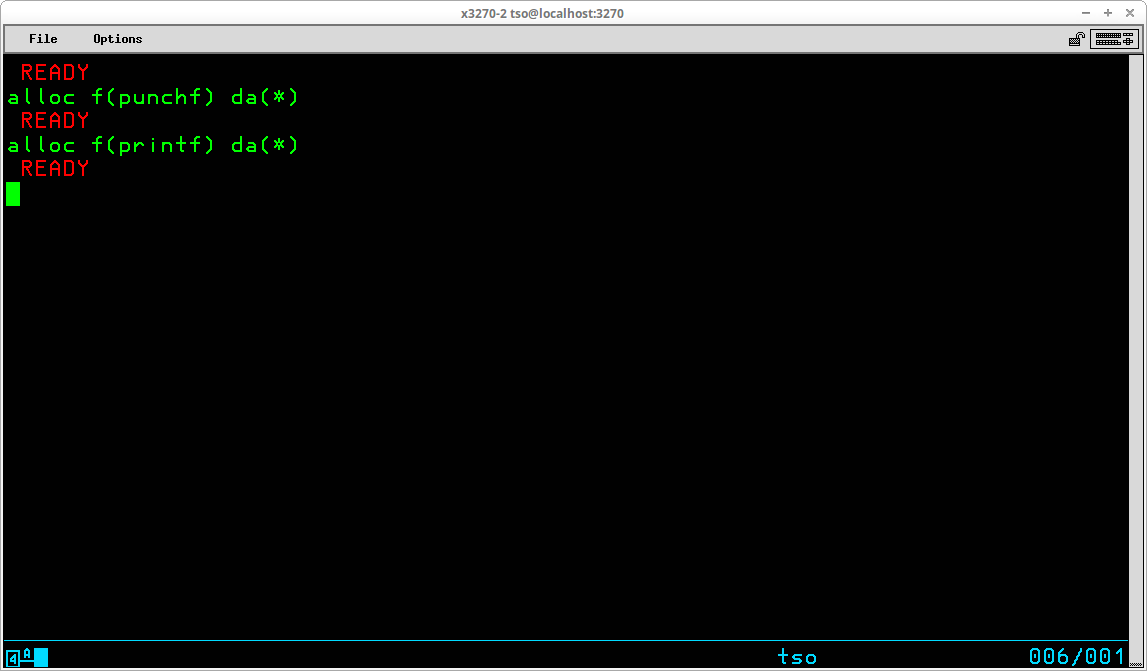
Likewise, files which are designed to produce card image or line printer output, utilize the same ALLOCate syntax to direct the output of the program to the TSO User's screen:
A special operand is provided to ALLOCate a JES2 dataset to a DD Name - SYSOUT. When a JES2 dataset is allocated, records produced by the program are written to the JES2 spool, just as they would be if the program was executed in batch. When the dataset is closed and the allocation is released, the data becomes a print (or punch) job on the spool and its disposition is handled according to the JES2 parameters supplied with the ALLOCate command and the Job Class as defined in JES2.
Instead of the usual operands required for a dataset, such as dataset name (DSName), SYSOUT(<class>) is used to ALLOCate JES2 to the DD Name with the output spooled to the class specified. The optional operands HOLD or NOHOLD may be included to modify the disposition of the print/punch output. The default is NOHOLD. You may also include the optional operand DEST(<station id>) to specify a remote site to which the output is to be routed.
A special operand - DUMMY - is provided to assign NULL files to DD Names:
When new datasets are being created more information is required, which requires more operands to be specified. Some information must be supplied by a user attribute list, which is provided by the ATTRIB command.
The ATTRIB command specifies a list of dataset attributes. The list is given a name by which it is subsequently referred to in an ALLOCate command. The syntax of the command is:
ATTRIB <attribute list name>
[ LRECL(<logical record length>) ]
[ BLKSIZE(<logical block size>) ]
[ RECFM(<record format>) ]
[ DSORG(<dataset organization>) ]
[ INPUT | OUTPUT ]
[ EXPDT(<expiration date>) | RETPD(<retention period>) ]
Like the ALLOCate command, not all operands will be used for all datasets. The attributes you will most frequently use are LRECL, BLKSIZE, RECFM, and DSORG. Once specified with an ATTRIB command, an attribute list remains defined for the duration of the TSO session or until explicitly released with the FREE command. Here is an example of an ATTRIB and ALLOCate command pair creating a new library:
The characteristics of the attribute list
are stored in the list name libattr. These are the commonly used attributes for source code libraries, so this attribute list might be used to create, with the ALLOCate command, several library datasets without having to reenter the attribute characteristics.
The ALLOCate command references the attribute list with the second operand - using(librattr). Since no DDName parameter is specified for the ALLOCate command, the purpose of this ALLOCate command may be assumed to be simply the creation of the new dataset. In fact, a DDName is automatically generated by TSO for the ALLOCate command, and you can learn what the name is using the LISTALC command described below.
Also note that in the ALLOCate command, the line continuation character (+) is used at the end of the first line to indicate that the command continues on the next line following. This allows for the orderly entry of long commands to make the more readable.
After you become familiar with the functions of the ALLOCate and ATTRIB commands, you might want to investigate an alternative from the CBT tape: ALLOCA.
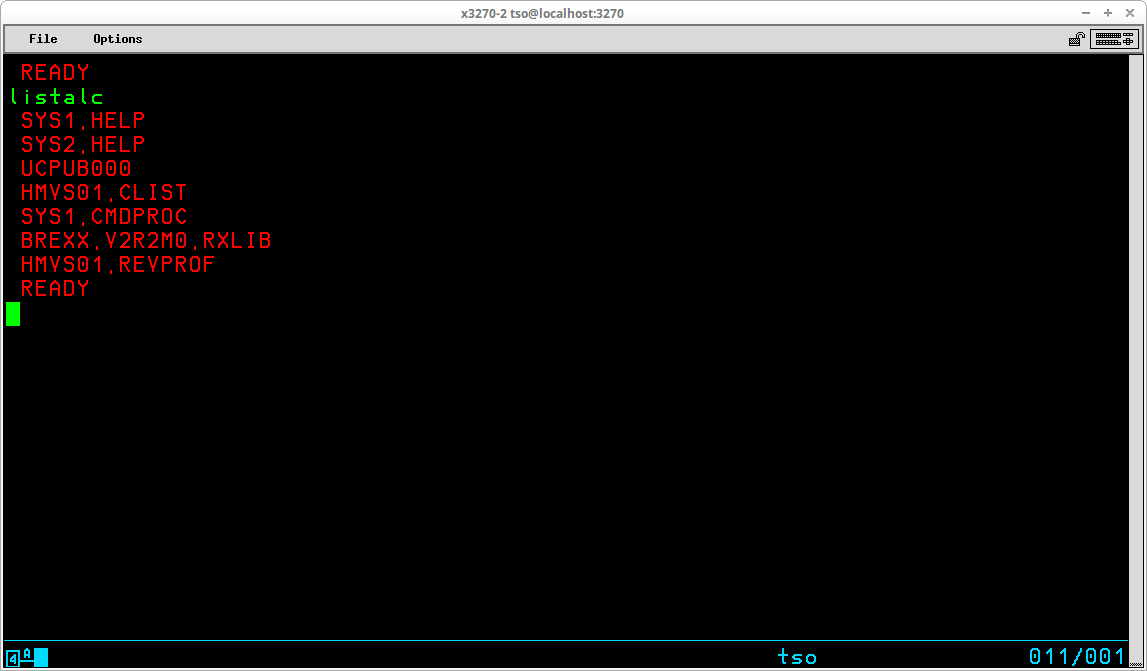
The LISTALC command is used to list the datasets allocated to your TSO session. The syntax of the command is:
LISTALC [STATUS] [HISTORY] [MEMBERS] [SYSNAMES]
If no operands are included, only the dataset names are listed for the datasets currently allocated:
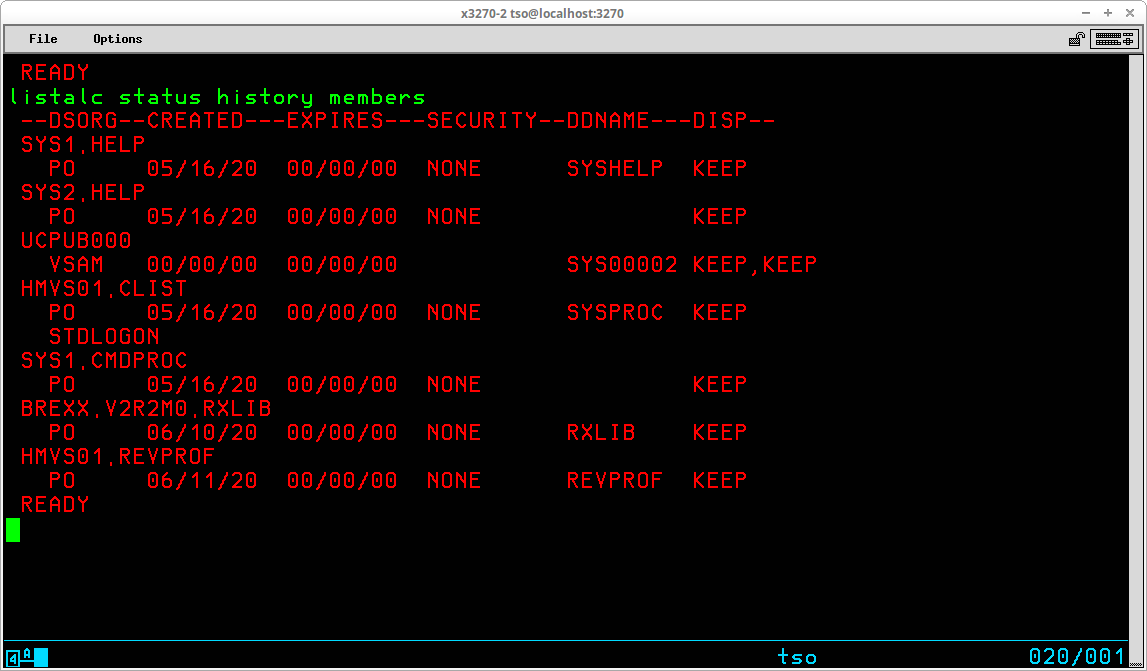
The default information provides very few clues about the datasets, so adding STATUS (provides DD Name and disposition), HISTORY (provides creation date, expiration date, and owner ID), and MEMBERS (provides a list of member names for partitioned datasets) will provide much more useful information:
If you are planning on using TSO frequently, you might want to investigate the ALIST and LISTDD TSO commands from the CBT tape.
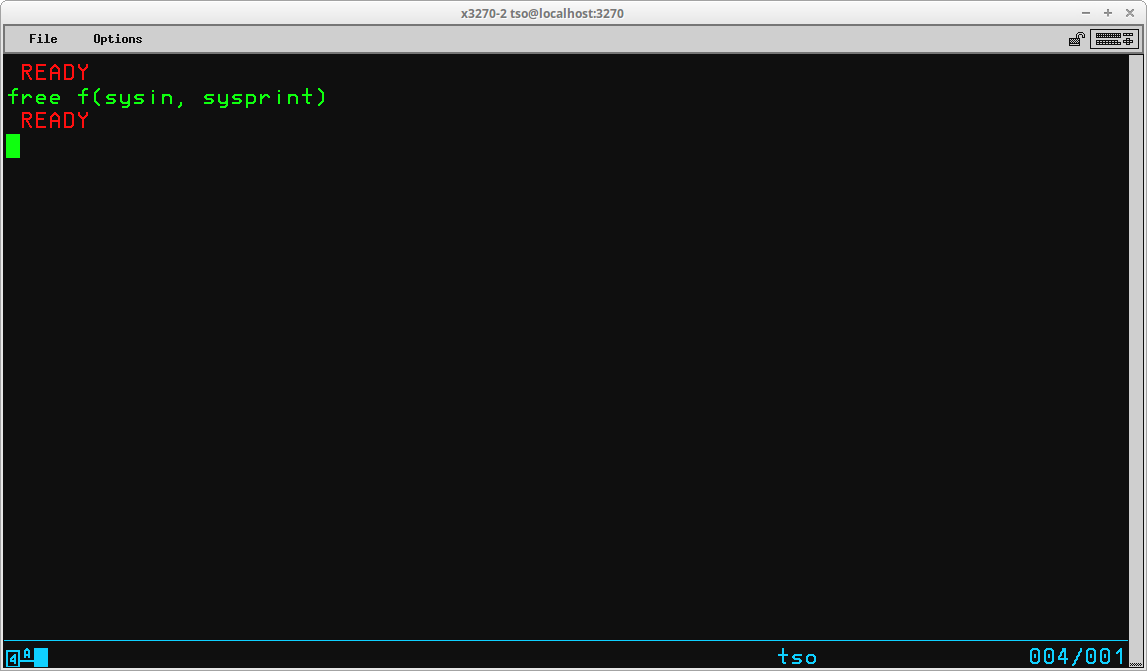
The FREE command is used to dynamically release datasets allocated during the TSO session. All allocated datasets are automatically released when a TSO session is terminated (via LOGOFF command or session time out). However, there are several reasons you might want to release datasets before the end of the TSO session:
The syntax of the command is:
FREE { File(<list of DD Names to be released>) |
DAtaset(<list of dataset names to be released>) }
The datasets listed in the FREE command are dynamically released and the disposition specified when they were allocated is processed.
There are times when you might want to free all allocated datasets. This may be accomplished with the FREEALL TSO command from the CBT Tape.
The CALL command is used to retrieve a load module (which has been processed by the Linkage Editor) from a partitioned Dataset and transfers control the the first executable instruction in the load module. The load module executes in the TSO session's address space. The syntax of the command is:
CALL <dsname>(<member>) [ '<parameter values>' ]
The <dsname> operand specifies a partitioned dataset that contains executable load modules as members. The <member> operand names the specific load module to be loaded/executed. If the TSO User ID has created a library with the name <userid>.LOAD, the dataset name may be omitted and only the (<member>) operand is required. If <member> is omitted, CALL attempts to load a member named TEMPNAME from the library. The optional <parameter values> may be used to specify up to 100 characters of information that is passed to the program as a parameter value.
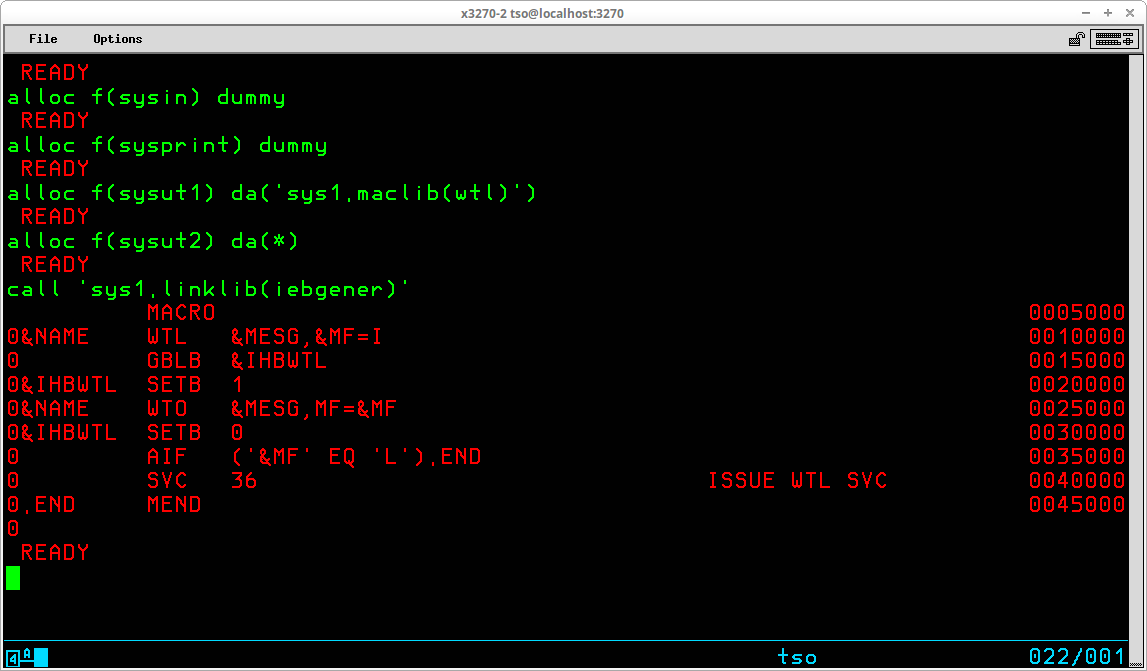
An example executing a utility program in foreground:
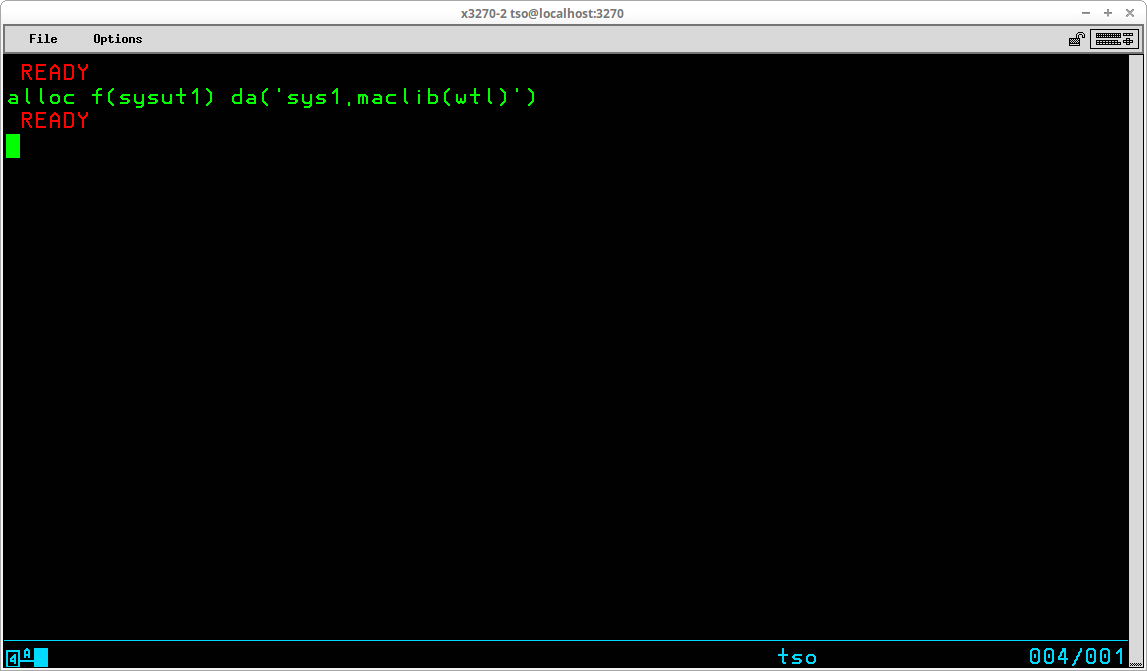
IEBGENER is typically executed with SYSIN as a NULL file. Since there is little useful information produced by IEBGENER in the SYSPRINT dataset, in this example both SYSIN and SYSPRINT are ALLOCated to NULL files. SYSUT1 is read as input by IEBGENER and is ALLOCated to a short member of SYS1.MACLIB. SYSUT2, to which IEBGENER copies the contents of the dataset ALLOCated to SYSUT1, is ALLOCated to the TSO terminal. When IEBGENER is loaded from SYS1.LINKLIB and executed, the records read from the input DD Name - SYSUT1 - are written to the terminal screen.
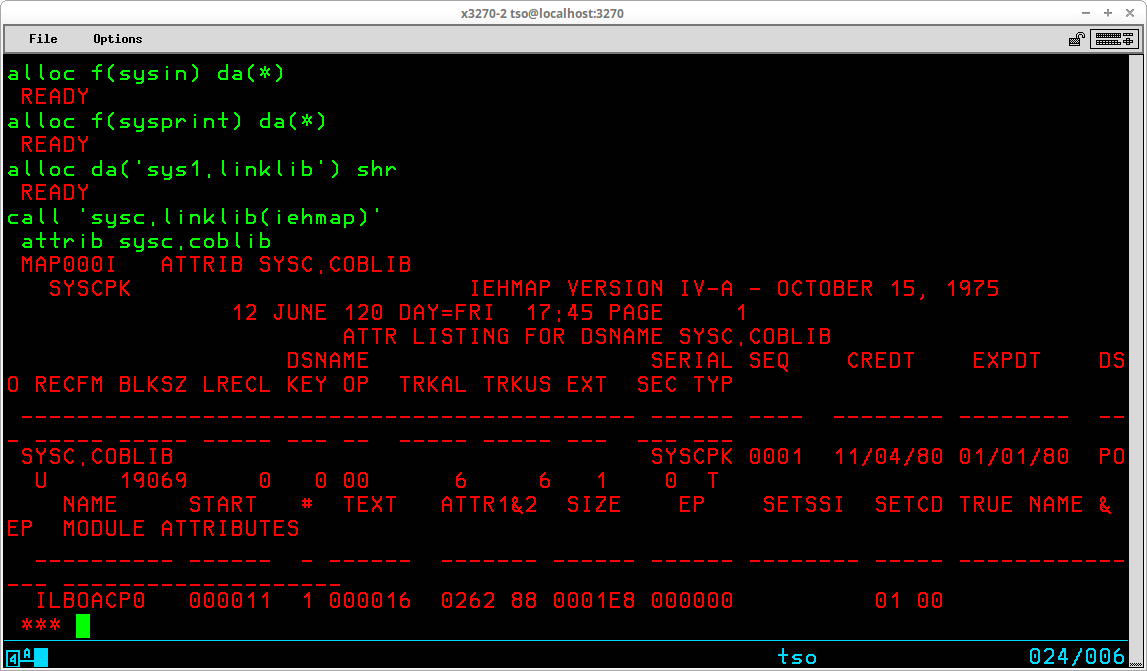
An example of a more complex utility, showing SYSIN input read from the TSO terminal:
Obviously this program is designed to produce 132 column output, so the lines wrap when displayed at the terminal, but executing such a program interactively can provide the information you need quickly and without submitting the job to batch and, either examining the output on the spool (with the OUTPUT command, QUEUE, or RPF) or printing the output to a Hercules' attached file and examining it there.
The TEST command (which may be abbreviated T) allows programs to be executed under precise control of the user for the purpose of debugging. Under TEST:
Obviously, the most successful use of the TEST command may be made if the program being executed was written in assembler and the if user is familiar with object code debugging, MVS addressing, MVS control blocks, and the structure of the program being executed. The TEST command allows more versatile addressing of the program's structure if the program being executed under TEST has been assembled and link-edited with the TEST option, which inserts specific information into the load module that is accessible to the TEST command. The syntax of the command is:
Test <program name> [ 'parameters' ] { LOAD | OBJECT }
<program name> specifies the dataset from where the program to be tested is to be loaded. The optional 'parameters' may specify a character string of up to 100 characters to be passed to the program. The LOAD/OBJECT operand specifies whether the named program is either a load module (has been processed by the linkage editor) or an object module (produced by the assembler or a compiler, but not link-edited).
After the program is loaded into the TEST environment, there are several subcommands that are available to control the execution of the program and examine and/or change values in storage or control blocks. A few of the more frequently used subcommands are:
ASSIGN <address> = <type> <value> place data values into storage locations AT { <address> | (<address list>) } set breakpoint at address (or addresses) GO [ <address> ] execute program (optionally from address) LIST { <address> | (<address list>) }
<type>
[ LENGTH(<length>) ]display contents of storage OFF { <address> | (<address list>) } remove breakpoints at address (or addresses)
There are more subcommands that a regular user of TEST might need to become familiar with, but I limit my discussion here to the most basic functions.
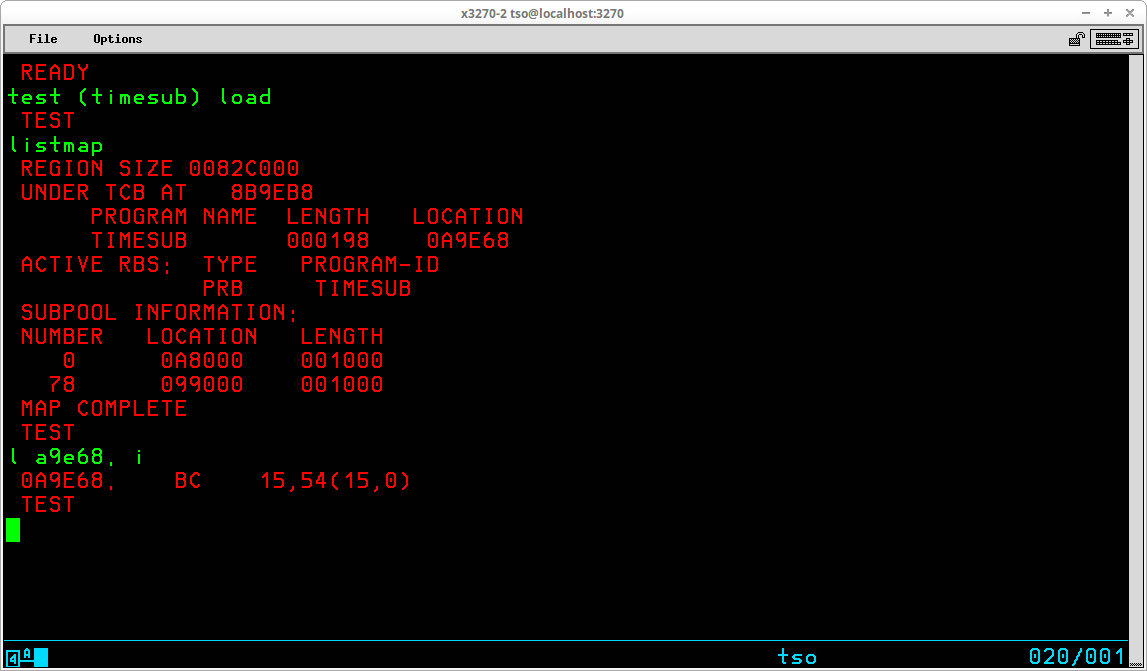
In the display above, a program is loaded into TEST. The program is a short assembler load module that is used to benchmark a simple routine. It is loaded from the <userid>.LOAD dataset; the member name is TIMESUB; the member has been processed by the linkage editor - LOAD operand.
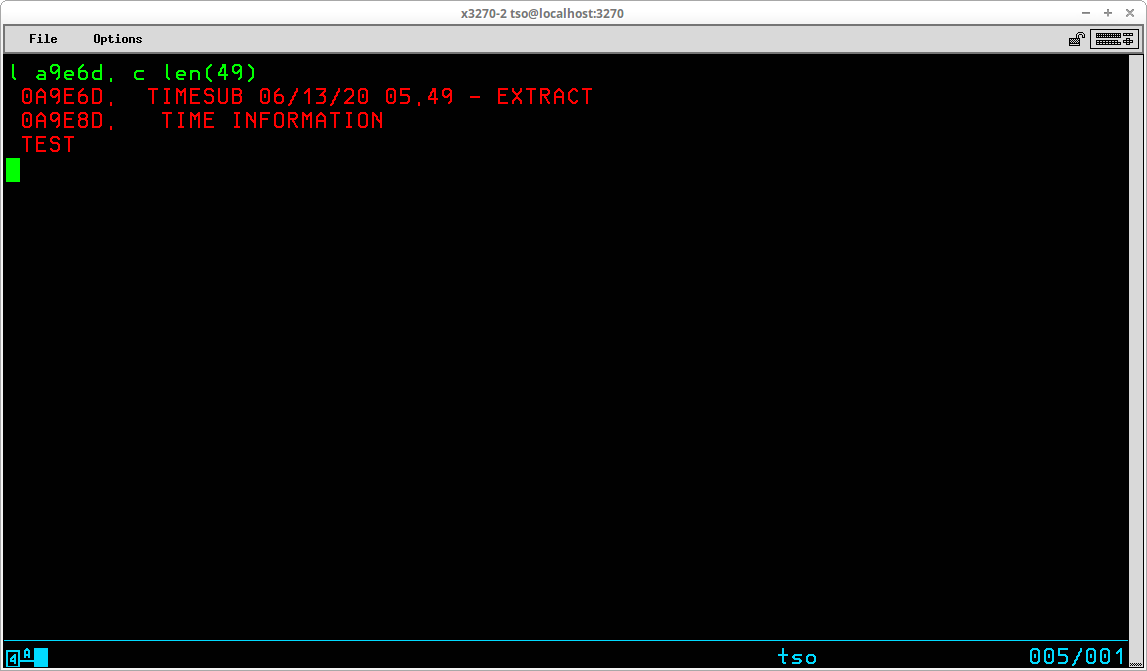
The LISTMAP subcommand displays key areas of the program's storage. The first location of the storage area is 0A9E68 - a LIST subcommand of that address with a TYPE designation I (instruction) shows that the first instruction is an unconditional branch relative to Register 15. This matches what is expected from the listing produced when the program was assembled and is a branch around identifying constants at the beginning of the program.
In the display above, the address immediately following the relative branch instruction is displayed with a TYPE designation C (character) for a length of 49 characters. This shows the identifying constants are the CSECT name, the date/time of assembly, and a comment.
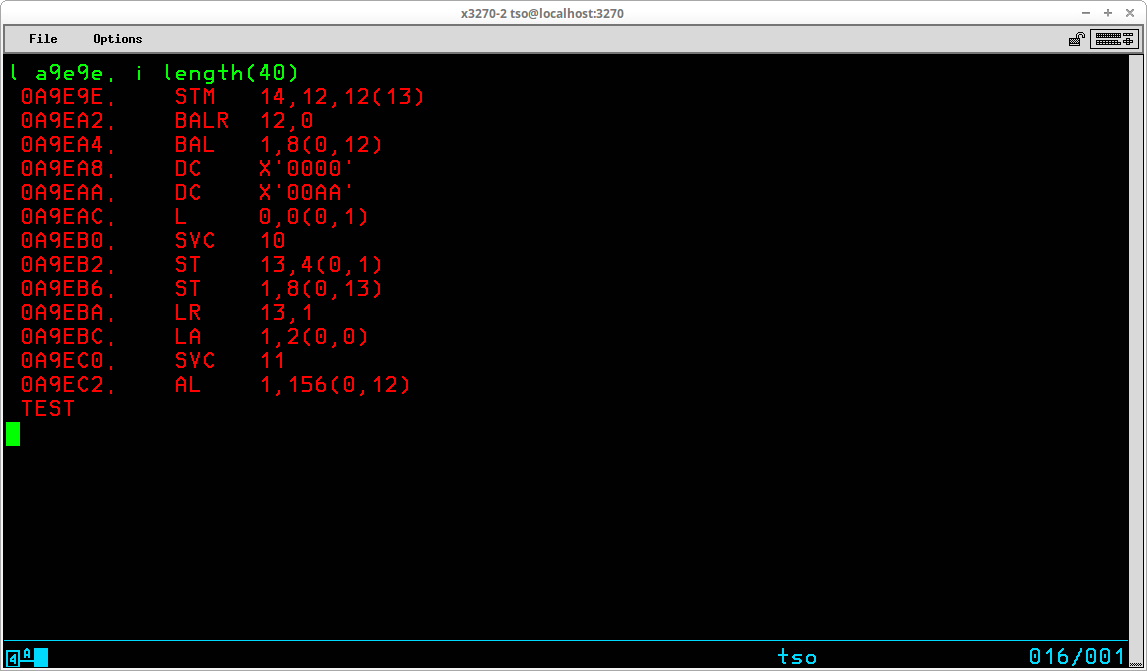
Continuing to examine the storage for the load module, using the first instruction address (which is the address contained in Register 15 when the module is loaded by TEST) and the length from the relative branch instruction at that address, the next instruction that will execute is located at address 0A9E9E (0A9E68 + 36 [the 54 offset in the displayed instruction is shown in decimal] = 0A9E9E). A LIST subcommand for that address with a TYPE designation I (instructions) and a length of 40 shows the expected instructions establishing standard linkage (the instructions at addresses 0A9E9E through 0A9EBA).
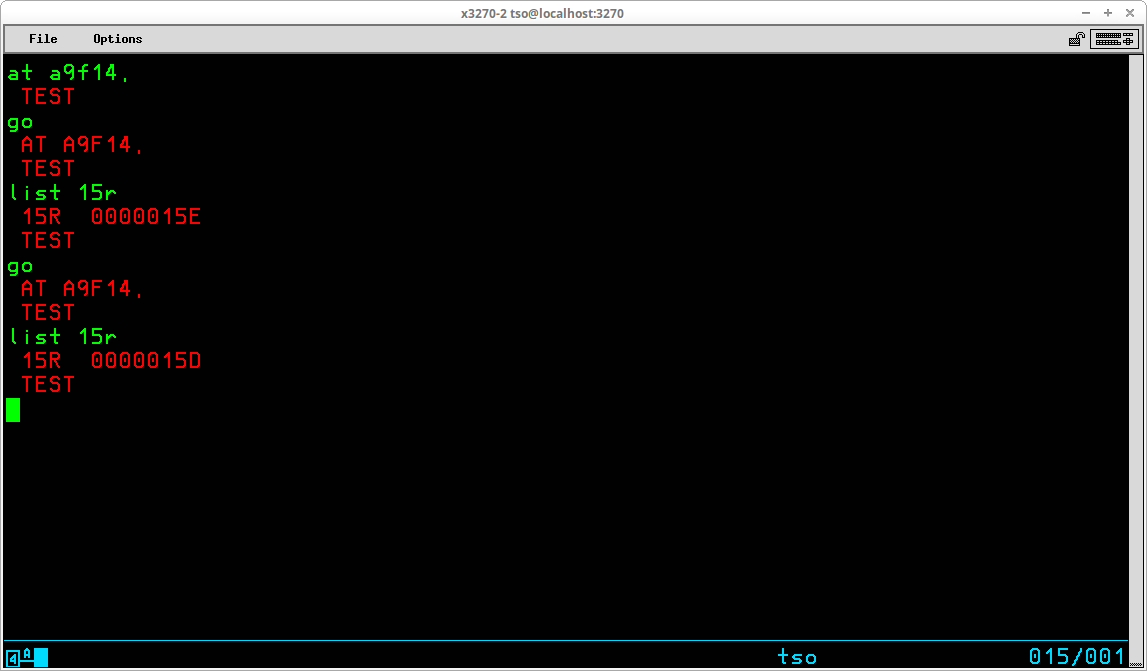
The routine being benchmarked by the program contains a loop controlled by a counter maintained by Register 15. The last instruction in the loop is a BCT instruction at address 0A9F14. In the display above, a breakpoint is established at that address. When the GO subcommand is given, the program runs until the breakpoint is reached, at which time the TEST prompt is displayed. A LIST subcommand is used to display the contents of Register 15 - list 15r - and the value displayed is 0000015E, or 350 in decimal, which is the initial value of the counter established by the loop. A second pair of GO and LIST subcommands show that after one iteration of the loop code, the value of Register 15 has been decremented by 1.
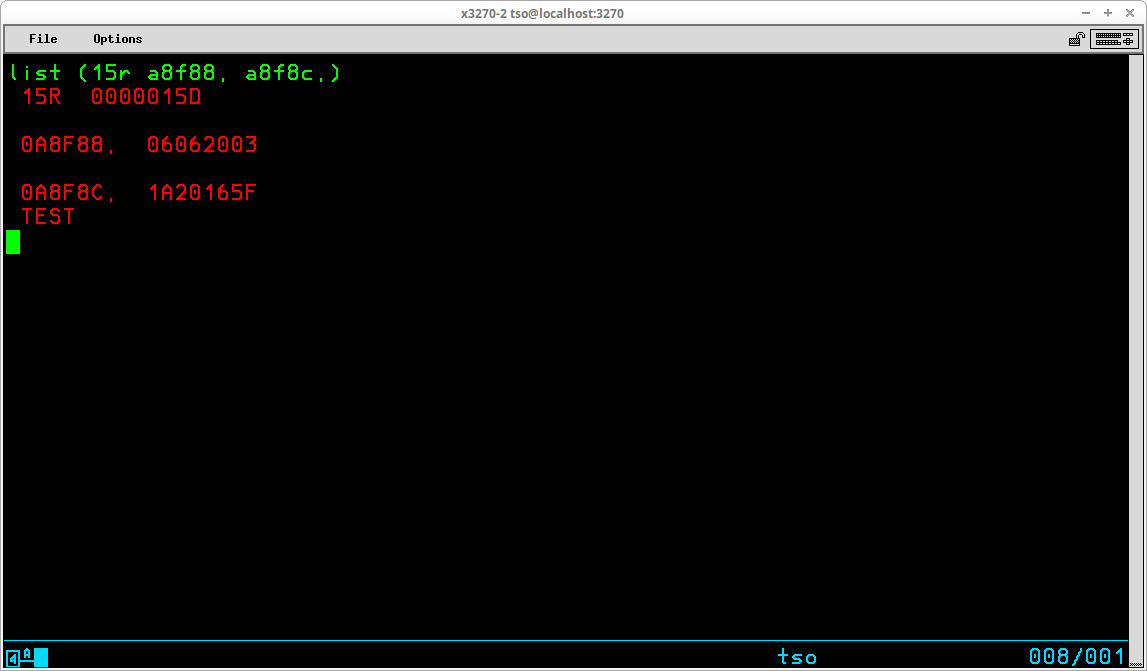
Multiple addresses may be displayed with a single LIST subcommand, as shown above, by including a list of the addresses to be displayed in parentheses. This list command is displaying Register 15 and two storage areas which contain the time and date saved from the system.
Although TSO provides a rich environment in which many tasks may be accomplished, there is still a necessity to utilize batch jobstreams for some tasks. And TSO provides a set of commands specifically to enable the TSO user to submit jobstreams to the batch environment, manage their progress, and retrieve and direct the disposition of the output those jobstreams create.
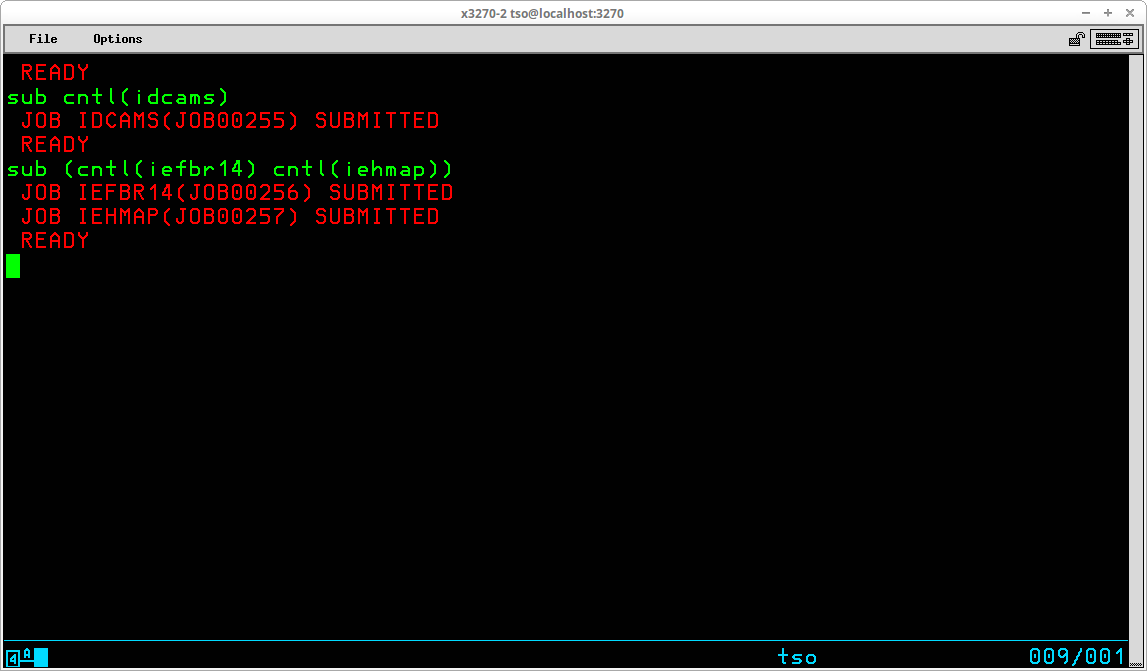
The SUBMIT command (which may be abbreviated SUB) is used to pass the contents of one or more datasets, or members of partitioned datasets, to JES2 for background processing. The syntax of the command is:
SUBmit { <dataset> | ( <dataset list> ) }
If a single dataset, or member, is to be submitted, the operand of the SUBmit command names the dataset. Multiple datasets may be submitted with a single invocation of the command by providing a list of datasets, enclosed by parentheses, as the operand. Note: Any dataset submitted may contain multiple batch jobs, which are defined by the presence of a JOB control statement as the first statement in a series of JCL statements.
The life cycle of a batch job submitted from TSO is:
Datasets containing Job Control Language statements may also be submitted from within other command environments, for example: EDIT, RPF, and REVIEW.
The STATUS command (which may be abbreviated ST) may be used to request information about batch jobstreams submitted by the TSO user. The format of the command is:
STatus { <jobname> | ( <joblist> ) }
The operand for the STATUS command should be either a single jobname or a list of jobnames separated by spaces and enclosed in parentheses. If the STatus command is issued with no operands, TSO attempts to find jobs whose name consists of the TSO User ID plus any one additional character (ie: <userid>A, <userid>B, <userid>C, ... <userid>9)
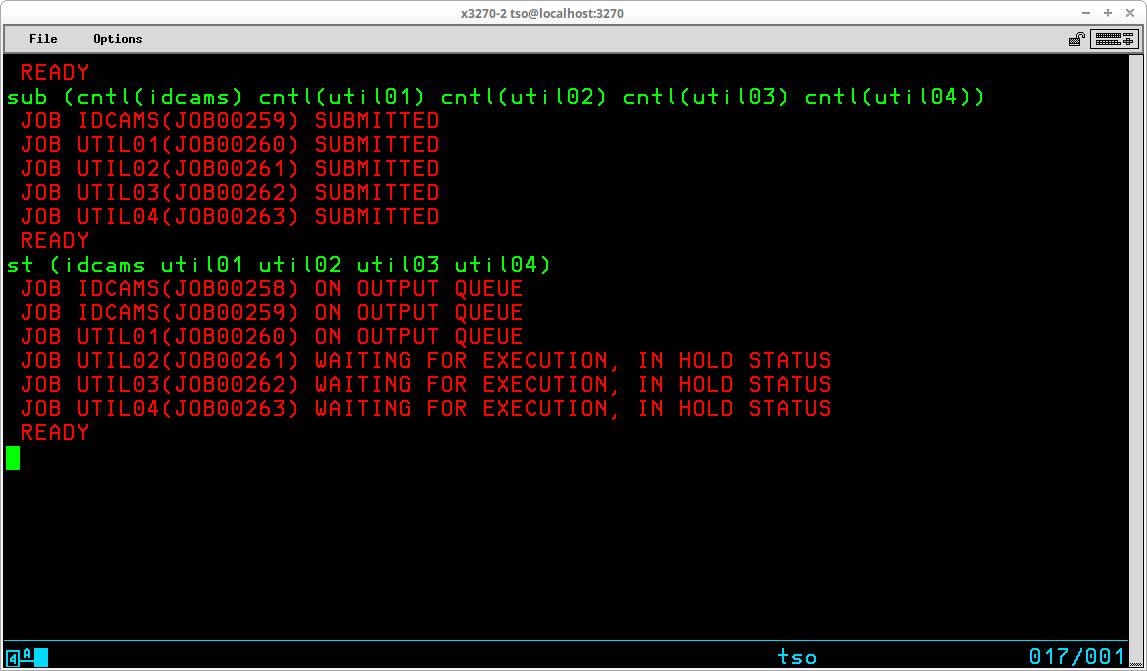
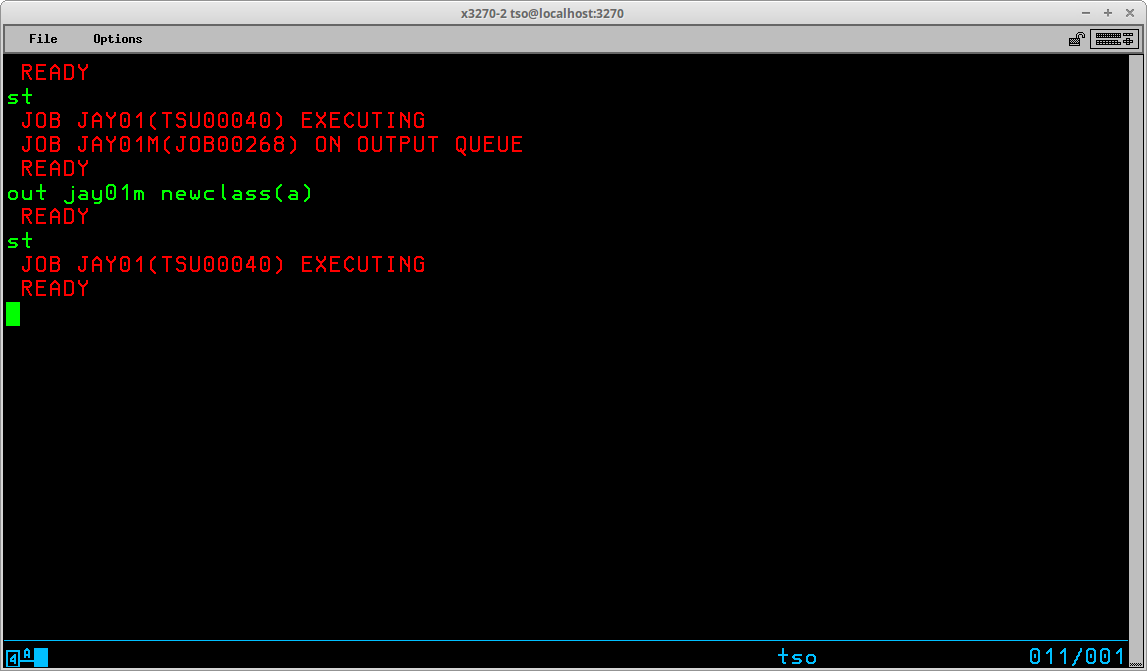
If there are multiple jobs in the JES2 queues with names identical to a jobname included on the STATUS command, the status display will contain all matching jobs. Notice in the session above there is a duplicate job with the name IDCAMS. But all jobs have a unique job identifier assigned by JES2 (JOBnnnnn).
In the display above, some of the matching jobs are awaiting execution (because they are HELD), and three of the jobs are on the output queue (have been processed by MVS and has output available for viewing).
The OUTPUT command (which may be abbreviated OUT) may be used to:
The format of the command is:
OUTput <jobname>[<job id>] [ PRINT( * | <dataset> ) | NEWCLASS(<class>)]
Some restrictions apply to which jobs are eligible to be processed by the OUTPUT command:
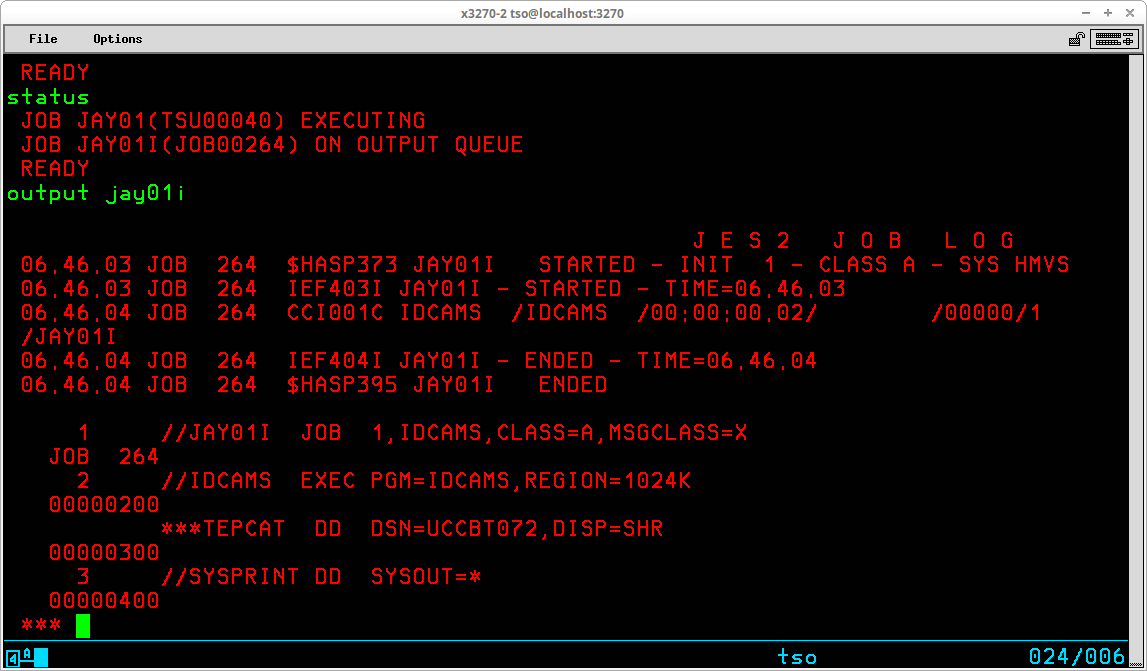
The only required operand for the OUTPUT command is the jobname (and optional JES2 job id). If only the jobname is provided as an operand to the OUTPUT command, the operand PRINT(*) is assumed and the output produced by the background job is retrieved from the JES2 queue and displayed at the TSO User's terminal:
The drawback of using the OUTPUT command in this way is that once viewed at the terminal, the output is no longer available on the JES2 queue to be viewed again or released for actual printing.
By specifying the PRINT operand with a dataset name as an argument, the background output is retrieved from the JES2 queue and written to the indicated dataset where it may be viewed repeatedly and, using some additional utility or TSO command, eventually be copied back to the JES2 queue for eventual disposition:
The two overlayed displays above show the output for a batch job - JAY01M(JOB00267) - retrieved by the OUTPUT command to a sequential dataset - JAY01.OUTLIST.OUTLIST - and the contents of the dataset being browsed using the REVIEW TSO Command. Note that unless the specified dataset is fully qualified, the OUTPUT command will prepend the TSO User's ID as the first qualifier and append 'OUTLIST' as the last qualifier to the value supplied in the PRINT operand in order to generate the full dataset name used to store the retrieved job output.
OUTPUT may also be used to change the class of the printed output so that it can be selected by a JES2 writer task for printing to a device attached to Hercules.
In my personal experience, there has almost always been some third party software available everywhere I have worked that was easier to use and provided more functionality than the OUTPUT command. If you are planning on viewing JES2 spooled output at your TSO session, I highly recommend that you investigate installing the QUEUE command [available from Greg Price's site: https://www.prycroft6.com.au/vs2sw/index.html]. If you are running an MVS that was installed using my Installing MVS 3.8j tutorial/instructions, then QUEUE is already installed. The specific purpose of the QUEUE command is viewing data contained in JES2 queues and manipulating jobs on the JES2 input and output queues.
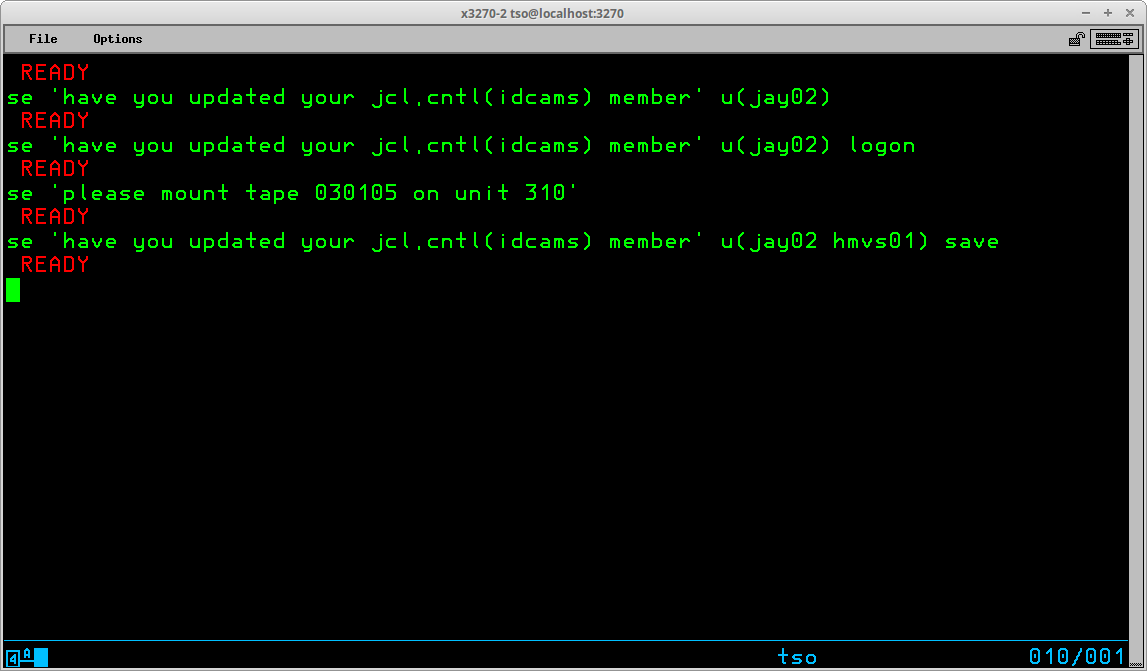
The SEND command (which may be abbreviated SE) is used to send text messages from a TSO User to one or more other TSO Users or the MVS operator's console. The syntax of the command is:
SEnd '<text of message>'
{ USER(<userid list>) | CN(<console id>) }
{ NOW | LOGON | SAVE }
The <text of message> is any string of characters to be sent as a message to the designated recipient. The text must be enclosed in apostrophes; if the message text contains an apostrophe, it must be entered as two consecutive apostrophes.
The USER or CN operands designate the recipient of the message. USER (which may be abbreviated U) may specify one or more TSO User IDs to which the message text is to be sent. Alternately, CN may be used to specify the operator console ID to which the message text is to be sent. If neither USER or CN is specified with the SEND command, the text will be displayed on the main operator's console - CN(00).
By default, the message is displayed at the recipients TSO session (or operator's console) as soon as ENTER is pressed (the NOW operand, which is the default if none is specified). The LOGON operand may be used to designate that the message is to be held for a TSO User that is not currently logged on and the message will be displayed the next time they log onto TSO. If the LOGON operand is specified and the target User ID is currently logged on, the message is delivered immediately, the same effect as if NOW had been specified. SAVE may be used to designate that the message is not to be displayed at the recipient's terminal, even though they are currently logged on, but saved until their next log on, at which time it will be displayed.
The usefulness of the SEND command under Hercules/MVS is questionable, as there is usually only one person using the MVS system running under Hercules.
TSO provides the capability for executing sequences of stored basic commands. This eliminates the redundancy of repeatedly entering sequences of commands that are frequently executed. Using this facility, very sophisticated stored procedures may be created, used, and shared with others. A sequence of stored TSO commands is referred to as a Command List (or CLIST). In addition to the usual TSO commands that may be entered at the TSO READY prompt, a number of specialized commands that are available for use only from within a CLIST may be utilized to modify the operation of these stored procedures. Variables may be created and used to control the sequence and actions of the procedure. Specialized system variables and functions to manipulate the contents of user variables are also available from within a CLIST.
CLIST statements assign values, set controls, select options, and control the conditions under which CLISTs execute. Statements operate in both the command and subcommand environment, either by the EXEC command or by the EXEC subcommand of EDIT. In general, statements fall into the categories of control, assignment, conditional, and file access:
Control ATTN CONTROL DATA - ENDDATA ERROR EXIT GLOBAL GOTO PROC RETURN TERMIN WRITE / WRITENR Assignment READ READDVAL SET Conditional DO - WHILE - END IF - THEN - ELSE File Access CLOSFILE GETFILE OPENFILE PUTFILE
A Command List may be stored in either a sequential dataset or a member of a partitioned dataset. The contents of a CLIST dataset are created/modified with any text editor and are not processed by a compilation process; ie the lines of a CLIST are interpreted each time they are executed. Although the records in a CLIST dataset may be variable length, most of the editors we are using in the Hercules' community are restricted in some way when editing variable length datasets. Also, the dataset allocated during System Generation to contain system CLISTs - SYS1.CMDPROC - is allocated to contain fixed length, 80 byte records. Therefore, it would be my recommendation to allocate a partitioned dataset to contain the CLISTs that you write using the characteristics: DSORG=PO, RECFM=FB, LRECL=80, BLKSIZE=3120, and DSN=<your TSO ID>.CLIST. The following commands may be used to accomplish that task:
ATTRIB CATTR DSORG(PO) RECFM(F B) LRECL(80) BLKSIZE(3120)
ALLOC F(CLIST) USING(CATTR) +
      DA('<your TSO user id>.CLIST') +
      UNIT(SYSDA) VOL(<volume serial>) +
      SPACE(15 15) TRACKS DIR(20)
FREE F(CLIST)
substituting your TSO User ID and a valid DASD Volume Serial number in the appropriate places. Collecting all of your CLISTs in a single partitioned dataset will keep them organized and will allow you to execute them easily using only the member name.
It will probably be helpful if you think of Command Lists as a simple programming language. Before launching into details of Command List structure and syntax of the additional commands available for use in CLISTs, here is an example CLIST that implements the usual "Hello World" logic:
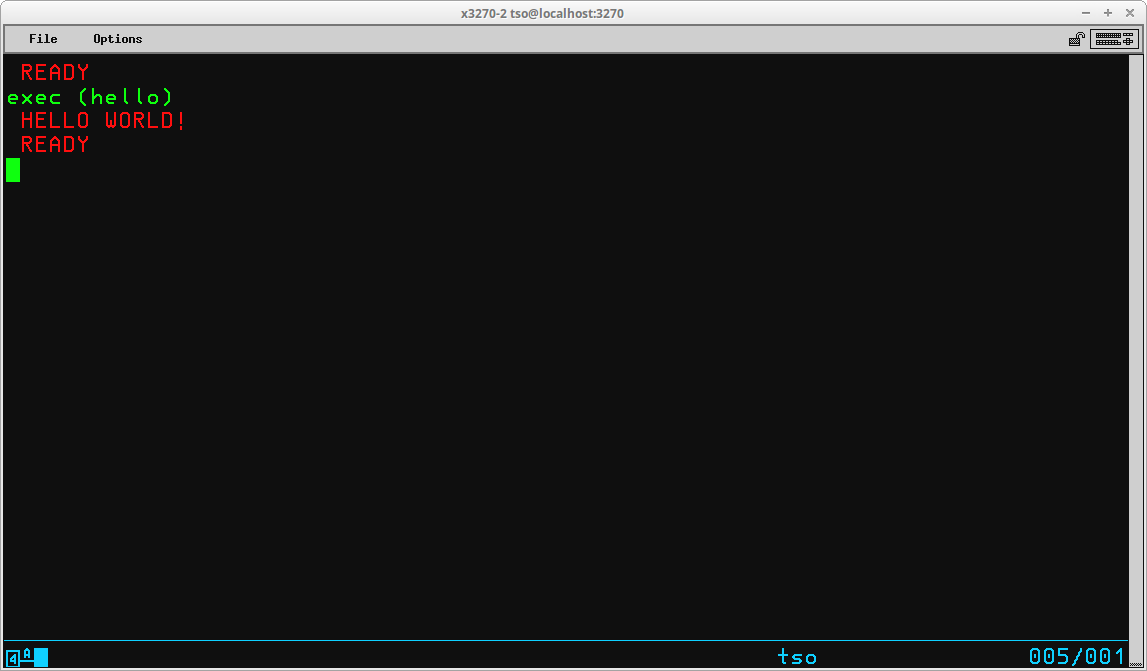
The TSO command used to invoke a Command List is EXEC (which may be abbreviated EX). The syntax of the command is:
EXec <dataset name> [ <parameters> ] [ LIST | NOLIST ] [ PROMPT | NOPROMPT ]
The <dataset name> specifies the dataset or member that contains the stored Command List. If the CLIST is a member of a partitioned dataset which is named '<your TSO User ID>'.CLIST, you can execute the contents of the member by specifying the member name enclosed in parentheses (as shown in the session above).
Two types of parameters may be supplied to the CLIST. Positional parameters, if used, must follow the <dataset name> operand. Keyword parameters, if used, may be specified following the last positional parameter. The use of the two types of parameters is explained in more detail below.
If the LIST operand is specified, TSO commands contained in the CLIST are displayed on the terminal before they are executed.
If the PROMPT operand is specified, the operator is prompted to supply missing information for TSO commands contained in the CLIST.
Because the name of a Command List is identical in format to the name of standard TSO commands, TSO will first search its own command libraries for a command matching the name specified on the EXEC statement. Since you know when you are executing a Command List from your own library, you can eliminate the time to perform this search by using the implicit form of Command List execution:
%<Command List name> [ <parameters> ] [ LIST | NOLIST ] [ PROMPT | NOPROMPT ]
Prior to using the implicit form, you must allocate the reserved DD Name SYSPROC to point to the partitioned dataset containing your Command Lists:
If you are running on an MVS system built using my Installing MVS 3.8j tutorial/instructions, the CLIST for the TSO User ID is concatenated with the system command list library under the DD Name SYSPROC during logon.
As long as the allocation for SYSPROC is not freed, when the implicit form of EXEC is used, TSO will search only the library allocated to the SYSPROC dataset for the specified member name:
For simple CLISTs, there may be no need to include any comments to document what the commands on a particular line, or group of lines, is intended to accomplish. But for more complex CLISTs, you should consider using comments as documentation for you, or someone else, if they later need to make modifications to the CLIST or just to help understand how to use it.
Comments begin with a forward slash followed immediately by an asterisk (/*) and are terminated with an asterisk followed immediately by a forward slash (*/). Comments may be continued on multiple lines by following the same rules for continuation of regular TSO commands - terminate the line to be continued with either a minus (-) or plus (+) sign and continue the comment on the next line of the CLIST.
Some examples of comments:
A procedure statement defines parameters and relates them to symbolic variables used in the Command List statements where the values passed through the parameters are to be substituted. The function of the keyword operands on the procedure statement in a CLIST is identical to the dummy variables contained on the PROC statement in a procedure for Job Control Language. The syntax of the procedure statement is:
PROC <count> [ <positional parameters> ] [ <keyword parameters>(<value>) ]
<count> is the number of positional parameters that are coded following the <count> value. If there are no positional parameters, <count> must be zero.
<positional parameters> are the names of variables that will receive values typed when the CLIST is executed, without the ampersand (&).
<keyword parameters> are the names of variables that will be specified by key words, without the ampersand (&). For each <keyword parameter> specified, <value> provides the default value to be given to the parameter if none is specified when the CLIST is executed. Null values are coded as empty parentheses.
Some examples:
PROC 0        /* NO PARAMETERS REQUIRED OR EXPECTED */

PROC 1 CVALUE /* ONE VALUE MUST BE SUPPLIED AT EXEC */

PROC 1 MEMBER LIBRARY(SYS1.PROCLIB) /* MEMBER MUST BE SPECIFIED */
                                    /* LIBRARY MAY BE SPECIFIED, BUT */
                                    /* WILL BE GIVEN THE DEFAULT     */
                                    /* VALUE 'SYS1.PROCLIB' IF NOT   */

PROC 0 FROMLIB() TOLIB() /* NO POSITIONAL PARAMETERS, BUT TWO */
                         /* OPTIONAL KEYWORD PARAMETERS WITH  */
                         /* NO DEFAULT VALUES SUPPLIED        */
The real power of Command Lists is the ability to use symbolic variables when writing the operands for TSO commands. When the CLIST is executed, the values contained in the variables are substituted for the symbolic variable name wherever that name is coded in the statements coded in the CLIST.
The name for a variable used in a CLIST may consist of up to 31 characters, alphabetic or numbers, beginning with a letter. When used in a command, the name of the variable is preceded by an ampersand (&), which indicates to the interpreter that the value contained in the variable whose name follows the ampersand is to be substituted for the variable name before the interpretation of the line continues. Here is a simple illustration of variable substitution:
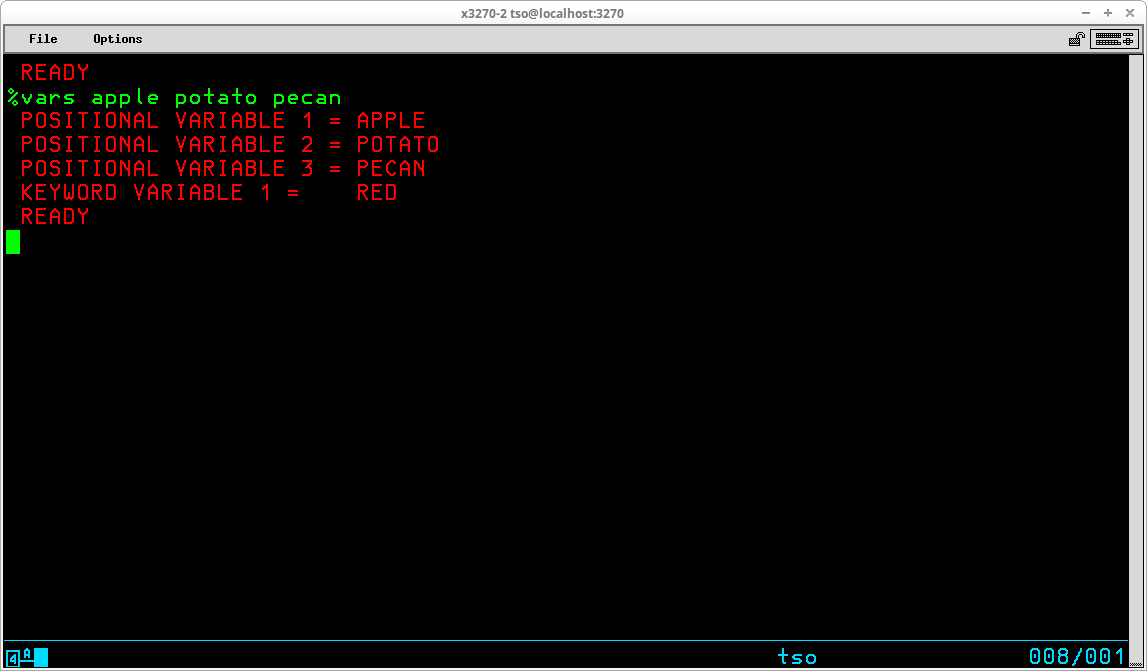
At execution time, the values specified for the three positional variables are assigned to the variable names included on the PROC statement as positional parameters - FRUIT, VEGETABLE, NUT. The value of the keyword variable is assigned from the default value coded on the PROC statement. When the WRITE statements are interpreted prior to execution, the values of each variable is substituted for the symbolic form of the variable name coded in the CLIST line. Each time a CLIST is executed, different values may be specified for each variable, including those designated as keyword variables:
Two special circumstances arise during variable substitution. The first involves the rules the interpreter follows for concatenating the value of a variable with other characters, or another variable, in the CLIST line. As long as the variable name is followed by a blank or special character, simply writing the variable name adjacent to the following text is acceptable:

However, if the character following the variable name is also alphabetic or numeric, the interpreter will fail to recognize the variable name correctly:
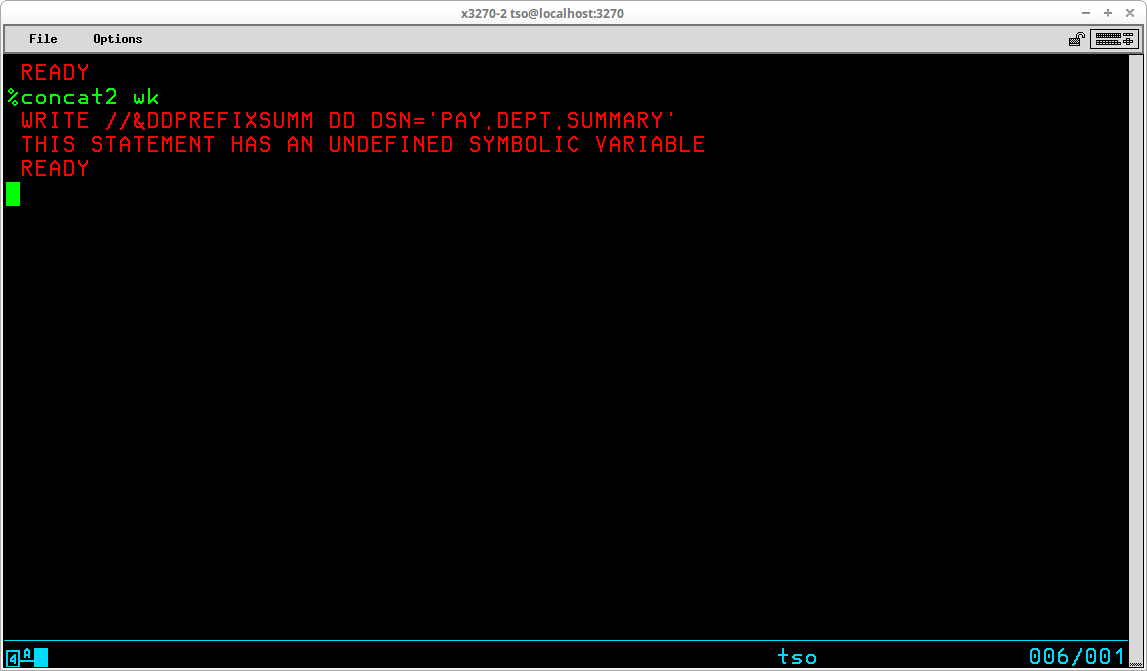
An error message is issued because the interpreter doesn't recognize that what is intended is that the value contained in the symbolic variable &DDPREFIX is to be concatenated with the letters SUMM that are following the variable name. The interpreter incorrectly tries to locate a variable named &DDPREFIXSUMM that doesn't exist. This situation is resolved by using a period (.) as a delimiter between symbolic variable names and the following text which is to be concatenated:

However, allowing the period for a delimiter causes an exception to the rule of only requiring the period as a delimiter when the following character is alphabetic or numeric. Because the delimiting period is removed by the interpreter, if the character following the delimiter is a period, in order to retain a period in the output after interpretation, you must include a second period:
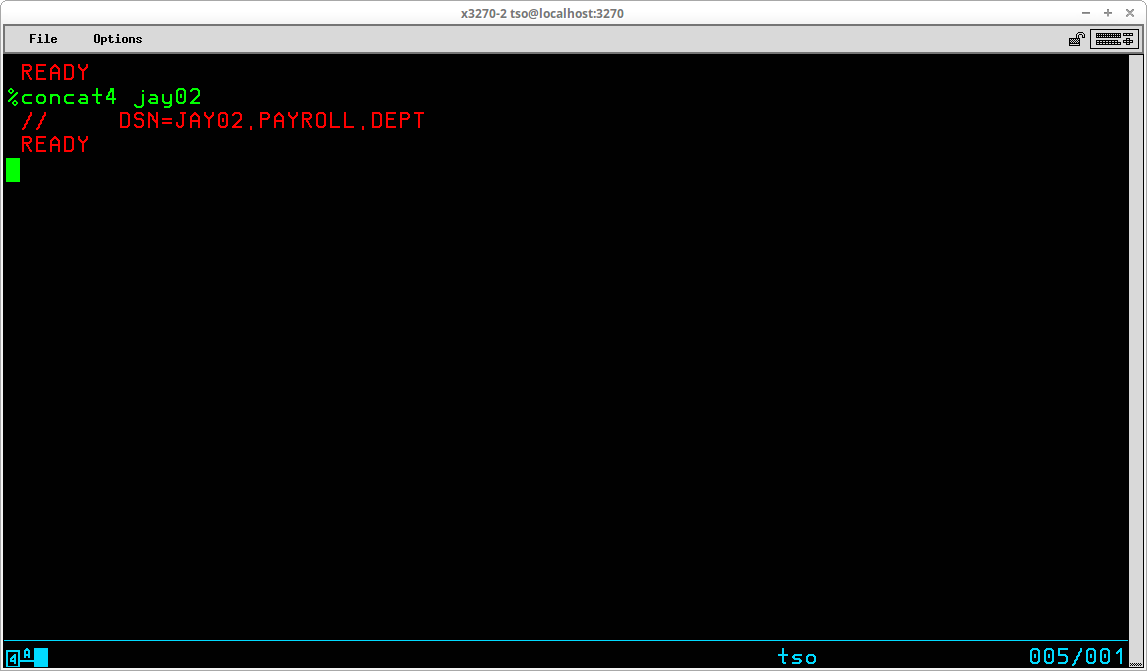
The second circumstance that arises as a result of the rules governing symbolic variable interpretation is that any place in a CLIST that you need to code an ampersand (&), such as the specification of a temporary dataset name, you must code two consecutive ampersands:
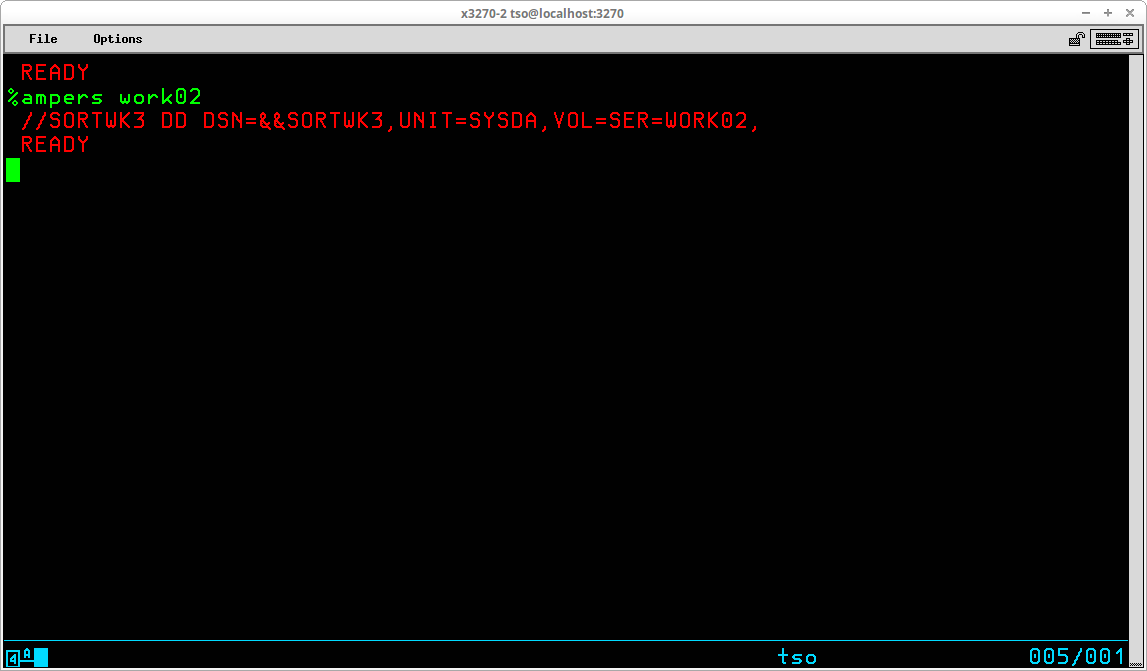
There are a number of settings/options that control how a Command List execute. These may be modified by using the CONTROL statement. The syntax of the statement is:
CONTROL [ FLUSH | NOFLUSH ]
[ PROMPT | NOPROMPT ]
[ LIST | NOLIST ]
[ CONLIST | NOCONLIST ]
[ SYMLIST | NOSYMLIST ]
[ MSG | NOMSG ]
[ MAIN ]
[ END(<string>) ]
The settings specified by a CONTROL statement remain in effect for the duration of the CLIST, or until another CONTROL statement is executed. You might have a control statement at the beginning of your CLIST to provide the settings you wish to have in effect for the majority of your CLIST, but have additional CONTROL statements before and after a particular segment of your CLIST to provide an alternate option to be in effect for just that segment.
The FLUSH setting causes immediate termination of the CLIST if an error occurs. If NOFLUSH is set, execution will continue after an error message is issued. This can allow some amount of post error processing under the control of your CLIST.
The PROMPT setting causes the operator to be prompted to supply any required operands for TSO commands if the operands are missing at the time of the command's interpretation.
The LIST setting causes TSO commands to be displayed before execution but after the substitution of symbolic variables.
The CONLIST setting causes command procedure statements to be displayed before execution but after the substitution of symbolic variables.
The SYMLIST setting causes TSO and command procedure statements to be displayed before any symbolic substitution takes place.
The MSG setting causes messages generated by TSO command execution to be displayed.
The MAIN setting prevents the CLIST from being terminated in the case of an error or an attention interruption. If MAIN is specified, NOFLUSH is also assumed.
The END operand allows an alternate character string to be specified as the terminator for a DO group.
You have seen the WRITE statement used in my examples above. The WRITE statement is used to display output as the Command List is executed. The syntax of the statement is:
[<label>:] WRITE[NR] <text>
If present, the <label> allows the statement to be the target of a branch from another part of the CLIST. Any <text> following the command is displayed. The text displayed can be used for messages, information, prompting, debugging, or whatever the writer of the command procedure desires.
If WRITENR is specified, as opposed to WRITE, the cursor position for the next output will immediately follow the last character of text displayed. When WRITE is specified, a carriage return/line feed are automatically issued following the text displayed as a result of the WRITE statement.
The SET statement is used to assign a value to a variable. The syntax of the statement is:
[<label>:] SET <variable name> { EQ | = } <expression>
If present, the <label> allows the statement to be the target of a branch from another part of the CLIST. The variable name need not have been defined already. The variable to be set cannot be a built-in function. It is not necessary for the <variable name> to include an ampersand (&); the interpreter will recognize it as a variable by its placement on the left side of the equal sign. The <expression> may consist of:
The arithmetic operators that may be used in the SET statement are:
Operator Function + Addition - Subtraction * Multiplication / Division ** Exponentiation // Remainder
A CLIST illustrating these SET statements:
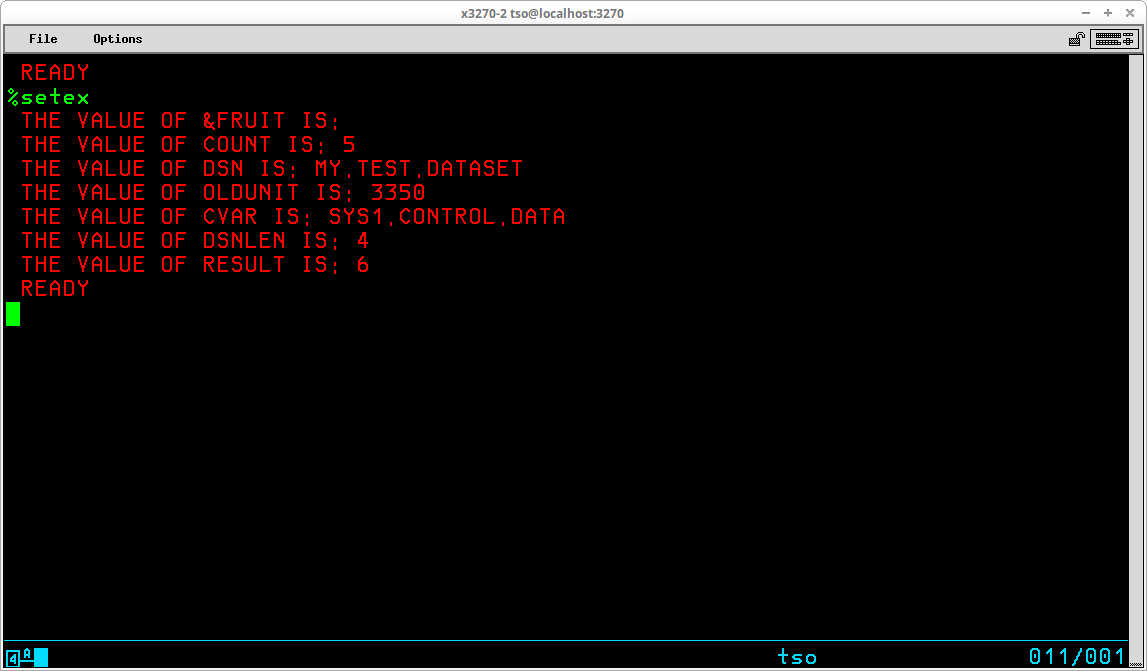
A set of built-in functions is provided to perform evaluations of data expressions, character strings, and substrings. To use a built-in function, include the appropriate symbolic variable on a CLIST statement. The interpreter will substitute data for the symbolic variable at execution time.
&DATATYPE(<expression>)
The &DATATYPE function is used to determine whether an expression is entirely numeric. The interpreter will return the string NUM if the <expression> is all numeric or CHAR for anything else.
&EVAL(<expression>)
The &EVAL function is used to find the result of an arithmetic expression. The interpreter will return the value calculated as the numeric result of <expression>.
&LENGTH(<expression>)
The &LENGTH function is used to find the number of characters that <expression> occupy.
&STR(<string>)
The &STR function is used to suppress the evaluation of the <string> specified, however symbolic substitution does take place.
&SUBSTR(<starting position>[:<ending position>],<string>)
The &SUBSTR function is used to select a segment from a character string. The <starting position> specifies the first character to be selected from <string>. The <ending position> specifies the last character to be selected. If omitted, <ending position> will default to the same value as <starting position>, resulting in a single character selected from <string>.
A CLIST illustrating the Built-In functions:
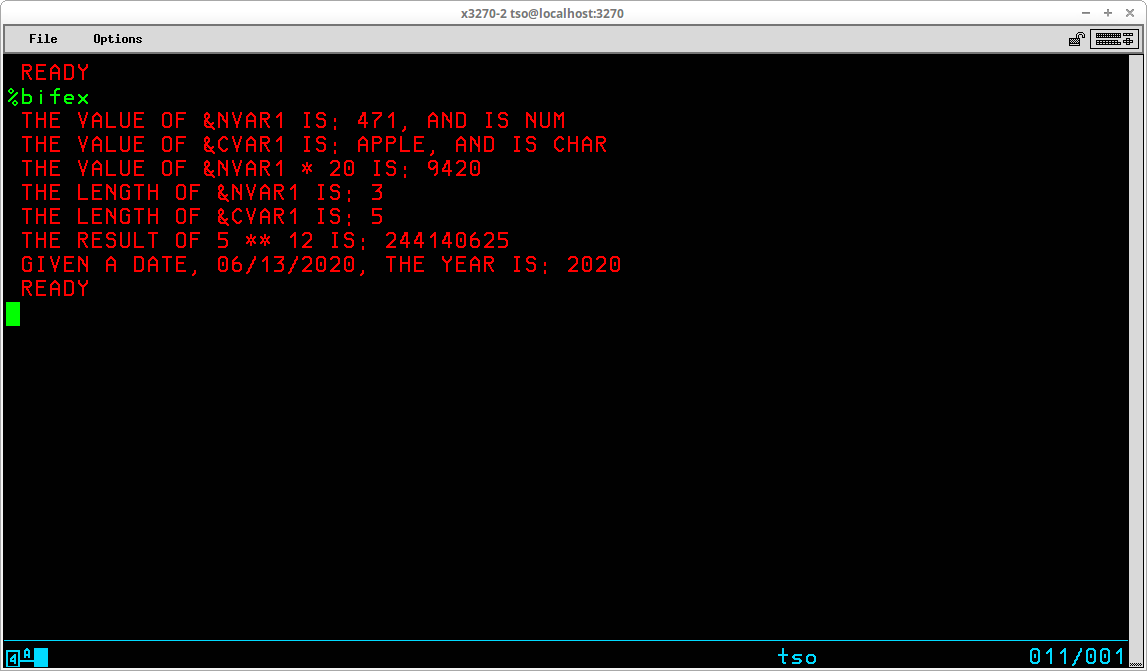
TSO maintains a set of variables whose values contain information about the current command procedure environment and the TSO user. The values of four of the variables may be set by CLIST statements - &LASTCC, &MAXCC, &SYSDVAL, and &SYSSCAN. Attempts to modify the other control variables will produce an error.
&LASTCC
Use &LASTCC to examine the return code from the last operation, whether TSO command/subcommand or statement. Values that may be returned by CLIST statements are:
16
Not enough virtual storage 836 (reserved) 300
User tried to update an unauthorized variable 840 Not enough operands 304 Invalid keyword on EXIT statement 844 No valid operators 308 Code specified, but no code given on EXIT statement 848 Attempt to load character from numeric value 312 Internal GLOBAL processing error 852 Addition error - character data 316 TERMIN delimiter greater than 256 characters 856 Subtraction error - character data 324 GETLINE error 860 Multiplication error - character data 328 More than 640 delimiters on TERMIN 864 Divide error - character data 332 Invalid file name syntax 868 Prefix found on character data 336 File already open 872 Numeric value too large 340 Invalid OPEN type syntax 900 Single ampersand found 344 Undefined OPEN type 904 Symbolic variable not found 348 File specified did not open (for example, the filename was not allocated) 908 Error occurred in an error action range that received control because of another error 352 GETFILE - filename not currently open 912 Substring range invalid 356 GETFILE - the file has been closed by the system (for example, file opened under EDIT and EDIT has ended) 916 Non-numeric value in substring range 360 PUTFILE - file name not currently open 920 Substring range value too small (zero or negative) 364 PUTFILE - file closed by system (see code 356) 924 Invalid substring syntax 368 PUTFILE - CLOSFILE - file not opened by OPENFILE 932 Substring outside of the range of the string (for example, 1:3,AB - AB is only two characters) 372 PTFILE - issued before GETFILE on a file opened for update 936 A built-in function that requires a value was entered without a value 400 GETFILE end of file (treated as an error, which can be handled by ERROR action) 940 Invalid symbolic variable 8xx Evaluation routine error codes 944 A label was used as a symbolic variable 800 Data found where operator was expected 948 Invalid label syntax on a GOTO statement 804 Operator found where data was expected 952 GOTO label was not defined 808 A comparison operator was used in a SET statement 956 GOTO statement has no label 812 (reserved) 960 &SYSSCAN was set to an invalid value 816 Operator found at the end of a statement 964 &LASTCC was set to an invalid value and EXIT tried to use it as a default value 820 Operators out of order 999 Internal command procedure error 824 More than one exclusive operator found Sxxx A system ABEND code 828 More than one exclusive comparison operator Uxxx A user ABEND code
&MAXCC
Use &MAXCC to examine the highest return code issued up to now in this CLIST, or passed back from any nested procedures executed.
&SYSDATE
Use &SYSDATE to get the present date in the format mm/dd/yy.
&SYSDLM
Use &SYSDLM to identify which delimiter string of those specified by the TERMIN statement the user entered to give up control. This allows a user to select options that a CLIST may provide.
&SYSDVAL
Use &SYSDVAL for one of three purposes:
- When TERMIN passes control to the terminal user, get the value of any parameters the user enters besides the delimiter string entered to pass control back to the CLIST.
- When READ requests specific terminal input, get the value of the user response line.
- Parse records read from datasets into fields
&SYSICMD
Use &SYSICMD to get the name by which the user implicitly invoked the currently executing CLIST. The name value will be null if the user invoked this CLIST explicitly.
&SYSNEST
User &SYSNEST to get character strings YES or NO, signifying whether the currently executing CLIST is nested (invoked from another CLIST instead of from the terminal directly).
&SYSPCMD
Use &SYSPCMD to get the name of the most recently executed TSO command in this CLIST. The initial value is "EXEC" in the command environment and "EDIT" in the subcommand environment.
&SYSPREF
Use &SYSPREF to get the dataset name prefix specified in the user profile table of the CLIST user.
&SYSPROC
Use &SYSPROC to get the logon procedure name for the current CLIST user.
&SYSSCAN
Use &SYSSCAN to get the maximum value for the number of times that symbolic substitution is allowed to rescan a line to resolve symbolic variables. The default value is 16; minimum value is 0; maximum value is the largest fixed-point number.
&SYSSCMD
Use &SYSSCMD to get the name of the subcommand currently executing. The iniital value is null if EXEC is issued in the command environment and "EXEC" if EXEC is issued in the subcommand environment (under EDIT). The value is null whenever the procedure is in the command environment.
&SYSTIME
Use &SYSTIME to get the present time in the format hh:mm:ss.
&SYSUID
Use &SYSUID to get the TSO User ID of the individual currently executing the CLIST.
Greg Price's User Modification ZP60014 adds some of TSO/E's variables to MVS 3.8j. If you are using an MVS generated following my Installing MVS 3.8j tutorial/instructions, you have these additional variables available, as ZP60014 will have been installed during System Generation. A few of the added variables are shown below; review the ZP60014 jobstream for additional information.
A CLIST illustrating some of the Control variables:
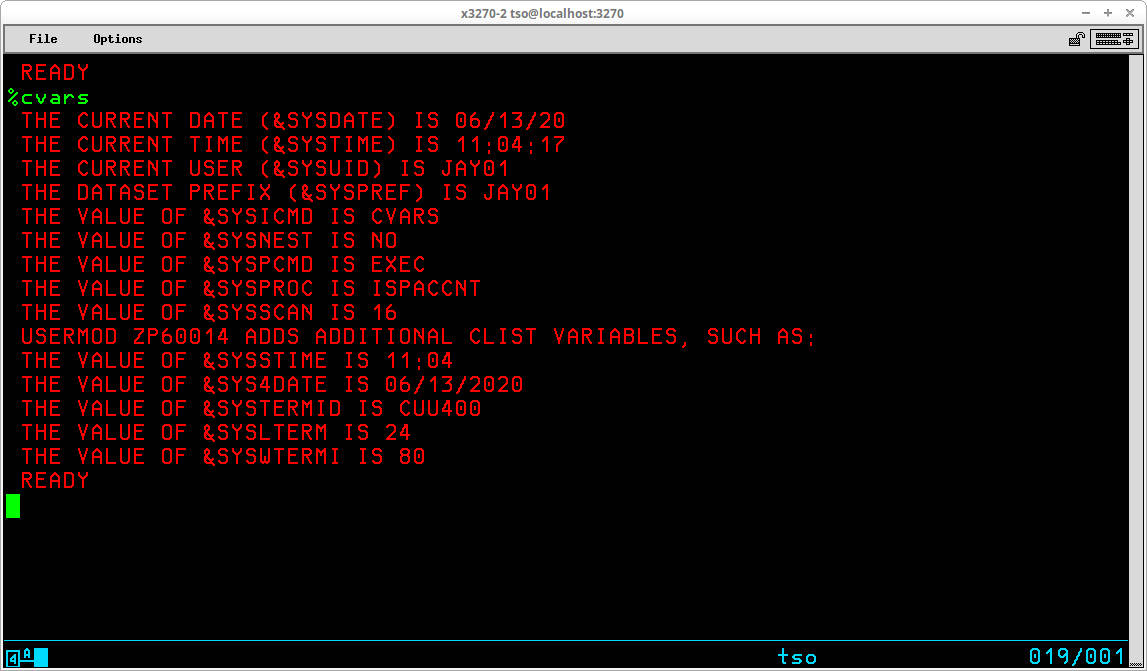
The sequence in which statements are executed in a Command List may be influenced by a couple of statements. The natural sequence of execution is to begin with the first statement contained in the CLIST and proceed one by one with each consecutive statement until the end of the CLIST is reached or an EXIT statement is encountered, terminating execution.
The value of variables may be examined using the IF statement and, based upon the outcome of the condition tested, a GOTO statement may be used to transfer control from the current statement in the CLIST to any other statement that contains a label. Current programming practice tends to frown upon this type of branching, but it is still a valid means of controlling execution sequence in a Command List and there are circumstances in which that is the only method available to implement the desired solution.
The use of a GOTO statement without a corresponding condition test made with an IF statement results in a unconditional branch.
A more structured approach to constructing execution loops is provided by a DO-WHILE-END sequence.
It is also possible to conditionally execute individual commands using the WHEN statement.
The IF-THEN-ELSE structure is used to test the contents of variables during execution and is similar to equivalent statements in most high level languages. The comparative expression in an IF statement allows the comparison of any combination of literal values and symbolic variables. The syntax of the statements is:
[<label>:] IF <expression> THEN <statement>
ELSE <statement>
If present, the <label> allows the statement to be the target of a branch from another part of the CLIST. The <expression> is of the format:
{ literal | symbolic variable } <comparison operator> { literal | symbolic variable }
The comparison operators which are valid are:
Comparison Performed Symbol Characters Equal = EQ Not Equal ¬= NE Less Than < LT Greater Than > GT Less Than or Equal <= LE Greater Than or Equal >= GE Not Greater Than ¬> NG Not Less Than ¬< NL
Complex comparisons may be constructed by joining simple comparisons with logical operators:
Connection Symbol Characters And && AND Or || OR
An example CLIST showing some simple IF-THEN statements:
PROC 4 V1 V2 V3 V4

IF &V1 GT &V2 THEN WRITE &&V1 (&V1) GREATER THAN &&V2 (&V2)
ELSE WRITE &&V1 (&V1) NOT GREATER THAN &&V2 (&V2)

IF &V2 EQ &V3 THEN WRITE &&V2 (&V2) IS EQUAL TO &&V3 (&V3)
ELSE WRITE &&V2 (&V2) IS NOT EQUAL TO &&V3 (&V3)

IF &V3 LE &V1 THEN WRITE &&V3 (&V3) IS <= &&V1 (&V1)
ELSE WRITE &&V3 (&V3) IS NOT <= &&V1 (&V1)

IF &V4 LT &V1 THEN WRITE &&V4 (&V4) IS < &&V1 (&V1)
ELSE WRITE &&V4 (&V4) IS NOT < &&V1 (&V1)

EXIT
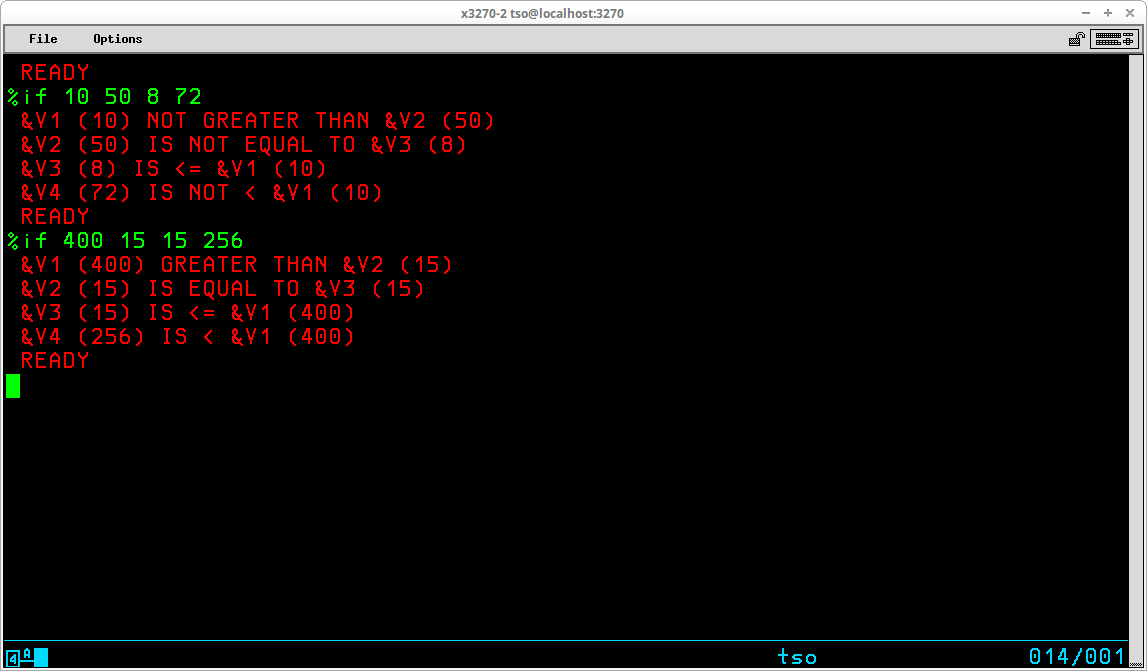
Some coding rules that must be followed when writing the IF-THEN-ELSE structure are:
Of course, it is most likely that you would need to execute more than one statement if the condition were true - THEN - or false - ELSE - in which case you can enclose multiple statements with a DO-END pair:
PROC 2 V1 V2

IF &DATATYPE(&V1) = NUM && &DATATYPE(&V2) = NUM THEN DO
   SET RESULT = &EVAL(&V1 * &V2)
   WRITE V1 * V2 = &RESULT
   END
ELSE DO
   WRITE V1 AND V2 MUST BE NUMERIC
   WRITE THE DATA TYPE OF V1 IS &DATATYPE(&V1)
   WRITE THE DATA TYPE OF V2 IS &DATATYPE(&V2)
   END

EXIT
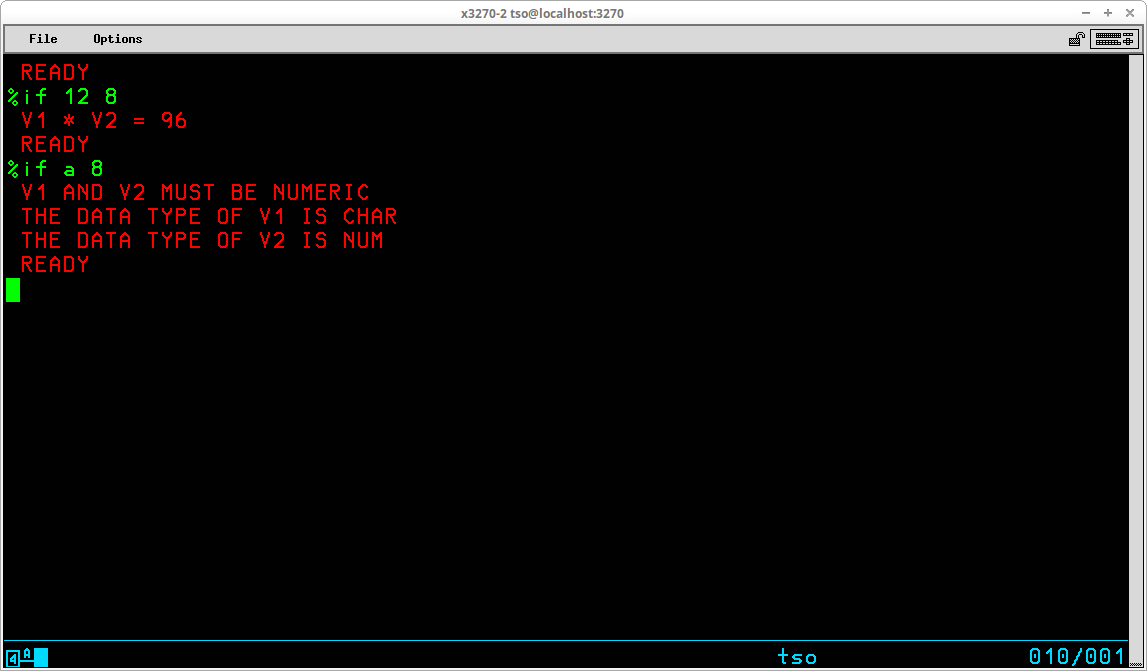
It is also possible to nest IF-THEN-ELSE structures:
PROC 3 V1 V2 OPERATION

IF &DATATYPE(&V1) = NUM && &DATATYPE(&V2) = NUM THEN DO
   SET OP =
   IF &OPERATION EQ ADD THEN SET OP = &STR(+)
   ELSE              /* NO ACTION ON ELSE */
   IF &OPERATION EQ SUBTRACT THEN SET OP = &STR(-)
   ELSE              /* NO ACTION ON ELSE */
   IF &OPERATION EQ MULTIPLY THEN SET OP = &STR(*)
   ELSE              /* NO ACTION ON ELSE */
   IF &OPERATION EQ DIVIDE THEN SET OP = &STR(/)
   ELSE              /* NO ACTION ON ELSE */
   IF &LENGTH(&STR(&OP)) = 1 THEN +
      WRITE THE RESULT OF &V1 &OP &V2 = &EVAL(&V1 &OP &V2)
   ELSE WRITE THE OPERATION SPECIFIED IS NOT RECOGNIZED
   END
ELSE DO
   WRITE V1 AND V2 MUST BE NUMERIC
   WRITE THE DATA TYPE OF V1 IS &DATATYPE(&V1)
   WRITE THE DATA TYPE OF V2 IS &DATATYPE(&V2)
   END

EXIT
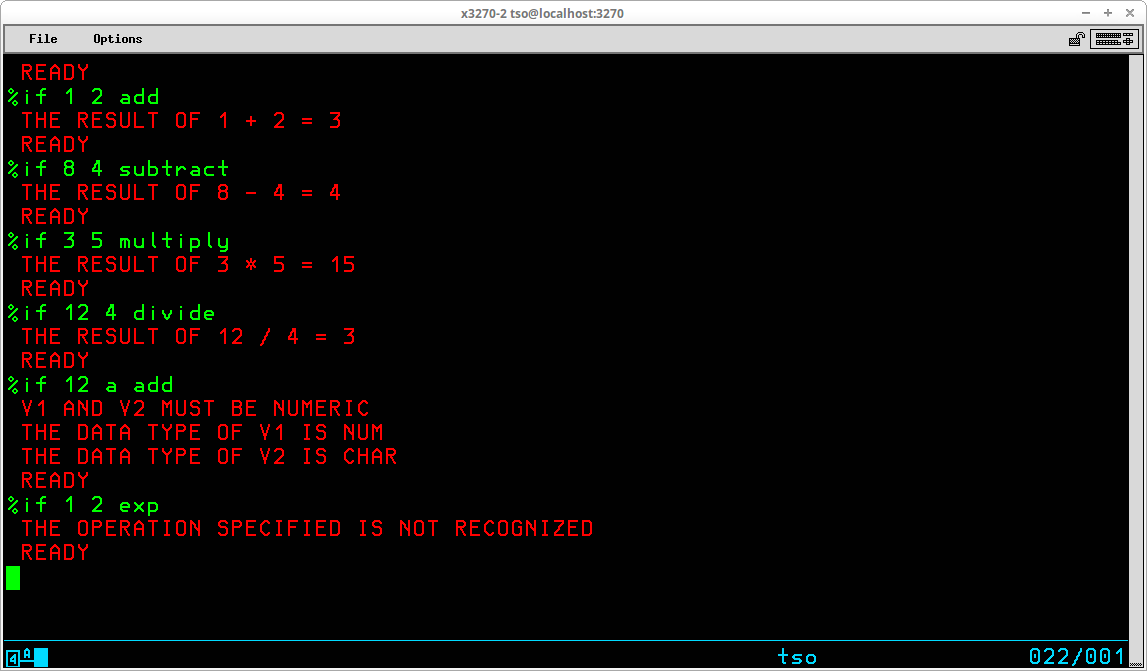
The GOTO statement unconditional transfers control from the currently executing statement to the statement containing the label specified as an operand on the GOTO statement. The syntax of the statement is:
[<label>:] GOTO <target label>
If present, the <label> allows the statement to be the target of a branch from another part of the CLIST.
There should almost always be a way to design your CLIST so that you can avoid the use of the GOTO statement, since creating procedures containing unconditional branch instructions are frequently prone to logic errors which are difficult to locate and resolve. Nevertheless, the statement is sometimes the only way to implement the desired logic. Here is another implementation of the prior CLIST using GOTOs:
PROC 3 V1 V2 OPERATION

IF &DATATYPE(&V1) = NUM && +
   &DATATYPE(&V2) = NUM THEN GOTO CONT1
ELSE DO
   WRITE V1 AND V2 MUST BE NUMERIC
   WRITE THE DATA TYPE OF V1 IS &DATATYPE(&V1)
   WRITE THE DATA TYPE OF V2 IS &DATATYPE(&V2)
   GOTO ERRORS
   END

CONT1: IF &OPERATION EQ ADD THEN GOTO CADD
IF &OPERATION EQ SUBTRACT THEN GOTO CSUB
IF &OPERATION EQ MULTIPLY THEN GOTO CMUL
IF &OPERATION EQ DIVIDE THEN GOTO CDIV
WRITE THE OPERATION SPECIFIED IS NOT RECOGNIZED

ERRORS: WRITE ERRORS WERE ENCOUNTERED
GOTO CEXIT:

CADD: SET OP = &STR(+)
GOTO CEVAL:

CSUB: SET OP = &STR(-)
GOTO CEVAL:

CMUL: SET OP = &STR(*)
GOTO CEVAL:

CDIV: SET OP = &STR(*)

CEVAL: WRITE THE RESULT OF &V1 &OP &V2 IS &EVAL(&V1 &OP &V2)

CEXIT: EXIT
It should be obvious that it is much harder to follow the logic with GOTOs.
The DO-WHILE-END structure provides the means to construct repetitive loops in a Command List in a clear, easy to understand manner. The syntax of the statements is:
[<label>: ] DO WHILE <expression>
<one or more statements>
[<label>: ] END
If present, the <label> allows either the DO or END statements to be the target of a branch from another part of the CLIST.
The statements enclosed by the DO and END statements are executed repeatedly as long as the <expression> coded on the WHILE statement is true. The <expression> may use logical operators to evaluate complex comparisons, in the same manner as the IF statement.
A simple example of a DO-WHILE-END loop:
PROC 0

SET &COUNT = 0

DO WHILE &COUNT < 12
  SET &COUNT = &COUNT + 1
  WRITE THE VALUE OF &&COUNT IS &COUNT
END

EXIT
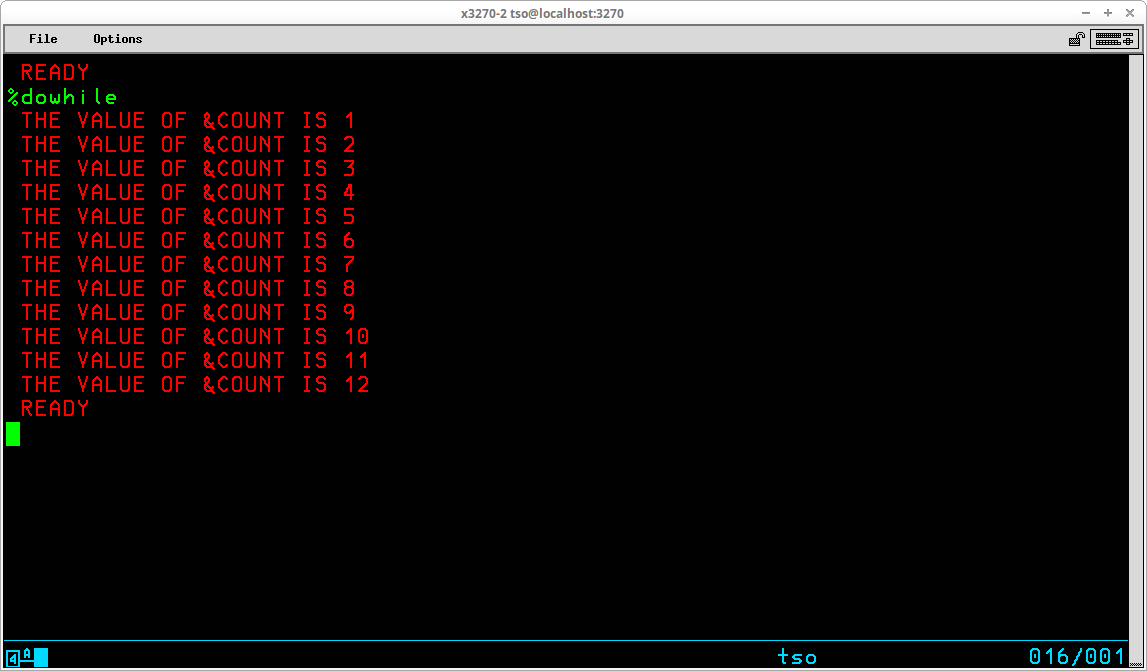
In order to terminate (stop executing) your Command List, you use the EXIT statement. The syntax of the EXIT statement is:
[<label>:] EXIT [CODE(<numeric literal> | <numeric variable>)]
If present, the <label> allows the statement to be the target of a branch from another part of the CLIST.
If you just code EXIT, the CLIST simply returns control to the TSO monitor. If the CODE operand is included, the numeric value specified either with a literal or a variable, is stored in the control variable &LASTCC, where it can be examined by statements in another CLIST.
EXIT statements may appear more than once in a single Command List. In actual practice, you will probably have a single common exit point to which control flows if the CLIST terminates normally. Then you might have additional exit points that are reached when error conditions are detected by your coded statements.
The file access statements allow records to be written to and read from sequential datasets. The operations are restricted to sequential datasets (QSAM access). In order to process a sequential dataset you must:
You should specify a CONTROL statement with the NOFLUSH operand for all CLISTs that use file input/output. If you don't and an error causes a CLIST to be terminated while files remain open, you may have to log off to recover.
Before you can issue read or write statements to a file, you must use OPENFILE to prepare the file for access. The syntax of the statement is:
[<label>:] OPENFILE <filename> { INPUT | OUTPUT | UPDATE }
If present, the <label> allows the statement to be the target of a branch from another part of the CLIST.
The <filename> operand refers to a file name which must have been ALLOCated prior to issuing the OPENFILE statement. A dataset which is opened for UPDATE may be the target of both PUTFILE and GETFILE statements. If a dataset already contains records and you wish to add more records to it or update the existing records, you must code a disposition of MOD on the ALLOCate statement.
The PUTFILE statement is used to write a single record to a dataset. The syntax of the statement is:
[<label>:] PUTFILE <filename>
If present, the <label> allows the statement to be the target of a branch from another part of the CLIST.
The <filename> operand refers to a dataset which must have been opened prior to the execution of the PUTFILE statement. PUTFILE transfers a single record to the dataset from the file variable &<filename>. The record must be initialized each time by a SET statement unless you want the same record written more than one time. If the dataset is opened in UPDATE mode, a PUTFILE statement overwrites the record read by the previous GETFILE statement. Therefore, to update the 20th record in an existing dataset, you must first issue 19 GETFILE statements to read past the records preceding the 20th record, which is the one to be updated.
The GETFILE statement is used to read a single record from a dataset. The syntax of the statement is:
[<label>:] GETFILE <filename>
If present, the <label> allows the statement to be the target of a branch from another part of the CLIST.
The <filename> operand refers to a dataset which must have been opened prior to the execution of the GETFILE statement. GETFILE transfers a single record from the dataset into the file variable &<filename>. After reading a record, the &SUBSTR built-in function may be used to extract individual fields from the file variable.
When you are finished reading or writing records to a dataset, you should close it using the CLOSFILE statement. The syntax of the statement is:
[<label>:] CLOSFILE <filename>
If present, the <label> allows the statement to be the target of a branch from another part of the CLIST.
The <filename> operand refers to a dataset which has been previously opened with an OPENFILE statement. In addition, you may want to code a FREE command to release the file ALLOCation.
An example CLIST using OPENFILE, PUTFILE, GETFILE, CLOSFILE:
PROC 0

/* ALLOCATE FILE (ALREADY EXISTS, CATALOGED) */
ALLOC F(TMPF) DA(SEQDATA) OLD

/* OPEN FILE FOR OUTPUT */
OPENFILE TMPF OUTPUT

/* WRITE SOME RECORDS TO FILE */
SET &TMPF = &STR(1ST DATA RECORD &SYSUID &SYSDATE &SYSTIME)
PUTFILE TMPF
SET &TMPF = &STR(2ND DATA RECORD &SYSUID &SYSDATE &SYSTIME)
PUTFILE TMPF
SET &TMPF = &STR(3RD DATA RECORD &SYSUID &SYSDATE &SYSTIME)
PUTFILE TMPF
SET &TMPF = &STR(4TH DATA RECORD &SYSUID &SYSDATE &SYSTIME)
PUTFILE TMPF

/* CLOSE FILE */
CLOSFILE TMPF

/* OPEN FILE FOR INPUT */
OPENFILE TMPF INPUT

/* READ RECORDS FROM FILE AND DISPLAY */
GETFILE TMPF
WRITE &TMPF
GETFILE TMPF
WRITE &TMPF
GETFILE TMPF
WRITE &TMPF
GETFILE TMPF
WRITE &TMPF

/* CLOSE FILE */
CLOSFILE TMPF

/* FREE FILE */
FREE F(TMPF)

EXIT
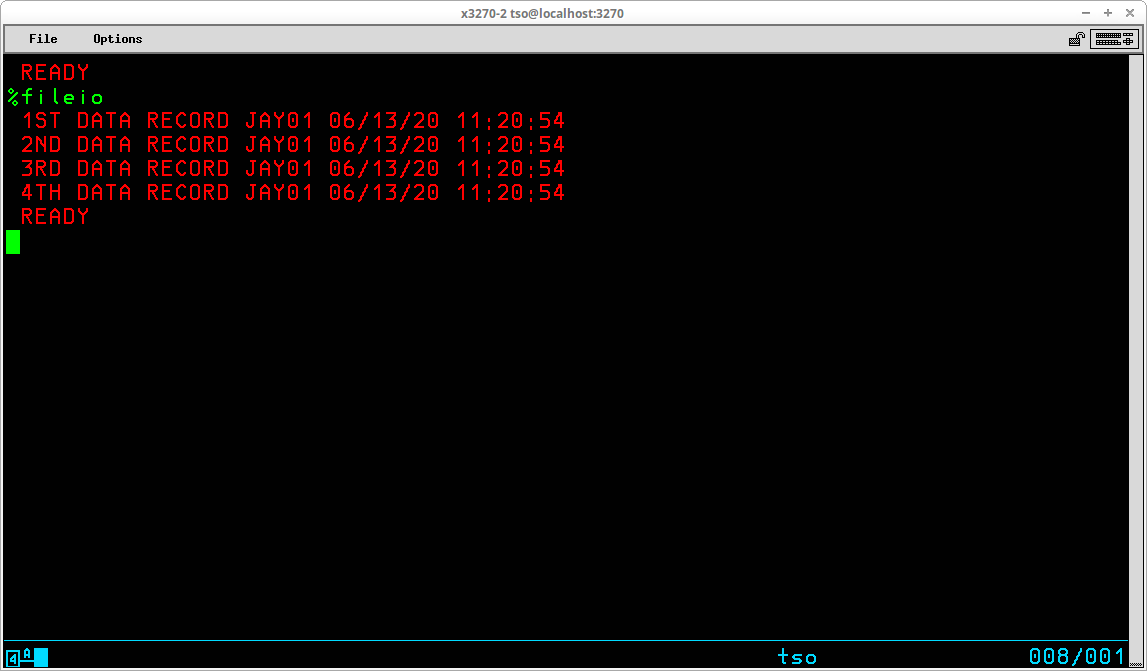
The READDVAL statement is used to parse the contents of the &SYSDVAL control variable into separate variables. The syntax of the statement is:
[<label>:] READDVAL <variable1> [ <variable2> <variable3> ... <variablen> ]
If present, the <label> allows the statement to be the target of a branch from another part of the CLIST.
The contents of the &SYSDVAL variable are broken into separate fields delimited by standard TSO delimiters - spaces or commas. If there are more fields in &SYSDVAL than variables are provided, the extraneous fields are ignored. If there are more variables than field available in &SYSDVAL, the extra variables are assigned null values.
In order to use READDVAL/&SYSDVAL to parse the contents of records, the file name used to allocate, open, and read the dataset must be SYSDVAL.
An example CLIST using READDVAL to read the records created by the previous CLIST example:
PROC 0

/* ALLOCATE FILE (CREATE IN PRIOR EXAMPLE) */
ALLOC F(SYSDVAL) DA(SEQDATA) OLD

/* OPEN FILE FOR INPUT */
OPENFILE SYSDVAL INPUT

/* READ RECORDS FROM FILE AND DISPLAY */
GETFILE SYSDVAL
READDVAL FIELD1 FIELD2 FIELD3 FUSER FDATE FTIME
WRITE BY &FUSER @ &FDATE &FTIME: &FIELD1 &FIELD2 &FIELD3
READDVAL FIELD1 FIELD2 FIELD3 FUSER FDATE FTIME
WRITE BY &FUSER @ &FDATE &FTIME: &FIELD1 &FIELD2 &FIELD3
READDVAL FIELD1 FIELD2 FIELD3 FUSER FDATE FTIME
WRITE BY &FUSER @ &FDATE &FTIME: &FIELD1 &FIELD2 &FIELD3
READDVAL FIELD1 FIELD2 FIELD3 FUSER FDATE FTIME
WRITE BY &FUSER @ &FDATE &FTIME: &FIELD1 &FIELD2 &FIELD3

/* CLOSE FILE */
CLOSFILE SYSDVAL

/* FREE FILE */
FREE F(SYSDVAL)

EXIT
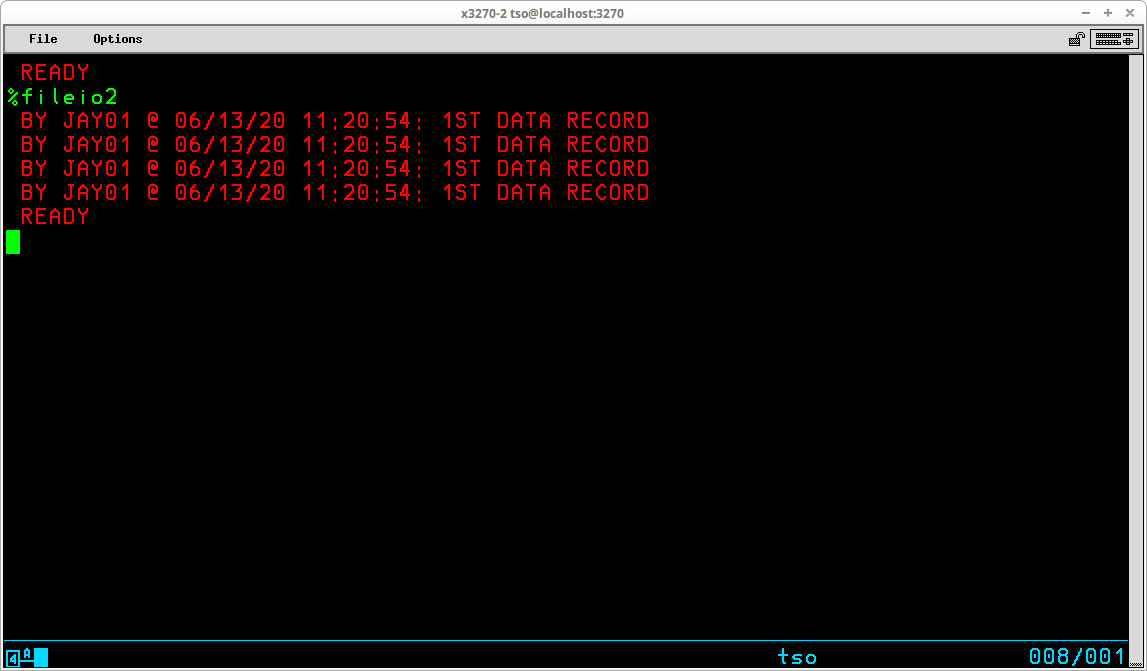
The READ statement accepts one or more strings from the TSO user and assigns them to symbolic variables. The syntax of the statement is:
[<label>:] READ <variable1> [ <variable2> <variable3> ... <variablen> ]
If present, the <label> allows the statement to be the target of a branch from another part of the CLIST.
If more than one string is entered by the operator, the strings must be separated by commas. If a string contains embedded blanks or special characters, the string should be enclosed in apostrophes. If the user enter more values than the number of variables coded on the READ statement, the extraneous values are ignored. If the user enters less values than the number of variables coded on the READ statement, the unmatched variables will be assigned null values. The user can selectively omit values by entering consecutive commas with no intervening value:
15,carrots,,1.50,,10
It is generally a good practice to precede READ statements with either WRITE or WRITENR statements identifying to the user what data is to be typed in response when the READ statement is executed.
Here is an example CLIST using READ to obtain values for depreciation calculation:
PROC 0  /* COMPUTE DOUBLE DECLINING BALANCE DEPRECIATION */

/* READ VALUES FOR ASSET */
WRITENR TYPE ASSET NAME, ORIGINAL VALUE, LIFE IN YEARS:
READ ASSET VALUE LIFE

/* DISPLAY DEPRECIATION REPORT */
WRITE
WRITE ASSET: &ASSET
WRITE ORIGINAL VALUE: $&VALUE
WRITE ASSET LIFE: &LIFE YEARS
WRITE                DEPRECIATION BOOK VALUE
SET CYEAR = 1
DO WHILE &VALUE > 0
  IF &CYEAR = &LIFE THEN DO
    SET &DEPR = &VALUE
    SET &VALUE = 0
    END
  ELSE DO
    SET &DEPR = (2 * &VALUE) / &LIFE
    SET &VALUE = &VALUE - &DEPR
END
  WRITE END OF YEAR &CYEAR   &DEPR         &VALUE
  SET &CYEAR = &CYEAR + 1
END                               /* END DO LOOP */

EXIT
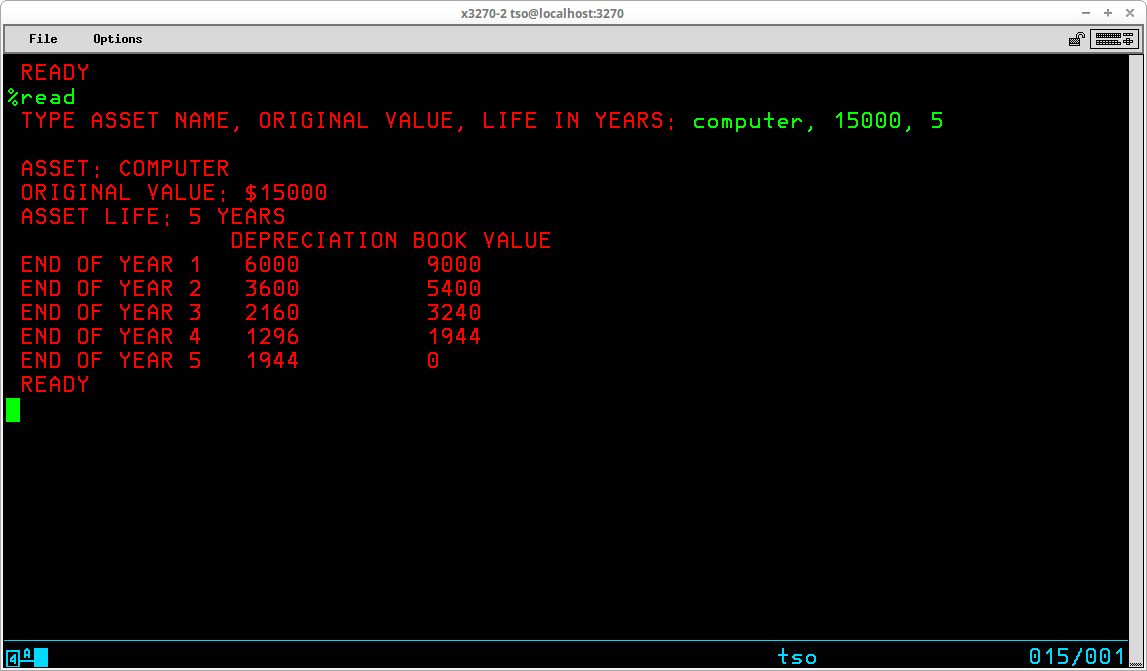
In order to include TSO commands in a Command List where the subcommands of the embedded TSO command could be interpreted by the CLIST as command statements, the DATA/ENDATA statements are required. The syntax of the statements is:
[<label>:] DATA
ENDDATA
If present, the <label> allows the statement to be the target of a branch from another part of the CLIST.
All commands and subcommands included within the DATA/ENDDATA block are regarded as data by the CLIST interpreter, but will be seen as commands/subcommands by the system. Symbolic substitution is performed on the lines with the block before execution.
An example CLIST:
PROC 1 SERIAL

EDIT (VTOCLIST) CNTL

DATA
C * =VTOCLIST=&SYSUID.VL=
F =SYSUT1=
C * =$$$$$$=&SERIAL=
SUBMIT
END NOSAVE
ENDDATA

EXIT
The CLIST invokes EDIT to tailor a generic jobstream. The purpose of the jobstream is to execute the VTOCLIST program. The EDIT subcommands contained inside the DATA/ENDDATA block perform the following functions:
The DATA/ENDDATA block may be used to supply subcommands to any TSO command.
The TERMIN statement returns control of the session to the TSO User in order to allow the user to input any TSO commands or subcommands and then resume execution of the CLIST at the statement following the TERMIN statement. The syntax of the statement is:
[<label>:] TERMIN [ <string1> <string2> ... <stringn> ]
If present, the <label> allows the statement to be the target of a branch from another part of the CLIST.
One or more optional character strings may be specified on the TERMIN statement. When the user enters a character string matching one of these strings, control is returned to the CLIST at the statement following the TERMIN statement. The control variable &SYSDLM contains a numeric value that corresponds to the ordinal position of the character string as it was coded on the TERMIN statement. Allowing multiple strings to resume the CLIST provides the capability for the TSO user to specify alternative execution options upon return of control to the CLIST. If no strings are to be specified on the TERMIN statement, the word TERMIN must be followed by a comma in place of the first string.
It is generally a good practice to precede TERMIN statements with WRITE statements identifying to the user what string(s) may be used to resume the execution of the CLIST.
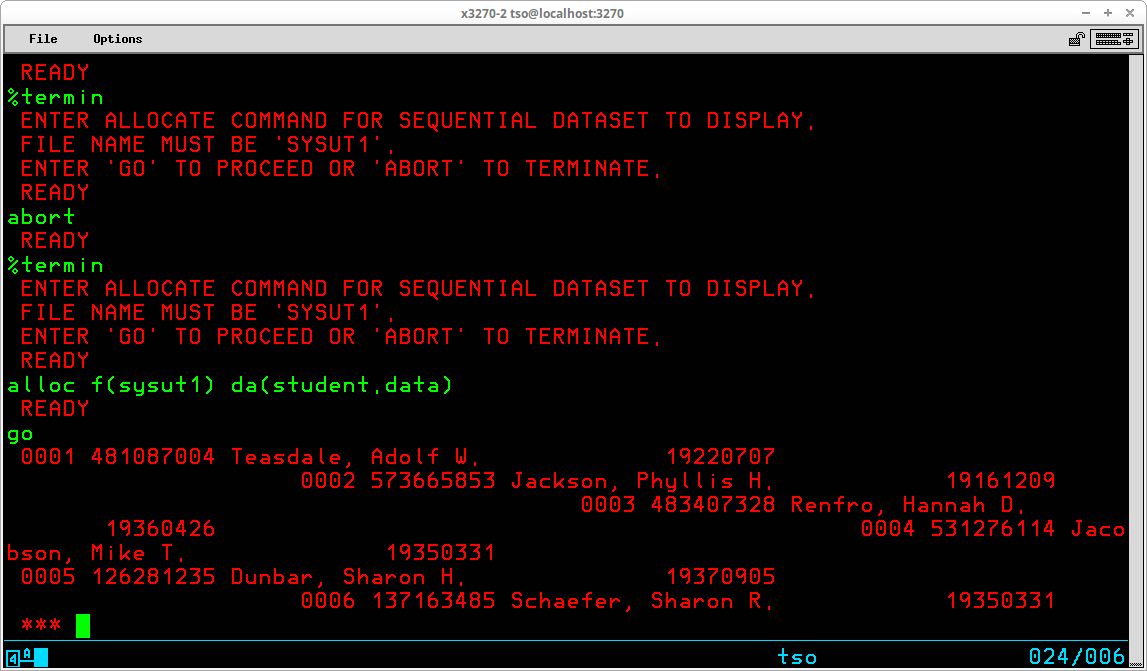
It is possible for one Command List to invoke a second Command List. When this occurs the CLISTs are said to be nested. The first CLIST is regarded as the outer procedure and the second CLIST is regarded as the inner procedure. When the second CLIST terminates, either because the last statement is executed or an EXIT statement is processed, control returns to the first CLIST and execution continues with the next statement in that procedure following the statement that invoked the second CLIST. CLISTs may be nested to many levels - the first CLIST is invoked by the TSO user, it calls a second CLIST, the second CLIST calls a third CLIST, etc. In actual practice, you should limit nesting to two or three levels. If you find that you need to nest calls more than three levels, you probably should investigate using a higher level language to satisfy your application.
When control passes from an outer CLIST to an inner CLIST, environment options set by any CONTROL statements are inherited by the inner CLIST. The inner CLIST may alter these options by issuing a CONTROL statement of its own. When control is returned to the outer CLIST, the options are restored to the settings they held when the inner CLIST was invoked.
The values contained in variables in the outer CLIST may be passed to the inner CLIST in two ways, through parameters when the inner CLIST is EXECuted or through the use of the GLOBAL statement. The syntax of the statement is:
[<label>:] GLOBAL <variable1> [ <variable2> <variable3> ... <variablen> ]
If present, the <label> allows the statement to be the target of a branch from another part of the CLIST.
The GLOBAL statement is coded in both the outer and inner CLISTs. The values contained in the variables are passed by the ordinal position in the GLOBAL statements. Therefore, the names used for the variables in the inner CLIST do not have to be identical to the names used in the outer CLIST. The GLOBAL statement in the inner CLIST may list fewer variables than the GLOBAL statement in the outer CLIST; the unmatched variables will not be available to the inner CLIST. The GLOBAL statement in the inner CLIST may not list more variables than the GLOBAL statement in the outer CLIST. All variables listed in a GLOBAL statement must be defined before they are included on a GLOBAL statement. It is probably a good programming practice to minimize the use of GLOBAL variables in CLISTs, just as the use of global variables is discouraged in current programming methodology.
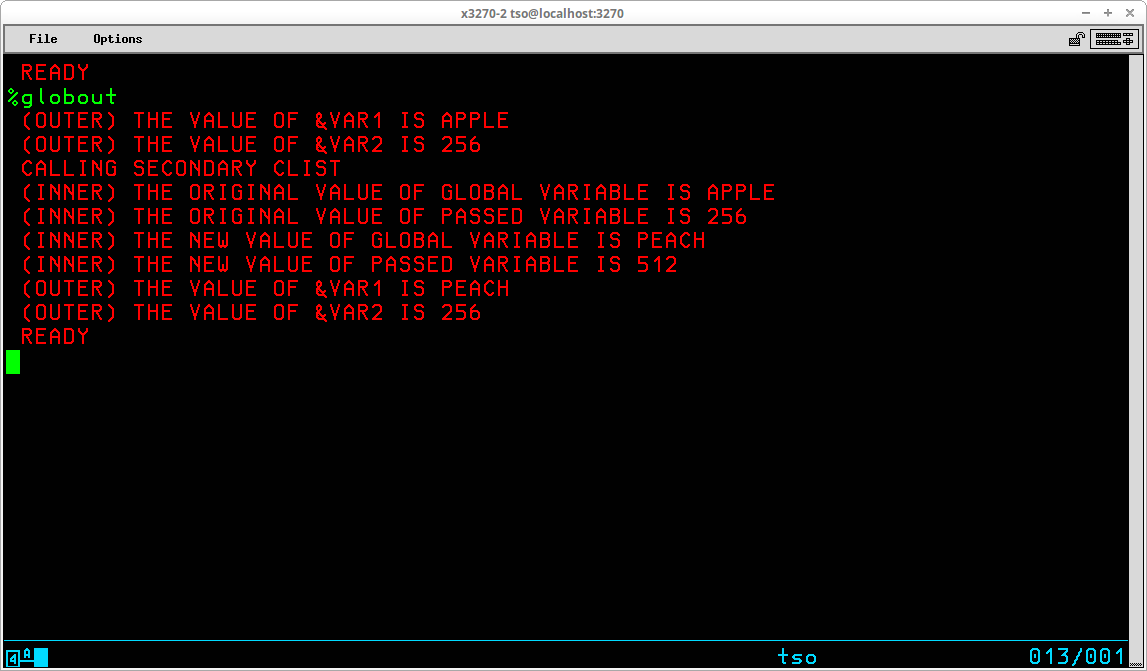
As you see in the example of parameter passing between the two nested procedures above, when a variable is passed between procedures using the GLOBAL statement, the inner CLISTs is given access to the same copy of the variable. If the value of the variable is changed in the inner CLIST, the original value of the variable is lost. When a variable is passed between CLISTs as a parameter (included on the PROC statement of the called CLIST and the value passed from a symbolic variable when the inner CLIST is invoked), a copy of the value of the variable named in the outer CLIST is passed to the symbolic name used in the inner CLIST. Regardless of the changes to the passed value made by the inner CLIST, the original value of the symbolic variable remains intact.
There may be times when you have designed a CLIST to be executed as a nested procedure and you wish to prevent a TSO user from explicitly invoking the CLIST from the TSO Ready prompt. You may accomplish this by using the &SYSNEST control variable:
A simple calculator illustrates the use of two levels of nested CLISTs:
PROC 0                       /* MAIN CLIST: CALC */

WRITE SIMPLE CALCULATOR
SET AGAIN = Y

DO WHILE &AGAIN = Y
  WRITENR TYPE VARIABLE, {ADD, SUBTRACT, MULTIPLY, DIVIDE}, VARIABLE:
  READ V1, OP, V2
  IF &SUBSTR(1,&OP) = A THEN DO
    %ADD V1(&V1) V2(&V2)
    GOTO CONTINUE:
    END
  IF &SUBSTR(1,&OP) = S THEN DO
    %SUB V1(&V1) V2(&V2)
    GOTO CONTINUE:
    END
  IF &SUBSTR(1,&OP) = M THEN DO
    %MUL V1(&V1) V2(&V2)
    GOTO CONTINUE:
    END
  IF &SUBSTR(1,&OP) = D THEN DO
    %DIV V1(&V1) V2(&V2)
    GOTO CONTINUE:
    END
  WRITENR OPERATOR ENTERED (&OP) IS NOT RECOGNIZED.
CONTINUE: WRITENR ANOTHER CALCULATION? (Y/N):
  READ AGAIN
END            /* END DO WHILE */

EXIT
Note: The statements contained in the three other second level CLISTs - SUB, MUL, and DIV are not shown above.
An exit routine is a block of statements coded as a DO group that is executed either when an error occurs or when an attention key is pressed by the TSO user. The handling and coding of both types of routines is similar.
The ERROR statement is used to set up an environment that checks for non-zero return codes from commands, subcommands, and CLIST statements in teh currently executing procedure. Detection of an error invokes a specified action, which can be an error exit routine. The syntax of the statement is:
[<label>:] ERROR { OFF | <statements> }
If present, the <label> allows the statement to be the target of a branch from another part of the CLIST.
If OFF is coded, any previously established ERROR routine is deleted. If a block of statements is coded, the statements become the current routine to invoke in the event an error occurs.
Note: A CONTROL statement with either MAIN or NOFLUSH must be in effect for a CLIST in which an ERROR routine is coded.
Normally when a TSO command or CLIST statement generates an error condition, the CLIST is terminated. Establishing an ERROR exit allows you to anticipate errors and, in some cases, recover from them while allowing the CLIST to continue execution.
The ATTN statement is used to set up an environment that detects attention interruptions processed by the TSO monitor program. The syntax of the statement is:
[<label>:] ATTN { OFF | <statements> }
If present, the <label> allows the statement to be the target of a branch from another part of the CLIST.
If OFF is coded, any previously established ATTN routine is deleted. If a block of statements is coded, the statements become the current routine to invoke in the event an attention interruption occurs.
The RETURN statement is used to return control following an error condition or an attention routine to the statement immediately following the one that caused the error condition to occur or the statement that was executing when the attention key was pressed. The syntax of the statement is:
[<label>:] RETURN
If present, the <label> allows the statement to be the target of a branch from another part of the CLIST.
RETURN is valid only when issued from an activated error routine or an activated attention routine from the current CLIST. If neither condition exists, the RETURN becomes a no-operation.
An example of an ERROR exit:
PROC 0

CONTROL NOFLUSH

RESTART: WRITENR TYPE HIGH LEVEL QUALIFIER:
READ QUAL

ERROR DO
  IF &LASTCC = 4 THEN DO
    WRITE QUALIFIER ENTERED NOT FOUND. RESTARTING.
    GOTO RESTART
    END
  ELSE EXIT(&MAXCC)
  END

LISTCAT LVL(&QUAL.)

EXIT
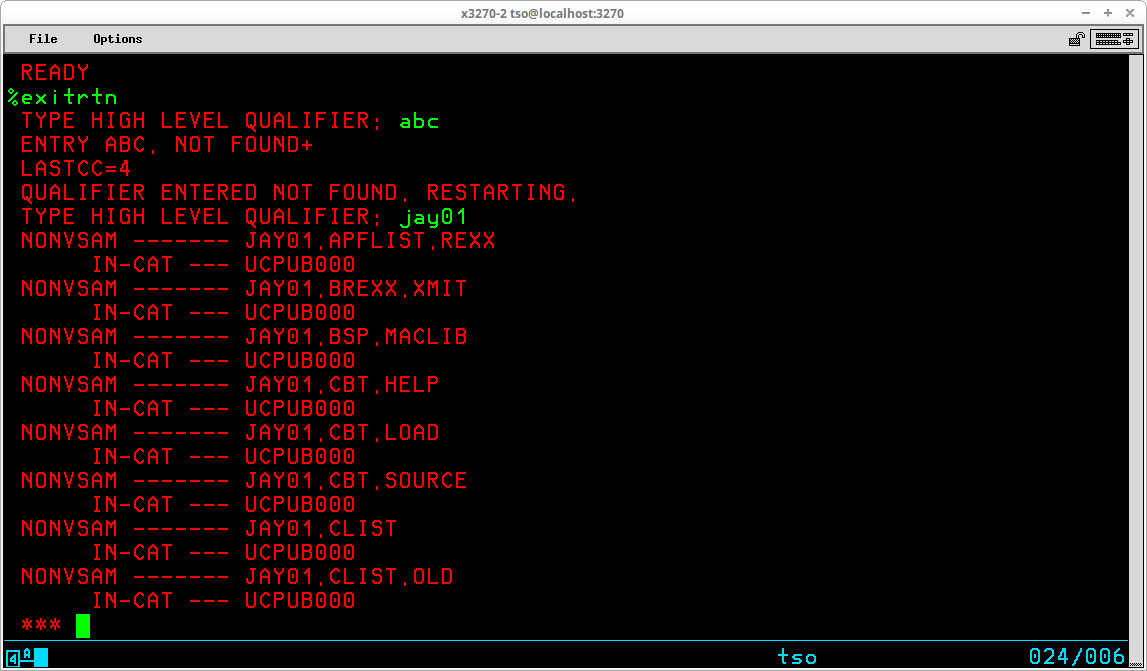
The ACCOUNT command is used to perform maintenance on the dataset that controls access to the TSO system. The command invokes a conversational program that allows authorized TSO Users to perform the administrative functions of changing, deleting, adding, and listing entries in the user attribute dataset. The ACCOUNT command has no operands, since its function is to initiate a conversational process through which subcommands are used to complete tasks. Prior to entering the ACCOUNT command, the user attribute dataset and broadcast message dataset should both be allocated:
It is recommended that SYNC be issued as the first subcommand after ACCOUNT is started. It is only necessary to issue the SYNC subcommand once per invocation of ACCOUNT. The SYNC subcommand ensures the correct formatting is present in the broadcast dataset and synchronizes the TSO User IDs between the two datasets.
The ADD subcommand is used to add a new TSO User ID. The syntax of the subcommand is:
ADD ( <userid> { <password> | * } {<accounting information> | * } <logon procedure> )
{ MAXSIZE(<maximum region size>) | NOLIM }
{ OPER | NOOPER }
{ ACCT | NOACCT }
{ JCL | NOJCL }
{ MOUNT | NOMOUNT }
USERDATA(<string>)
{ PERFORM(<performance group>) | NOPERFORM }
SIZE(<default region size>)
UNIT(<default DASD unit>)
DEST(<routing destination>)
For additional help on the operands of the ADD command, you can enter HELP ADD.
The LIST subcommand is used to list the settings for one or more TSO User IDs. The syntax of the subcommand is:
LIST ( <user id> | * )
Specifying asterisk (*) for the operand will list all User IDs.
The DELETE subcommand is used to delete a User ID. The syntax of the command is:
DELETE (<user id>)
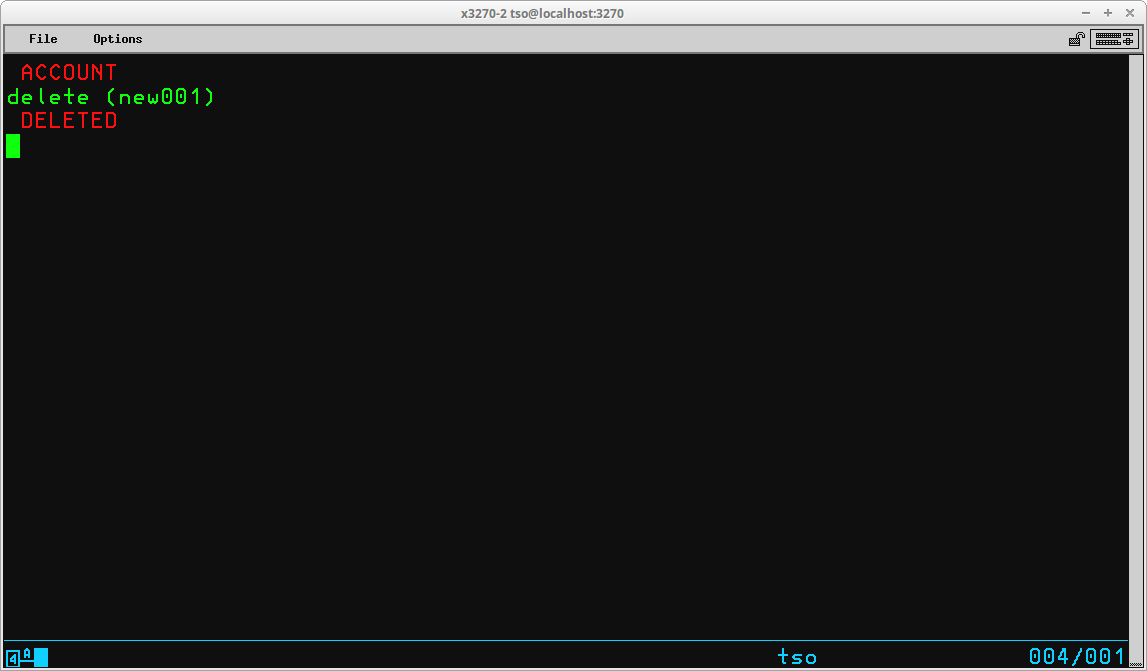
The CHANGE subcommand may be used to change some attributes of a User ID, however in my experience it is usually easier to simply delete the existing User ID and add it back with the desired settings.
The ACCOUNT conversational process is terminated by the END subcommand.
The OPER command is used to enter a subset of the MVS console operator commands that are usually entered at the main or alternate system console. The command invokes a conversational program that allows authorized TSO Users to perform some of the functions usually carried out by the MVS system operator. The OPER command has no operands, since its function is to initiate a conversational process through which subcommands are used to complete tasks. The basic syntax of the subcommands is:
<subcommand> <operand1>,<operand2>,...<operandn>
Blanks are the only acceptable separator character between the <subcommand> and the operands. A comma is the only acceptable separator character between the operands. Details for selected subcommands is included below.
The CANCEL subcommand (which may be abbreviated C) is used to cancel TSO User sessions. The syntax of the subcommand is:
Cancel U=<userid>[,DUMP]
If the optional DUMP operand is specified, a storage dump is produced of the address space allocated for the TSO User session.
The DISPLAY subcommand (which may be abbreviated D) is used to display information about regions, TSO User sessions, jobs, and SLIP traps. The syntax of the subcommand is:
Display { T | TS[,List] | R[,List] | Jobs[,List] | SLIP[,=<id>] }
The information displayed for each available operand is:
The MONITOR subcommand (which may be abbreviated MN) is used to request notification at your terminal when batch jobs or TSO sessions begin and end, or the disposition of datasets when they are de-allocated. The syntax of the subcommand is:
MoNitor { JOBNAMES[,T] | SESS[,T] | STATUS }
The information displayed for each available operand is:
The notification messages will only be displayed as long as the OPER command remains active.
The STOPMN subcommand (which may be abbreviated PM) is used to terminate the display of messages initiated by the MONITOR subcommand. The syntax of the subcommand is:
stoPMn { JOBNAMES | SESS | STATUS }
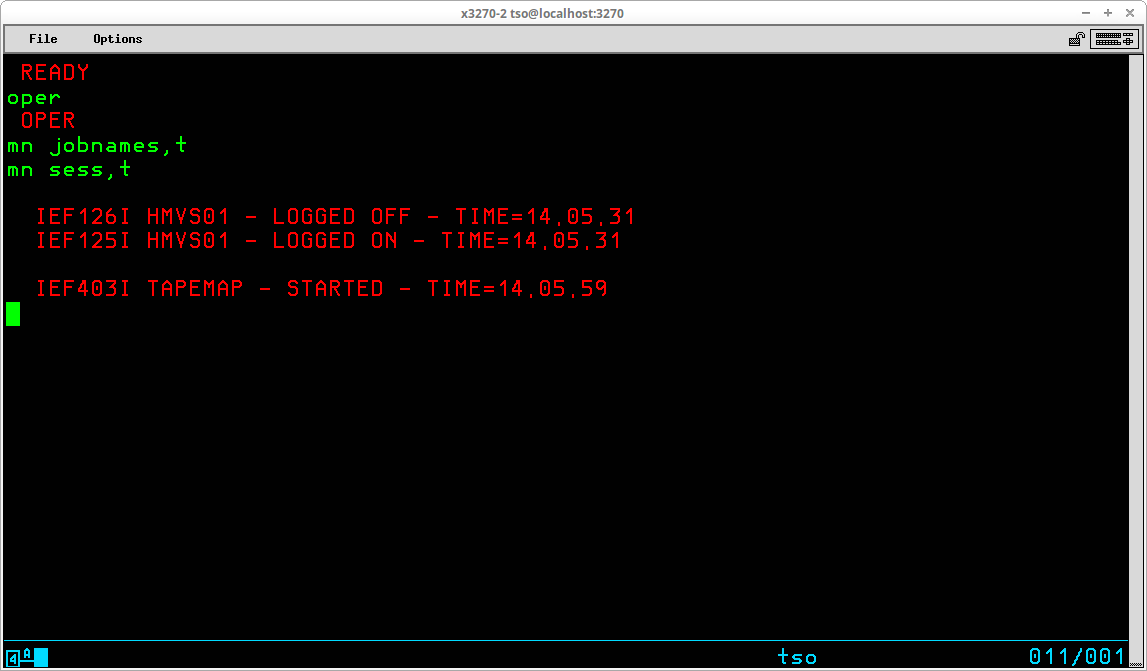
The OPER conversational process is terminated by the END subcommand.
I wrote the original version of the information above in 2004. In June 2020 I have updated it a bit, mostly replacing the screen captures with better quality captures, but I did find and correct some grammatical errors. All of the information presented above covers the basic TSO capabilities included with MVS 3.8j. Since 2004 there have been many additions to MVS 3.8j from members of the Hercules community. Greg Price's ZP60014 is mentioned above, which adds more functions and variables to TSO that are usually only found in TSO/E.
On my own system I use many batch programs and TSO commands that may be found on the CBT Tape collection. I have recently added installation jobstreams for most of the CBT software I use on my own system into the SYSCPK volume. If you have the SYSCPK volume installed on your system, and have updated to the latest version, you have these jobstreams available to use. The batch programs are already installed in SYSC.LINKLIB and, in most cases, there is also a sample job included in SYSC.JCLLIB to show you how to use the batch program. In order to use the TSO programs from CBT, all you have to do is submit the installation jobstream (from SYSC.CBT.SOURCE) on your system to install the TSO command and help files. I have created a companion document to this one that will illustrate the TSO commands from CBT and how to use them at Using TSO Commands from CBT.
I hope that you have found my instructions useful. If you have questions that I can answer to help expand upon the information I have included here, please don't hesitate to send them to me:

This page was last updated on April 01, 2021.